This manual covers the use of Kotahi. While it provides Kotahi documentation, its scope is broader - to help you rethink and design workflows.
This manual aims to:
explain Kotahi's capabilities
provide tools to evaluate, design, and evolve workflows.
guide Kotahi configuration to encapsulate your way of working
provide assistance to all Kotahi users
If you first wish to understand how Kotahi works, we have included descriptions of all the interfaces and high-level concepts in the chapters Kotahi Explained, Settings, CMS, and Production.
If you wish to get quick help on specific topics, go to the How To Guides section.
However, the workflow chapters provide important conceptual foundations. The Tips on Setting Up Your Workflow section especially bridges workflow design and Kotahi capabilities.
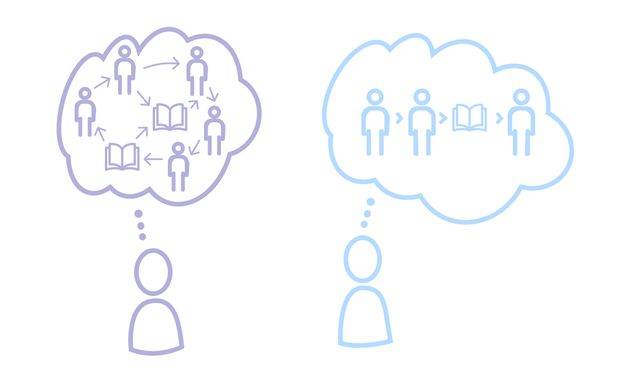
Consider reading the workflow chapters to reflect on processes, even if you are not changing your workflow now. Technology decisions should follow, not drive, workflow needs. Use this manual to take a step back and rethink how work gets done.
1
Introduction
For years, academic publishing has relied on legacy systems that hinder efficiency and scholarly communication. Complex interfaces frustrate users. Rigid, one-size-fits-all submission systems cannot accommodate diverse content, workflows, or journal requirements. Email-driven communications cause delays. Production remains siloed externally without automation. Monolithic architectures hamper scalability.
At Coko, we believe it’s time to move forward. Driven by a passion for improving research sharing, we developed Kotahi to tackle these systemic challenges. Initially funded through our surplus, and later with help from partners like eLife who share our vision, Kotahi is designed to modernise workflows for traditional and emerging publishing models.
This documentation represents a key milestone for the project - the Kotahi 2.0 manual.
The platform tackles key challenges - making standards like JATS attainable without technical staff. It provides enormous flexibility to customise workflows as needed. Sophisticated multitenancy enables the hosting of multiple journals, preprint review, and preprint servers within a single install. Automated PDF production enables consistent, high-quality typesetting at scale. The microservices architecture allows independent scaling and updating of components.
Now, you will have the information in your hands on how to leverage the powerful features of Kotahi.
Scholarly publishing is evolving rapidly, and Kotahi is designed to improve how research is currently shared while anticipating future needs. By improving existing workflows and anticipating emerging models, Kotahi represents the innovative future of research communication.
2
In a Nutshell
What is Kotahi?
Kotahi is an open source publishing platform designed to modernise workflows for journals, preprint servers, preprint review communities, and other models. It provides a flexible system to support diverse publishing needs.
What are the key features of Kotahi?
Some key features include configurable workflows, multitenancy, automated JATS and PDF production, drag-and-drop form building, support for any metadata schema, tailored peer review, real-time communications, task management, and more.
What publishing models can Kotahi support?
Kotahi can support traditional journals, preprint servers, publish-review-curate models, overlay journals, micropublications, and more. Its flexibility enables many emerging publishing paradigms.
How does Kotahi support preprint review?
Kotahi enables the import of preprints, AI-powered recommendations, custom review forms, collaborative annotation, grouped reviews, and flexible publishing of reviews or curated collections.
What review models does Kotahi offer?
Kotahi supports single-blind, double-blind, open, collaborative, community self-review, multiple iterative rounds, and combinations of these models.
How does the Kotahi form builder work?
The intuitive drag-and-drop form builder allows creation of submission, reviewer, and decision forms without coding. Forms can be designed from templates or customised.
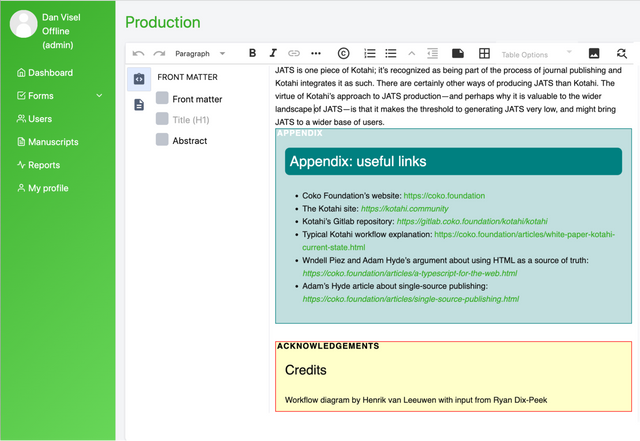
How does Kotahi produce JATS XML?
Kotahi provides a simple production editor for users to visually tag document sections. These are automatically mapped to JATS XML elements on export.
How does Kotahi create PDFs?
Kotahi leverages Paged.js to automatically paginate manuscripts into print-perfect PDFs with professional typesetting and formatting.
How does task management work in Kotahi?
Advanced but customisable task management allows configuring workflows at a per-group or per-manuscript level with reminders, actions, and invites.
What multitenancy capabilities does Kotahi offer?
Kotahi enables hosting multiple isolated journals, preprint servers, or review groups within one installation while retaining custom workflows for each.
How is Kotahi designed to be customisable?
Kotahi is highly configurable through its settings and also extensible via plugins, APIs, and microservices. Coko offers customisation services.
What benefits does Kotahi's architecture provide?
The microservices architecture enables independent scaling and updating of components along with overall flexibility and resilience.
How difficult is it to install Kotahi?
Kotahi utilises Docker and microservices to simplify deployment. While sysadmin skills help, the goal is accessible self-service installation. There are third-party hosting and publishing services vendors that can also help you with Kotahi hosting.
Is Kotahi open source?
Yes, Kotahi is 100% open source software published under the MIT license. The code is freely available on GitLab.
Kotahi was created by Coko, a non-profit developing open source publishing infrastructure. Learn more at https://coko.foundation
3
Key Features
The following is a brief summary of some key Kotahi 2.0 features.
Flexible workflow
Kotahi is more than just a journal platform - it is a comprehensive scholarly publishing platform. Kotahi offers a range of customisable workflows that go beyond traditional journals, allowing teams to collaborate and process research objects according to their specific requirements.
Kotahi advances publishing in three key ways:
Supporting legacy workflows - Kotahi can operate traditional journals, while offering extensive configuration options to optimise workflows over time.
Enabling new workflows - Kotahi is built for emerging models such as publish-review-curate, and more. Its flexibility supports micropublications, curated knowledge compendiums, and other innovations.
Allowing experimentation - With multi-tenancy support, Kotahi enables setting up multiple teams/journals to test new workflows at no added cost. Teams can run legacy systems while experimenting with new models.
Overall, Kotahi provides adaptable infrastructure to encapsulate diverse publishing models and ways of working, both current and emerging. Its configurability aims to move scholarly publishing forward.
Multitenancy supporting diverse use cases
Managing multiple scholarly publishing groups like journals, preprint servers, or preprint review communities has traditionally required running separate software for each one. This quickly becomes cumbersome and difficult to scale.
Kotahi resolves this issue by providing native multitenancy support for many use cases within a single integrated system. This allows a single Kotahi installation to host any number of journals, preprint servers, or preprint review communities in the one installation.
Each group functions independently with its own:
isolated data and privacy
customisable submission workflows
unique look and feel
publish endpoint
The key benefits of Kotahi’s multitenant approach include:
reduced software overhead since only a single instance needs to be maintained
workflows tailored for each group without conflicts
easy scalability when adding new groups
streamlined cross-group analytics and reporting
the ability to experiment with new publishing processes within the one system
This architecture substantially reduces the complexity and costs of operating diverse portfolios of journals, preprint servers, and review communities. As publishers scale up their groups, new ones can be easily onboarded while retaining custom workflows.
By supporting this kind of sophisticated multitenancy natively, Kotahi establishes a new standard for flexibly managing any number of publishing groups, with any number of different workflows and use cases, on a single streamlined platform.
A modern, powerful CMS
Kotahi incorporates a modern content management system (CMS) based on static site generation rather than a traditional database-request-driven CMS. This approach provides significant advantages in speed, security, and scalability.
Compared to a traditional CMS which can become sluggish and vulnerable at scale, Kotahi’s CMS remains lightning fast and rock solid regardless of traffic or content volume. This innovative architecture ensures publishers can manage content efficiently while providing users with a reliably fast experience. Full text articles are published at a push of a button. The CMS can handle the demands of complex scholarly publishing requirements both now and in the future.
Automated JATS production
The Journal Article Tag Suite (JATS) XML standard has become ubiquitous in scholarly publishing, allowing content to be structured, exchanged, and preserved in a consistent machine-readable format. However, many publishers have found the JATS format complex, costly and cumbersome to implement, and have said that the specialised skills and effort required by the format drive up costs, hamper efficiency, and create barriers to adopting this critical publishing standard.
Kotahi aims to change this status quo by integrating JATS production seamlessly into the publishing workflow.
At its core, Kotahi sees a document as a constellation of content, primarily in the form of the manuscript text itself, and associated metadata. Both categories of information are transparent to Kotahi as the system ingests manuscripts at submission time and converts them to an internal file format. Customisable submission forms designed in Kotahi gather comprehensive metadata up front.
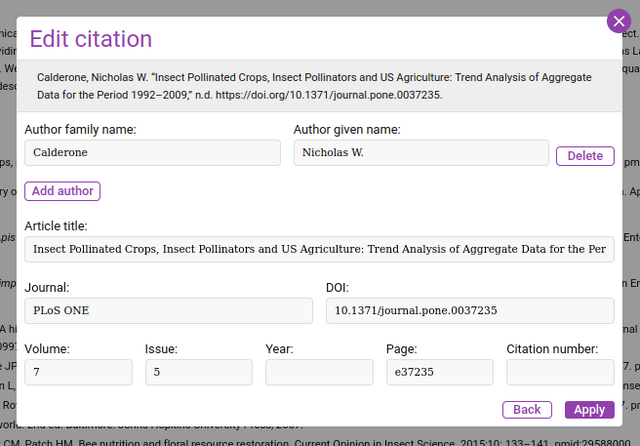
The internal production editor then provides an intuitive way to prepare content for JATS export without needing direct XML skills. Users simply visually highlight and tag content sections, and these selections are automatically mapped to the appropriate JATS document elements. On demand, Kotahi converts the prepared manuscript and metadata into validation-checked JATS XML that complies with all specifications. This standards-compliant JATS file can also be regenerated as needed throughout the editorial workflow. Kotahi also has an evolving set of tools for the management and validation of citations.
By integrating JATS production into the publishing pipeline in this tailored yet automated manner, Kotahi makes adopting JATS accessible to mainstream publishers. The platform’s innovative production tools lower the barrier to entry while facilitating standards compliance at scale, reducing overhead costs, and accelerating publishing turnarounds.
Automated production of PDF
One of Kotahi’s standout features is the ability to automatically typeset and generate print-ready PDFs with just a click. This is powered by the integration of Paged.js (also built by Coko), an open-source library for paginating HTML content into high-quality PDF documents.
As manuscripts in Kotahi are edited and stored as HTML, Paged.js can fragment the content into pages, inject sophisticated print styling, and paginate a preview within the browser. When ready, the print-perfect PDF can be saved out (or batch processed) - no manual typesetting is required.
This browser-based PDF generation approach also enables automated workflows. Kotahi can thus produce press-ready PDFs at scale in a fraction of the time and at little or no cost. The result is a system that can take manuscripts from writing to publication-quality typesetting with unparalleled efficiency. Hands-off, consistent, and aesthetically pleasing PDFs become accessible to publishers of all sizes through Kotahi’s simple automation.
Drag-and-drop submission form creation
Another of Kotahi’s standout features is the ability to create submission forms using an intuitive drag-and-drop interface. This removes the need for any coding knowledge or technical expertise. Users can easily add, remove or rearrange form fields as needed.
Whether working from pre-made templates or designing fully customised forms, the entire process is quick and user-friendly. For authors, filling out submissions becomes simpler, with reduced chance of errors. This results in more complete information being captured upfront, benefitting downstream teams.
Compared to traditional form creation methods which are often complex and time-consuming, Kotahi’s drag and drop approach simplifies submission management for publishers and authors alike.
Support for any metadata schema
The submission process for journals and other preprints requires capturing metadata - information about the manuscript itself. However, traditional systems often force standardised schemas that lack flexibility.
Kotahi provides versatility by supporting submission and publication using any metadata schema, including custom schemas or niche standards. This adaptability lets publishers capture optimal metadata for their domain and needs.
Kotahi provides possibilities for action through a number of methods, but largely through its drag-and-drop form builder where any metadata tags can be attached to submission fields. It also supports capture of complex nested data via custom form elements - this enables capture of detailed author information, for example.
For authors, submitting manuscripts is simpler when providing metadata in appropriate domain-specific schemas. For publishers, post-submission overheads are reduced by capturing comprehensive, flexible metadata up front.
This metadata can then be configured to be pushed through to the appropriate publishing end points.
By empowering customised metadata capture, Kotahi ensures journals and publishers get the specific information they need while authors provide it painlessly. This metadata versatility represents a key advantage of Kotahi’s submission system.
Tailored peer review process
The peer review process is a crucial element of scholarly publishing. However, traditional systems often enforce a rigid, one-size-fits-all approach.
In contrast, Kotahi provides flexibility to tailor the review process to each journal or review community’s specific needs. Different models including open, blind, or double-blind reviews can be configured. Reviewers can collaborate on shared reviews while also providing individual feedback if desired.
Kotahi enables customising the level of author participation as well. Review workflows can allow authors to respond to reviewer comments via threaded discussions if needed. Annotations (comments) made directly onto manuscripts are also supported.
Kotahi aims to facilitate constructive conversations between authors and reviewers to improve manuscripts. As peer review evolves towards more collaborative exchange, Kotahi provides built-in tools ready to enable this emerging review model.
By supporting tailored review workflows, Kotahi offers the capacity to design the peer review model best suited to the publication needs. This flexibility and customisability result in higher quality, more meaningful reviews.
Real-time communication tools
Effective communication between authors, editors, and reviewers during the submission and peer review process is key. However, email is not always the ideal medium for these interactions.
Kotahi instead incorporates real-time communication features including live chat and video chat to facilitate conversations as needed. All communications become visible within the platform, eliminating email clutter.
Users can quickly get answers, resolve issues, and streamline collaboration all within Kotahi’s interface. Smooth end-to-end discussions from submissions to publication become possible.
Customisable task management
To streamline worklow, Kotahi incorporates advanced but customisable task management capabilities. Project boards provide an overview of tasks and workflows across the publishing lifecycle.
Granular controls allow configuring task management at a per-journal or even per-manuscript level. Automated reminders, actions and invitations are configurable within the task manager itself.
This results in workflows that are tailored to each manuscript’s unique needs.
Versioning
Kotahi supports versioning of submissions to track revision history across review and editing cycles.
Each new submission round creates a new version of both the manuscript content and submission metadata. This allows tracking a submission from initial draft to final published form.
Versioning provides a record of all changes while ensuring users only interact with the current definitive version.
This version control system is crucial for collaborative workflows where manuscripts go through many stakeholder hands. Kotahi maintains submission integrity and clarity through automated version tracking.
AI-powered preprint recommendations
Kotahi also has some advanced features to support preprint review. For example, Kotahi enables AI-powered preprint recommendations that assist curators in identifying relevant manuscripts for review.
For preprint servers like bioRxiv, new submissions in specified subjects are automatically imported. Curators can then select preprints of interest for review.
Based on these selections, Kotahi leverages various APIs and AI services to recommend related preprints that may also warrant review. Checks help ensure only recent submissions from a preconfigured time period, and from approved preprint servers, are suggested.
This tailored AI-matching allows curators to rapidly pinpoint the most pertinent preprints to evaluate and disseminate within their field or community. This enhances the efficiency of preprint screening while making evident hidden gems curators may have otherwise missed.
By combining Kotahi’s infrastructure with the power of AI-powered recommendations, the platform aims to accelerate preprint discovery and review - getting impactful research into the right hands faster.
Configurable, customisable, and extensible
Kotahi is designed to be highly configurable, customisable, and extensible to meet diverse publishing needs.
The system already allows individual configuration of workflows, review models, metadata schemas, CMS and publish endpoints, task management, and more per group. This enables tailored setups without software and the need for developer assistance.
Further customisation can be achieved through integrations, plugins, addition of new microservices or new functionality and the Kotahi team is ready to support organisations wanting to customise, extend, or configure the system to their needs. Whether it’s tailored workflows or custom enhancements, Kotahi provides the versatility to meet publishing requirements and Coko is here to support you.
Microservice architecture
Kotahi is built using a modular microservice architecture. In contrast to monolithic platforms, components are designed as independent services that work together.
This provides benefits including:
scalability - services can be individually scaled as per demand
flexibility - issues with one service don’t propagate across the system.
resiliency: Issues with one service don’t propagate across the system.
As publishing needs grow and evolve, Kotahi’s microservices make scaling, upgrading, and maintenance simpler and more cost-effective.
Smooth installation and deployment
Although designed for flexibility, Kotahi offers straightforward installation and deployment. It employs a Docker-based architecture with modular microservices that reduce complexity.
While basic sysadmin skills are recommended, Kotahi aims to streamline the initial setup process. Once deployed, the system can scale groups and content without requiring deep technical knowledge.
Ongoing enhancements continue to simplify installation and configuration further. The goal is an accessible system where publishers can easily leverage Kotahi’s capabilities with minimal engineering overhead.
With its lightweight microservices and consolidated design, Kotahi enables publishing teams to get started swiftly and focus on content creation rather than technical hurdles.
100% open source
Kotahi is published under open source licenses, with all source code freely available. This enables publishers the full freedom to use, modify, and distribute the software to meet their needs.
As open source software, Kotahi benefits from community contributions and transparency. Anyone can inspect the codebase, propose improvements, report issues, or create customisations.
This open development model also helps drive rapid innovation as the platform evolves via a kind of ‘public peer review’. Organisations can collaborate to extend Kotahi rather than reinventing the wheel.
By being 100% open source, Kotahi represents a publishing platform unencumbered by proprietary restrictions. This liberates publishers to fully utilise Kotahi as a strategic asset customised for their requirements.
4
☙ Kotahi Explained ❧
5
What Use Cases Does Kotahi Support?
Kotahi provides versatile tools extending far beyond traditional journal workflows. Kotahi enables end-to-end management of journal article submission through publication, with customisable reviewer selection, multi-round review, author proofing, and output generation.
However, Kotahi is not limited to mimicking journals. It can be used as a preprint server, house preprint review processes, provide overlay features, and innovative community curate and peer review models.
Additionally, Kotahi facilitates new output types like micropublications and interactive data papers. Authors can publish bite-sized findings enriched with multimedia and data visualisations.
While purpose-built for scholarly communication, Kotahi adapts for uses beyond academic research. Customisable stages, reviewers, and decisions enable grant proposal evaluation or student work submission and review.
In essence, Kotahi provides open architecture to empower new communication paradigms across research and education. It brings flexible workflows and formats beyond the limitations of traditional journals.
6
What Can Kotahi Publish?
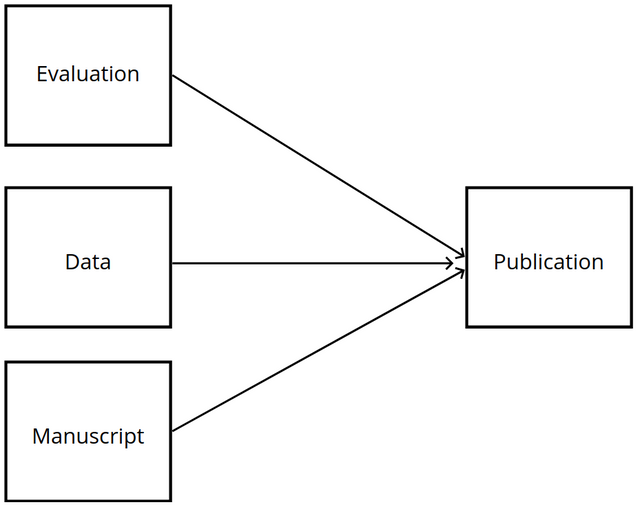
Kotahi is highly configurable and can publish a wide variety of research outputs. Here are some of the main options:
Types of content
Evaluations - Review content and decision summaries from the peer review process. This could include full verbatim reviews or edited excerpts.
Data - Datasets, metadata, code, multimedia, and other supplementary files.
Manuscripts - Preprints, journal articles, conference papers, micropublications, and other scholarly documents.
Publishing destinations
Internal CMS - Kotahi has a built-in content management system (CMS) to display content. The CMS is customisable to fit your needs.
External endpoints - Kotahi can publish to any external endpoint or system provided it can receive the data. This includes institutional repositories, preprint servers, journals, archives, social media, and more.
Multiple targets - Content can be published to the internal CMS, external endpoints, or both simultaneously.
Configuration Options
Kotahi allows flexible configuration of publishing in various ways:
publish any combination of evaluations, data, and manuscripts or none at all
publish to single or multiple endpoints
customise metadata, identifiers, licenses, formatting, layouts, and more
In summary, Kotahi enables publishing virtually any scholarly content anywhere through a highly configurable system.
7
What Review Models are Available?
Kotahi supports a wide range of peer review models that can be customised for your journal's needs. Options include:
single-blind review - reviewers know the author's identity but their identity is hidden from the author
double-blind review - the identities of both the author and reviewers are hidden from each other
open review - the identities of the authors and reviewers are known to each other
collaborative review - reviewers can discuss the submission together and collaborate on a review. This can be moderated or unmoderated.
community self-review - the review process allows the community to self-select as reviewers without editor assignments. Often used for preprint reviews.
multiple rounds - as many iterative rounds of review as needed with the same or new reviewers each round (typical for Journals)
rolling submissions - authors can update submissions during an active review round if enabled (this has proven useful for some preprint review use cases)
In summary, Kotahi is highly configurable to support single-blind, double-blind, open, collaborative, community self-review, and combinations of these models. The system allows multiple iterative review rounds with flexible reviewer selection and updated submissions.
8
Pre-configured Workflows
Kotahi supports several pre-baked workflows for a quick start without having to understand all the congfiguration possibilities beforehand.
The four pre-configured workflows (it is possible to add more with the assistance of a developer) include:
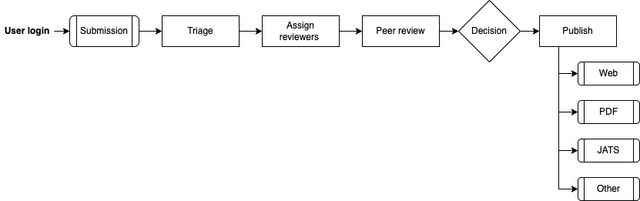
Journal publishing workflow
Supports an end-to-end traditional journal publishing workflow; author submits, editors triage, with support for multiple peer review cycles and publishing to Crossref and other endpoints including export to PDF and JATS.
Publish, Review, Curate
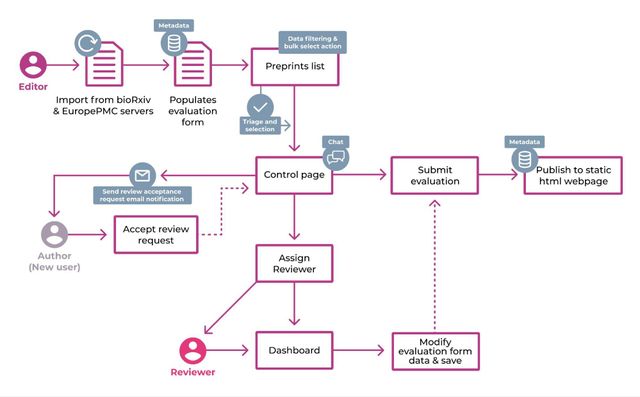
Supports an end-to-end publish, review and curate (PRC) workflow; imports manuscripts from a preprint server, editor triage, customisable submission, review and evaluation forms and publishing endpoints.
Preprint review
Use a single submission form to capture and publish metadata, peer reviews and/or evaluation reports. The right choice if the team is not required to manage an end-to-end workflow, and a lightweight solution that’s easy to use.
Preprint review 2
Import manuscripts from a preprint server. Use a single submission form to capture and publish metadata, peer reviews and/or evaluation reports to an endpoint. This configuration makes use of a Manuscripts table, providing an overview of all objects in the system, with specific features to support the triage process.
The right choice if the team is not required to manage an end-to-end workflow, and what’s needed is a lightweight solution that’s easy to use.
9
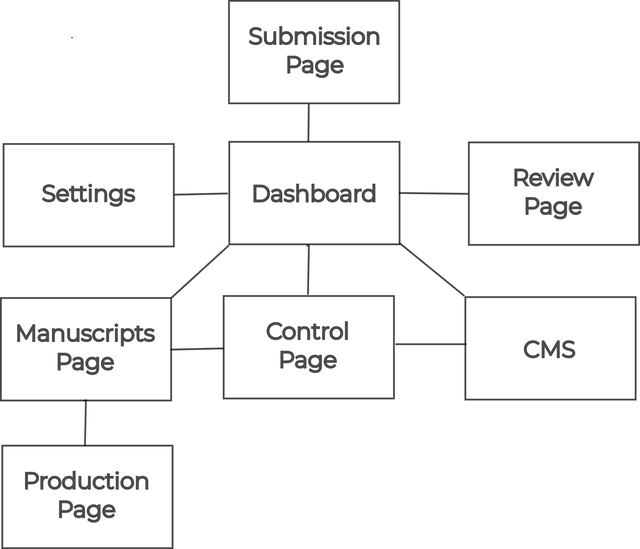
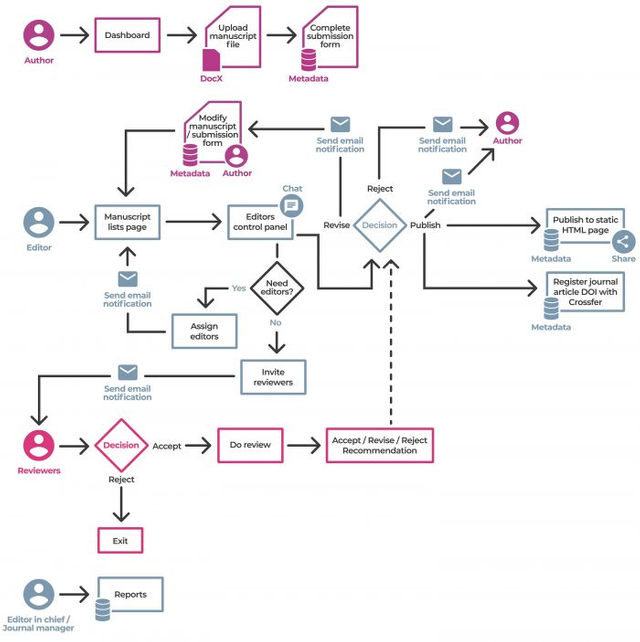
Architecture
Kotahi has a number of screens or pages connected together that allow for the amazing versatility of workflows. From a very high level, the interconnected ‘spaces’ or pages look like the following.
Each of these is convered in detail in this documentation. Here is a brief overview:
Dashboard - the starting page for most users where new submissions are created and associated research objects accessed.
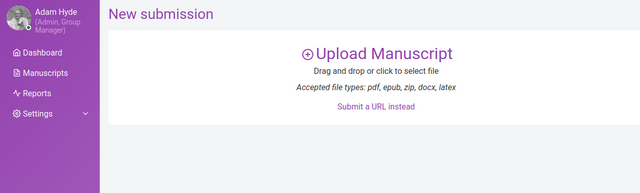
Submission page - where metadata and files for new submissions are provided.
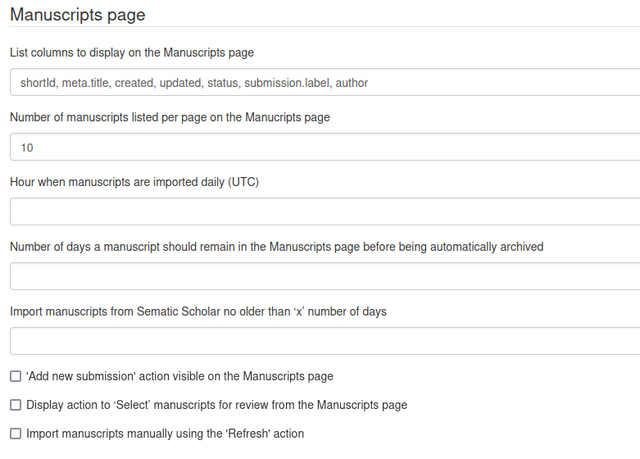
Manuscripts page - a configurable listing of all research objects in the system. Access controls can be customised based on workflow needs.
Control page - where review cycles, tasks, and decisions are coordinated. Access can be limited or open depending on hierarchy preferences.
Review page - the interface for reviewers to provide feedback on submissions.
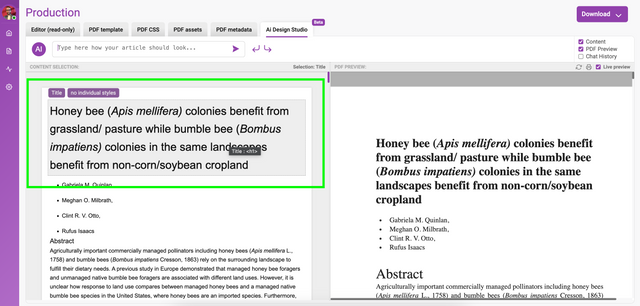
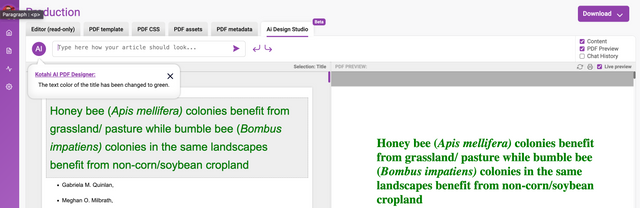
Production Page - enables output of publication-ready files like PDFs and author proofing.
Settings - configuration options for the platform.
CMS - controls for customising public-facing pages along with published content endpoints.
To get started with Kotahi, focus on learning the Dashboard, Manuscripts Page, and Control Page.
These spaces enable most core workflows and provide a general understanding of Kotahi's capabilities. The modular architecture allows flexible arrangement of screens to meet a wide variety of use cases.
10
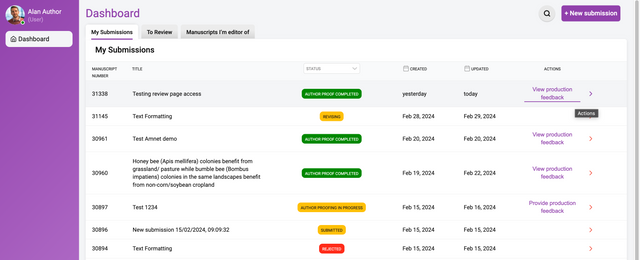
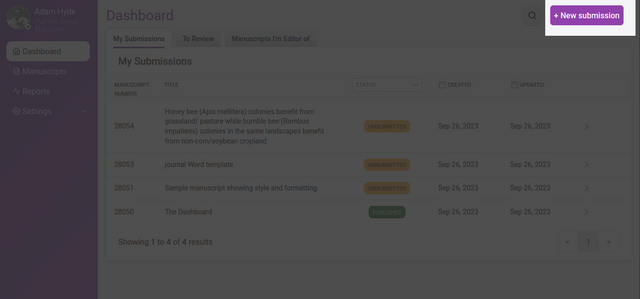
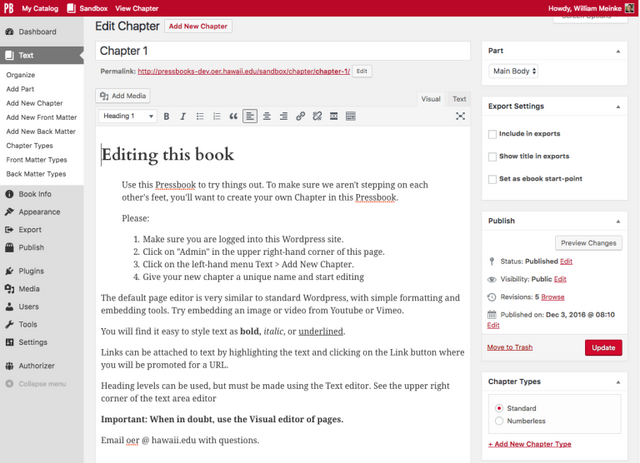
Workflow Dashboard
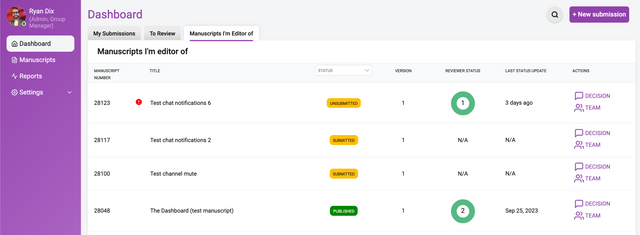
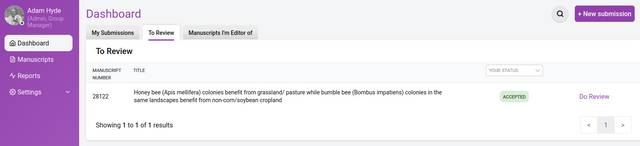
The Dashboard shows you the research objects you are assigned to.
Dashboard
Here you can see all the research objects for each role within the group. The above example displays 3 tabs:
My Submissions - the list of research objects submitted or created within the group
To Review - the list of research objects to review
Manuscripts I’m an editor of - the list of research objects for which you are an editor / curator
Within each of those tabs there is a list which is different according to the tab selected:
My Submissions
In the My Submissions tab (the tab displayed by default) the following columns are shown:
Manuscript ID - the unique identifier (created automatically by Kotahi) for each research object
Title - the title of the research object
Status - the status of the research object (see below)
Created - the date of creation/submission
Updated - the date when something was last changed
To Review
In the To Review tab the following columns are shown:
Manuscript ID - the unique identifier (created automatically by Kotahi) for each research object
Title - the title of the research object
Your Status - the status of the invitation.
Manuscripts I’m an editor of
In the Manuscripts I’m an editor of tab the following columns are shown:
Manuscript ID - the unique identifier (created automatically by Kotahi) for each research object
Title - the title of the research object
Status - the status of the research object (see below)
Reviewer Status - a graphical status display of the reviewer process
Updated - the date when something was last changed
Updated - the date when something was last changed
Actions - a link to the control panel and team pages for the research object
Indicator - an icon indicates an overdue task
Sorting
All columns within each of the Dashboard tabs are sortable. To sort click on the name of the column you wish to sort by, to reverse sort click the same column name again.
Filter
To filter the Status column, click the dropdown and select the state to be viewed e.g ‘Unsubmitted’. Sorting can be applied on a filtered view.
11
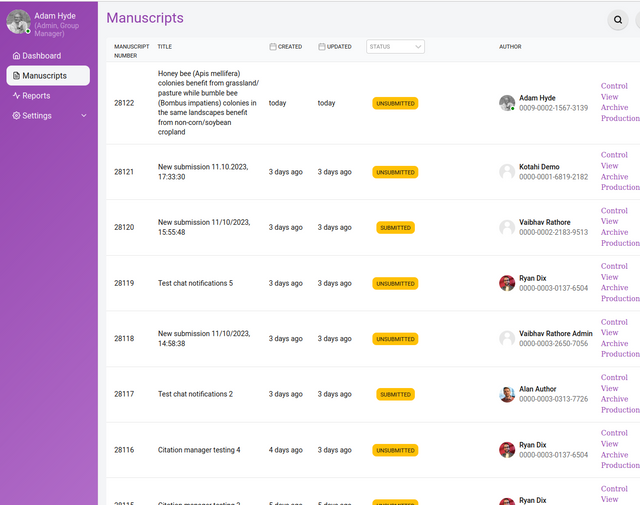
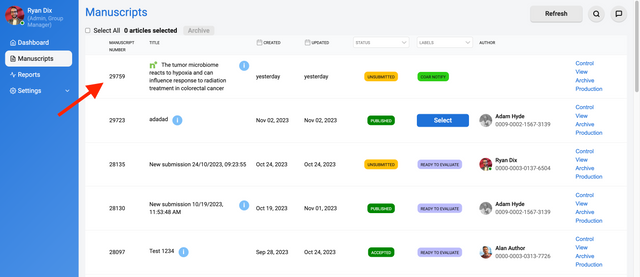
Manuscripts Page
The Manuscripts page is generally only available to Kotahi Group Manager and Editor roles.
The Manuscripts page is entirely configurable, so the actual columns you may see in your version might be quite different to the example above (taken from a journal configuration of Kotahi).
The Manuscripts page displays all research objects in the system. The above image shows a very different Manuscripts page configured for a preprint review workflow. You can choose which field you wish to display fom the Configuration page.
All columns are sortable, one click sorts a column in ascending order (0→9, a→z), a second click sorts in descending order (9→0, z→a).
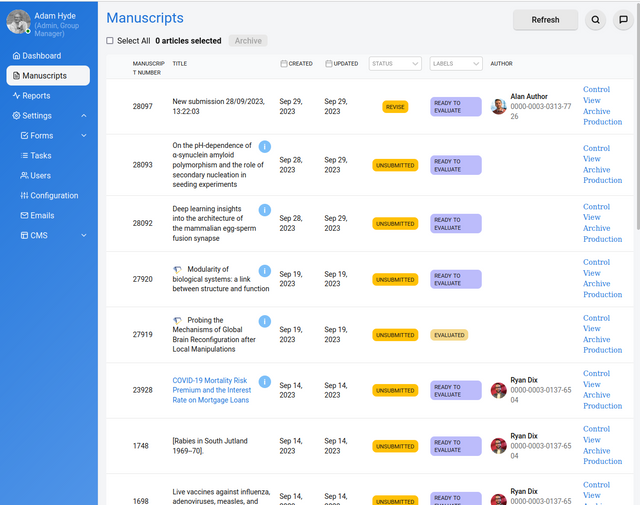
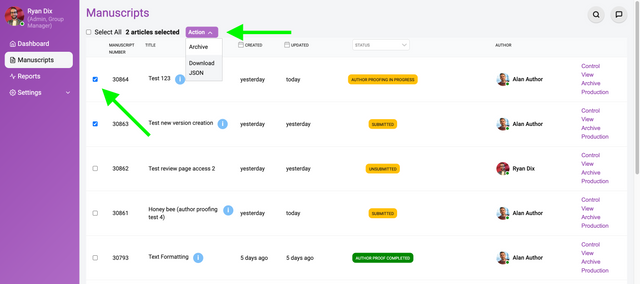
You can select or bulk select manuscripts from the Manuscripts page. Once you have made a selection you have the option to ‘Archive’ or ‘Download as JSON’.
Archive - will delete the object from the Manuscripts table, but not the database. Currently, archived manuscripts can not be retrieved from a frontend interface.
Download as JSON - will automatically download a single or multiple files to your downloads folder. All manuscript metadata is included in the JSON file.
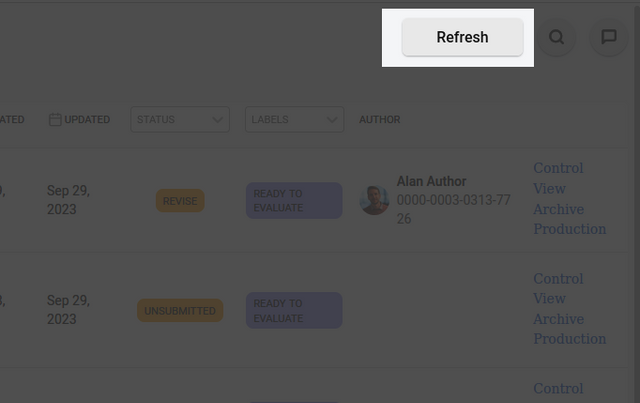
Automated ingestion of submissions
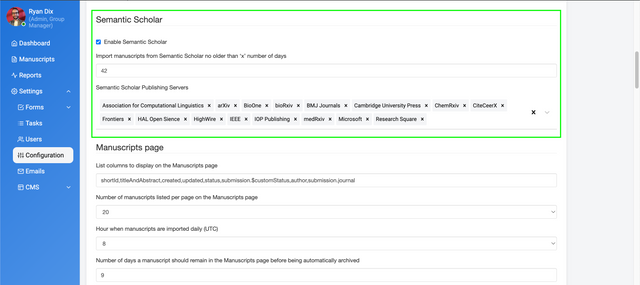
Kotahi can be configured to import manuscripts automatically from the Settings→Configuration→Manuscripts page. If the Manuscripts page displays a refresh button as below, this is for the automated batch ingestion of submissions. Generally, this is used for the ingestion of preprints from various sources but the functionality could be used for batch ingestion of other types of material.
In most use cases, this button is used for ingesting preprints from various sources using its AI-powered engine. If the ‘Refresh’ button is available, pressing it will trigger this automated process. The system can also be configured to ingest preprints on a regular schedule without needing the button to be pressed. This automated ingestion helps keep your preprint collection up-to-date efficiently.
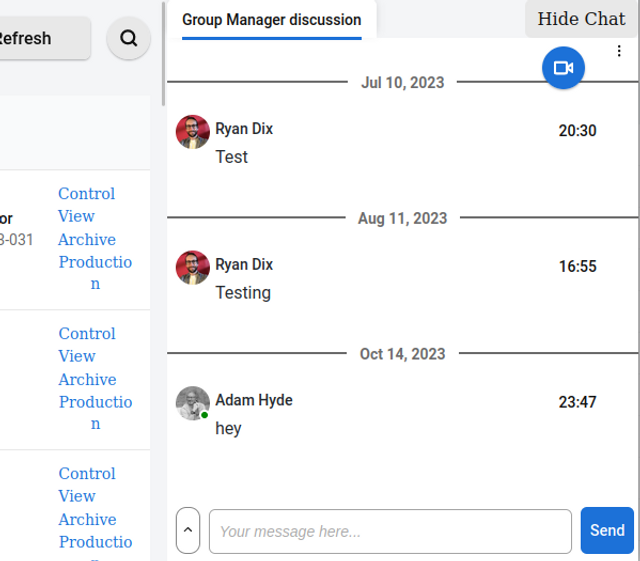
Discussions
There is a live discussion (chat) available for all members who have access to the Manuscripts page.
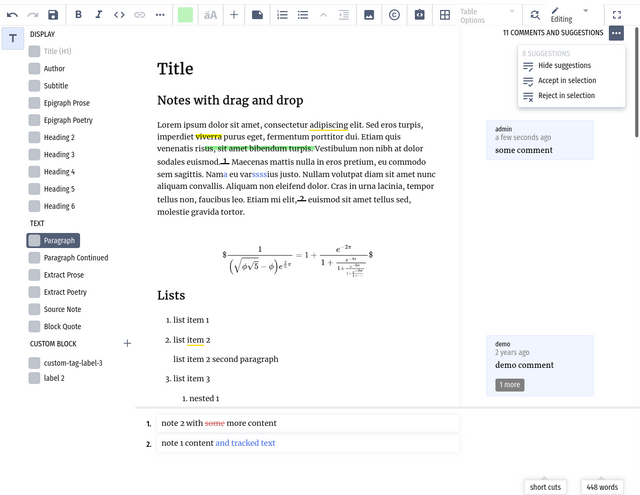
The chat also two very powerful features - rich text (including math) and @mentions. In addition, video chat is available. Clicking on the camera icon displayed will open a video chat room.
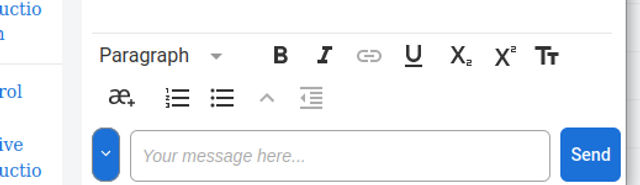
Rich Text
Clicking on the small icon to the left of the ‘Your message here...’ input field will display a rich text editor toolbar:
This enables rich text to be created or edited if the content is cut and pasted into the chat input area. Math is also supported using the $$ syntax.
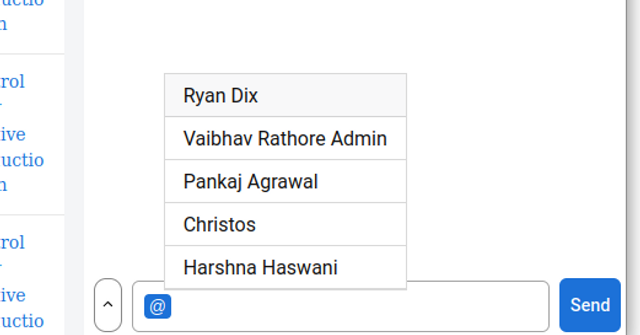
@Mentions
Typing ‘@’ into the chat input area will display a pop-up of users that can access the chat.
Selecting the name of the person you wish to notify will send them an email notification.
Hovering your mouse over a message reveals an ellipses menu which contains actions to edit/delete a post. You can also mute (press) email notification communication per channel from the ellipses menu at the top of the chat viewport.
12
Control Page
Every research object has its own Control page. This is used by the team to manage the review and publishing process.
There are 5 tabs:
Team - the team (editors and reviewers) is managed here
Decision - this is where the management of the decision/evaluation takes place
Manuscript text - the full text (if applicable) of the research object
Metadata - the full list of metadata associated with the research object
Task and notifications - where tasks are managed for this specific research object and where manual notifications can be actioned
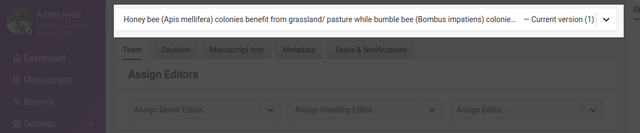
Additionally, at the top of the page is the version dropdown. This dropdown persists across all tab views.
The version dropdown displays the name of the research object AND the version or ‘round’ you are currently in. Research objects can be reviewed in multiple rounds, and in each round Kotahi creates a new ‘version’ (of all data) of the submission. The latest version is always displayed when you visit the control page, but you can browse earlier versions from the dropdown.
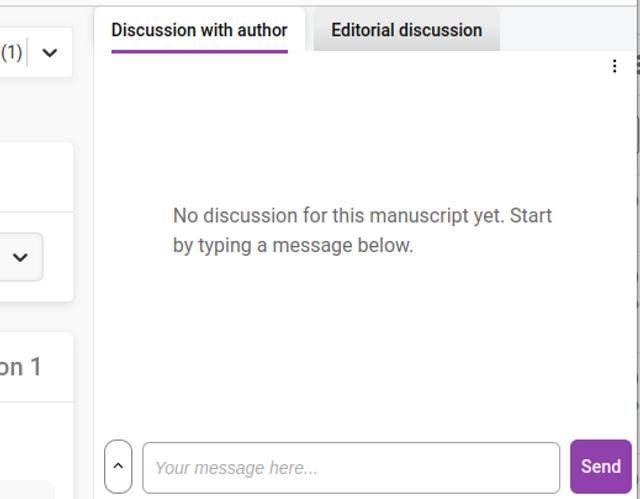
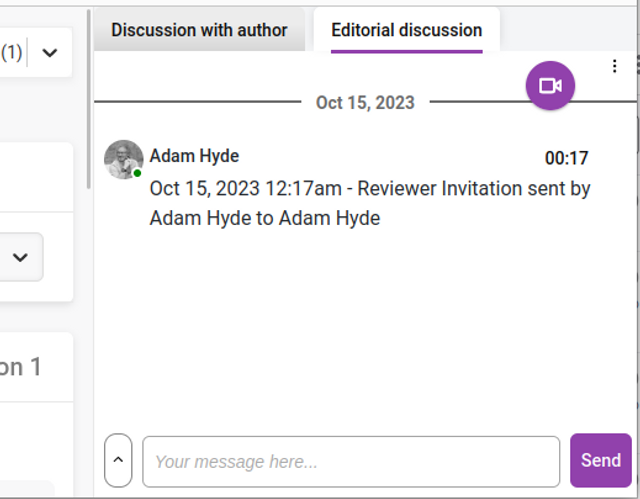
In addition, there are two chat rooms to the right of the page which are also persistent across all tabs.
The Discussion with Author is for the team to use to chat with the author (if applicable) that submitted the research object.
The Editorial discussion is for the team to use to chat with each other about the research object. Reviewers also have access to this channel. A video link is also available for a group chat if required;
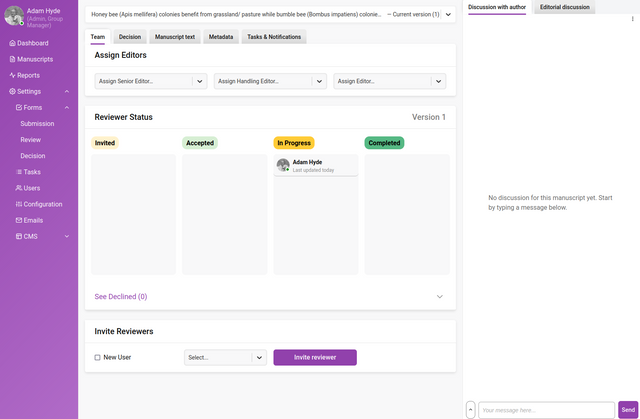
Team tab
The team tab enables assigning of the editorial team and invite reviewers.
To assign Editors, simply choose the person from each of the dropdown menus for Senior Editor, Handling Editor, and an additional Editor.
In the case of preprint review communities or other workflows, these roles are best considered as as team members, each with the same level of privileges for managing the process around the research object.
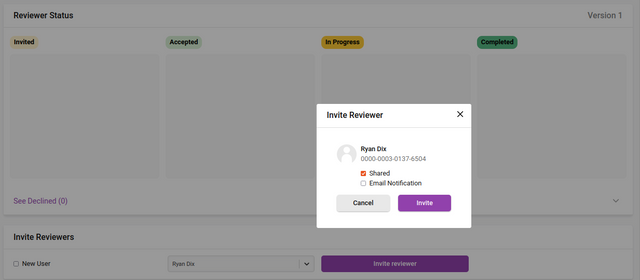
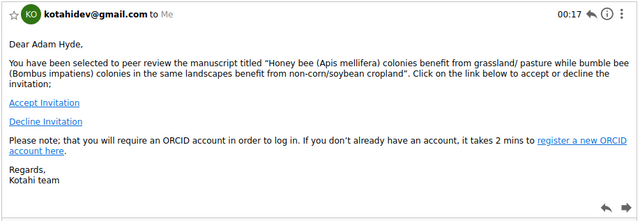
To invite reviewers, simply select a user from the dropdown menu (listing all users in Kotahi). Note: typing the first letters of the preferred reviewer will trigger the autocomplete function. If the user does not exist in the system, you can invite someone via email by clicking the ‘New user’ option:
Here you can enter the name and the email of the reviewer you wish to invite. They will also receive an email invitation and if they click accept from the email, their account will be created and the review will be associated with their new account.
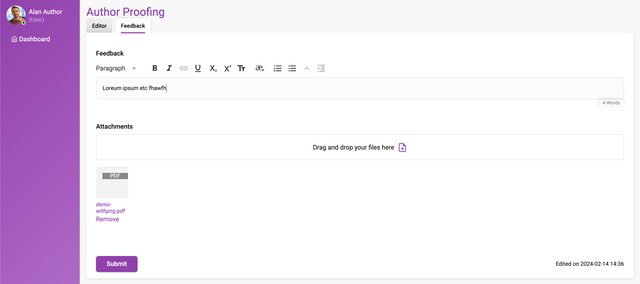
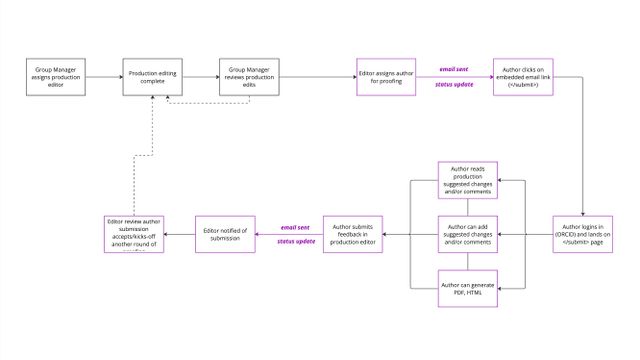
If the author proofing workflow is enabled (see the Configuration page), editors can invite an author to participate in a round of proofing by clicking on 'Submit for author proofing’. This will notify the author using the ‘Author proofing invitation’ email notification.
The author will be able to access the Production editor from a link included in the email notification or from a link provided on the Dashboard.
The manuscript status will be updated following the phase;
The editor assigns the author from the Control panel, and the status updates to; 'Author proof assigned'
Author access the Author proofing editor (clicks on the Dashboard→My Submissions→Production editor link) and the status updates to; ‘Author proofing in progress’
Author submits proofing feedback (clicks on the submit action on the Production ediorr>Feedback page) and the status updates to; ‘Author proof completed’
The author can add ‘Suggested’ changes to a manuscript (if a docx submission) and complete a ‘Feedback’ form.
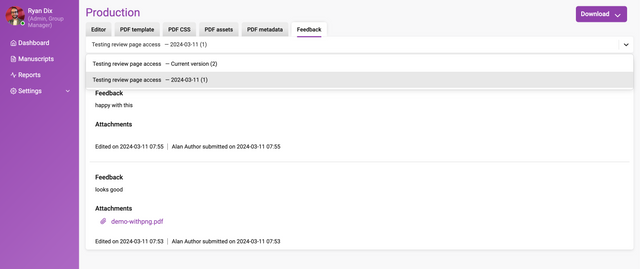
On the successful submission of a Feedback form, the editor (Editor role) assigned will receive an ‘Author proofing submitted’ notification. A link to the production editor and Feedback form will be included in the email notification. The editor can also access the author's feedback from the Control panel→Feedback page and suggested changes or comments from the Manuscripts text page.
An overview of steps that constitute a round of author proofing;
1. Editor assigns an author to a round of proofing from the Control panel→Teams page
1. Author receives an email notification with a link to the feedback form / alternatively the author can access the feedback form a link on their Dashboard→My submissions
1. Author is able to add Comments and 'Suggested’ (track changes) in the Production editor and can also submit a feedback form
1. Editor receives an email notification that author feedback has been submitted
1. Editor can access the feedback from the control panel (read-only)
A history of author feedback is captured in the feedback form. A record of authors assigned to participate in a round of proofing is captured in the Control panel→Teams page per version.
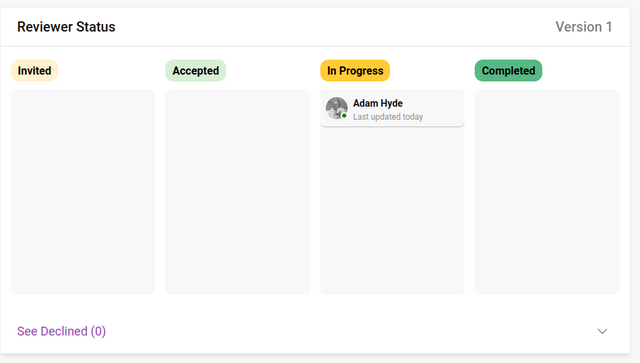
Review status
It is possible to see the status of all reviews at a glance:
Invited - existing/new users have been assigned as a reviewer. This can be done manually or by sending a ‘Reviewer invitation’ email notification.
Accepted - the reviewer has accepted the review from the ‘Accept’ action displayed on the Dashboard→To Review page or embedded within the email notification.
In progress - the reviewers have accessed the Review page.
Completed - the reviewers have submitted a review. A review submission is uneditable.
In the Reviewer Status window (shown above) you will notice ‘Version 1’ in the top right corner. This is the version or ‘round’ number (see above).
As reviewers are invited and progress through the workflow, the reviewer icons will automatically progress through the flow from left to right.
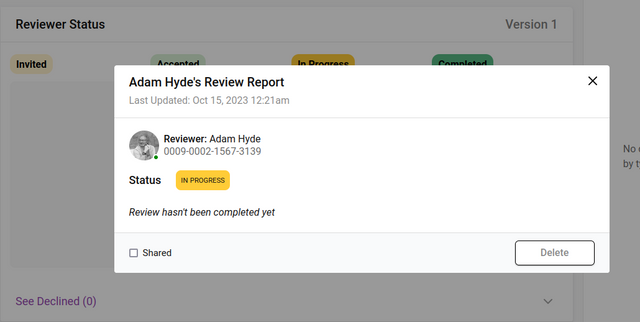
Clicking on a reviewer card will display a pop-up with further information:
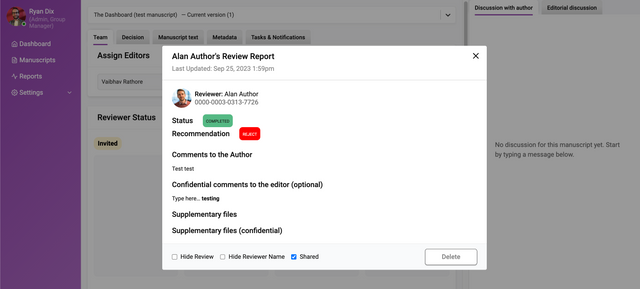
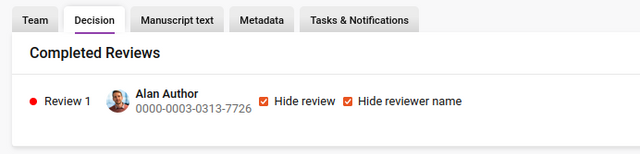
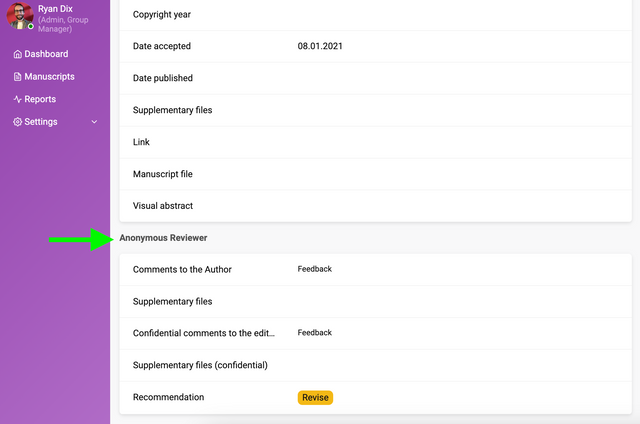
If the review is completed, this pop-up will display the actual review. Additional controls allow the editor to ‘Share’ the review - this enables submitted reviews to be visible to other reviewers who have submitted a review and have the ‘Shared’ enabled. ‘Hide review’ will hide the review from the Author when a Decision is submitted, and ‘Hide reviewer name’ will anonymise the review on the Review page.
Clicking ‘See Declined’ at the bottom of this area will display all declined invitations. Reviewers who decline an invitation to review are directed to a landing page where feedback on the decision can be captured, and the user can also choose to ‘Opt out of further requests’ to participate in a peer review.
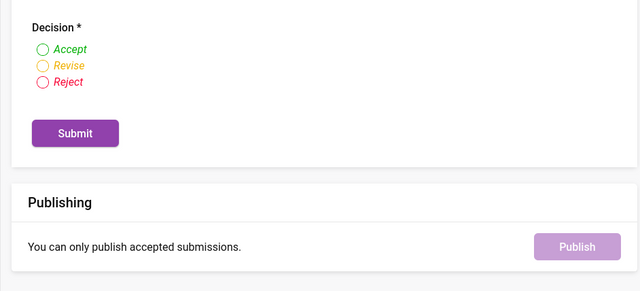
Decision tab
The Decision tab displays all the information and controls necessary to determine the outcome for the current review round.
As with many things in Kotahi, the Decision form is entirely configurable (see section on Decision form), so the form you see is displayed on the Decision tab.
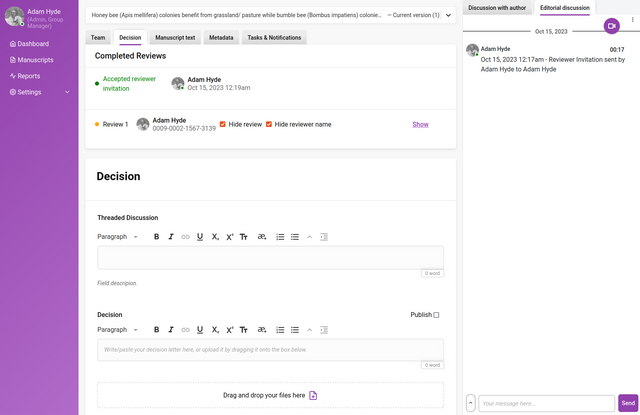
Completed Reviews are displayed at the top of the tab for ease of reference when compiling evaluation/decision summaries. Clicking on ‘Show’ for each completed review will display the actual review.
Below the decision form are two buttons - Submit and Publish.
The ‘Submit’ button sends the decision and associated information to the submitting author. If the decision was ‘accept’ then the ‘Publish’ button will change to an active state. Clicking on ‘Publish’ will publish the research object. Publishing itself is entirely configurable so what happens at this moment will depend on how your Kotahi group is configured.
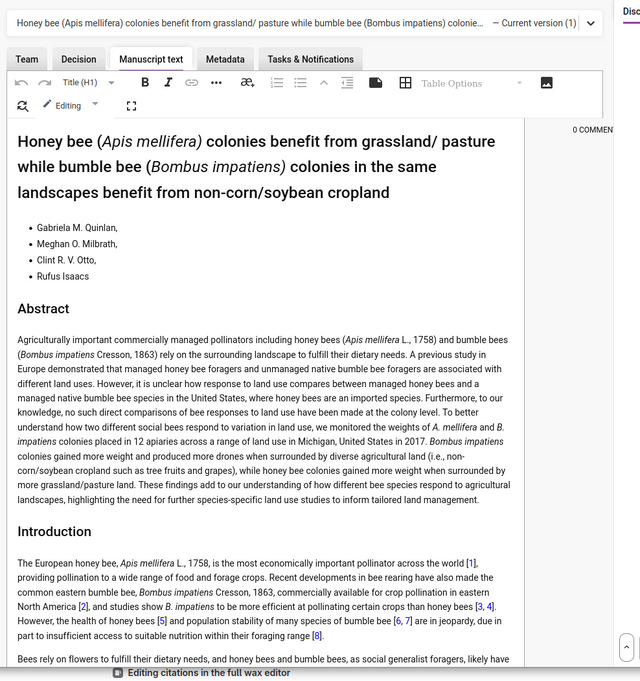
Manuscript text tab
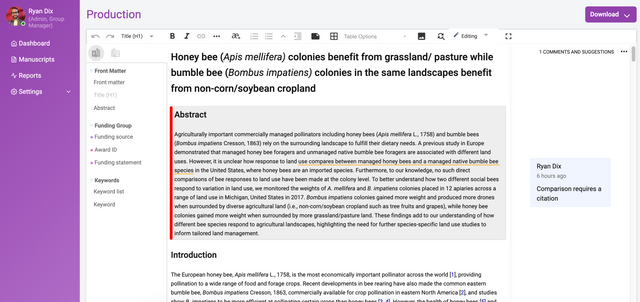
The manuscript text tab displays the entire manuscript (if submitted as a docx) in the Kotahi scholarly word processor.
Comments can be made in the editor. For a full rundown of how the editor works, please see the section on the Kotahi Scholarly Word Processor.
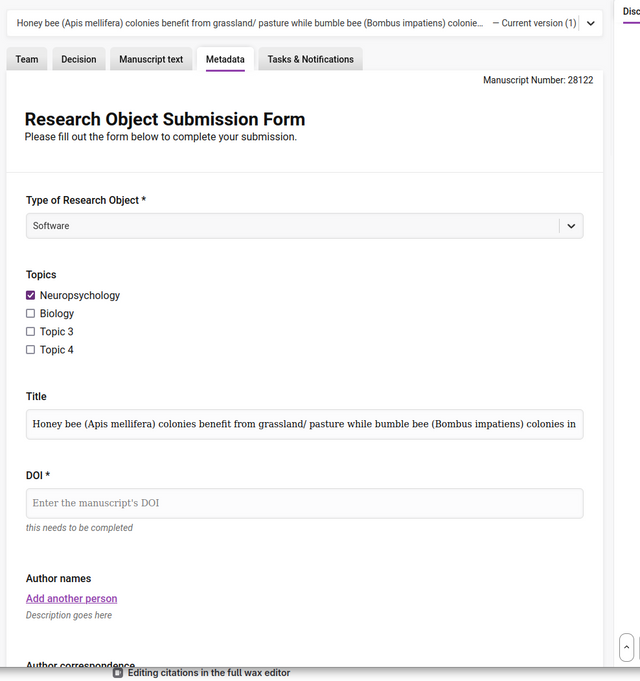
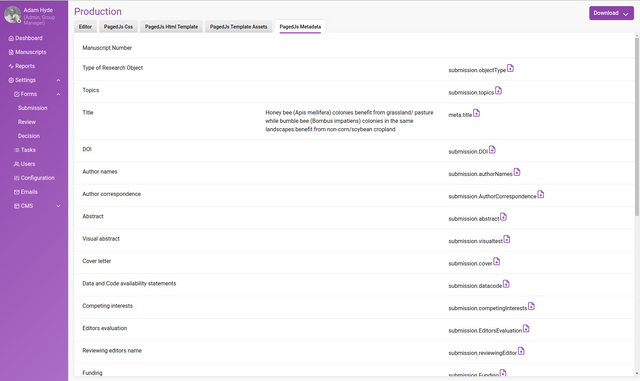
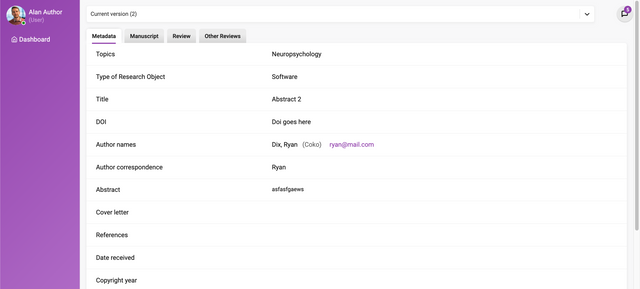
Metadata tab
All metadata added to the research object will be displayed here.
What is displayed on this screen depends entirely on how the metadata submission form has been configured. For example, Submission form fields that are hidden from the Author are accessible to the editorial team from this tab.
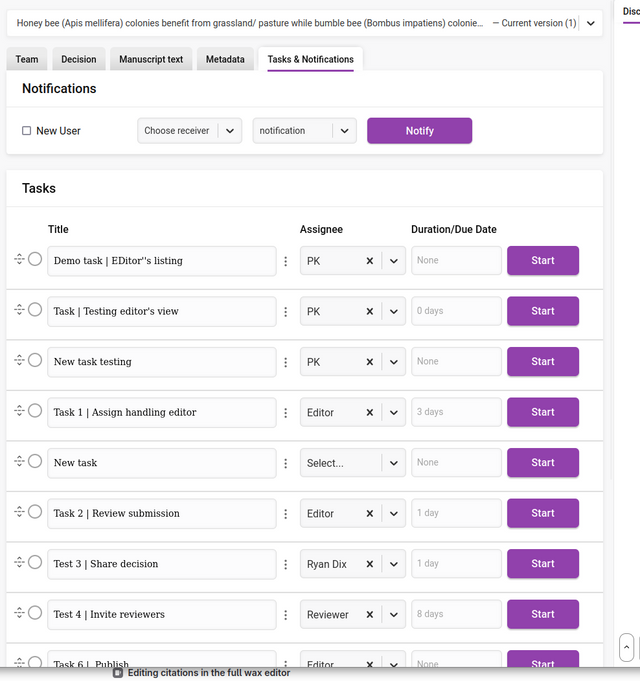
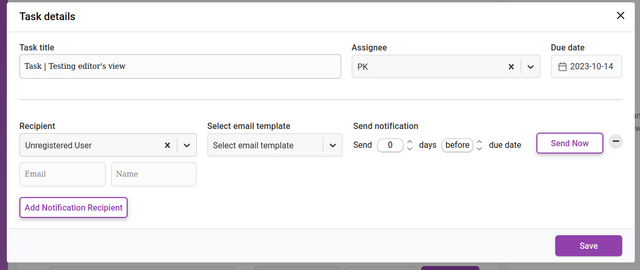
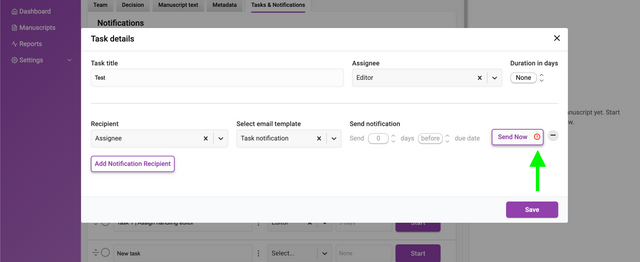
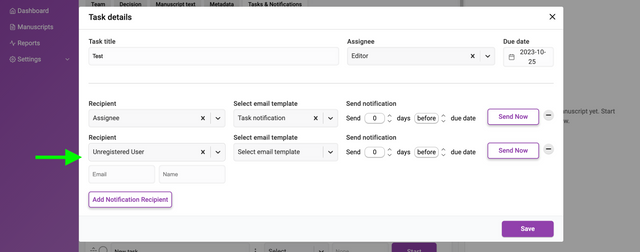
Tasks and notifications tab
This page displays the tasks and notification controls for the research object.
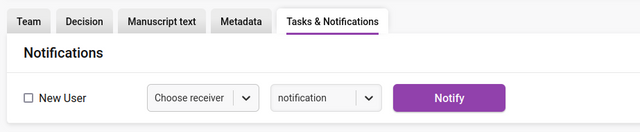
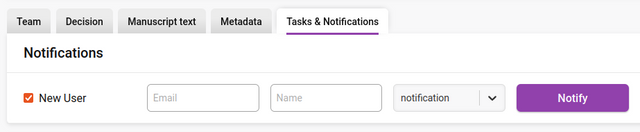
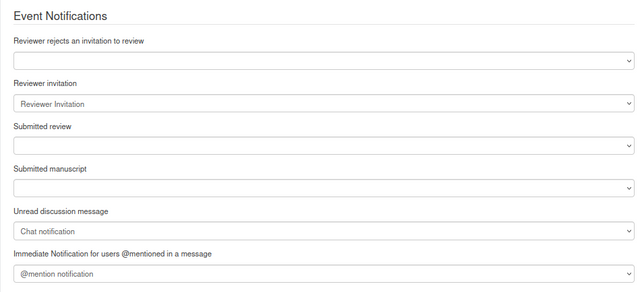
Notifications
The Notifications controls allow you to send email notifications to registered users or to new users. To send a notification to a registered user simply select their name and the notification from the dropdowns and press ‘Notify’.
To send a notification to a new user (unregistered user) simply click on the ‘New User’ box, enter their email address and name, choose the notification and press ‘Notify’.
When the notification has been successfully sent, a check appears next to ‘Notify’ on the button, and you will also the action event recorded in the Editorial discussion chat.
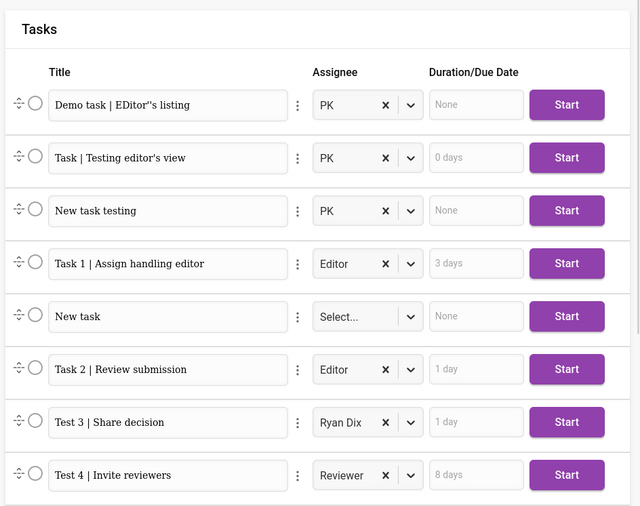
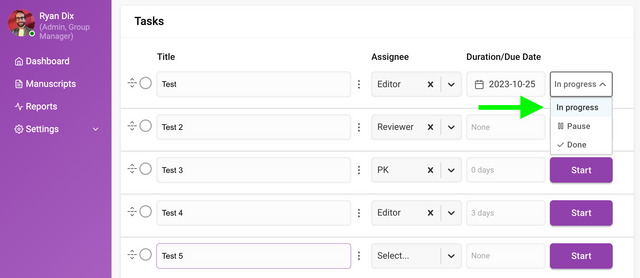
Tasks
The Tasks section displays all tasks for the research object.
The initial task list for the research object will be inherited from the task list set up in
Settings →Tasks (see that section). It is also possible to add/delete/alter the inherited list to suit the needs of the specific research object.
Tasks can be created, edited, deleted, modified, started, and reordered from this interface.
Adding tasks is done via the ‘+’ button at the bottom of the task list.
Starting a task can be actioned by clicking on the ‘Start’ button. Starting a task will change the status of the task to ‘In progress’. Associated email notifications will only be sent on the due date if the task is ‘In progress’.
Pausing a task can be done by selecting the ‘Pause’ status in the dropdown menu. This will also suppress email notifications that are queued to be sent.
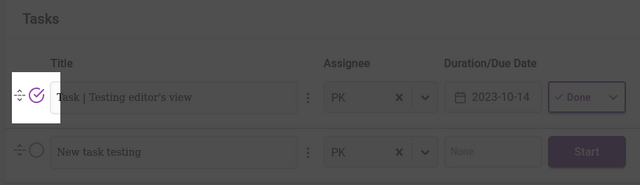
You can mark a task as complete by clicking on the left circular ‘Done’ checkbox or selecting the status of done from the dropdown menu.
Adding a task title and adding an assignee can all be done via the input fields provided. The assignee dropdown displays a list of roles and the full searchable list of users in the system for selection.
A description can be added to each task. Use this field to be specific about task requirements, and use editing tools to add lists, links and other details as needed.
Duration can only be edited by opening the task for editing.
Deletion or editing of the tasks can be managed through the icon displayed between the task title and the assignee.
Deletion will ask you for a confirmation before completing.
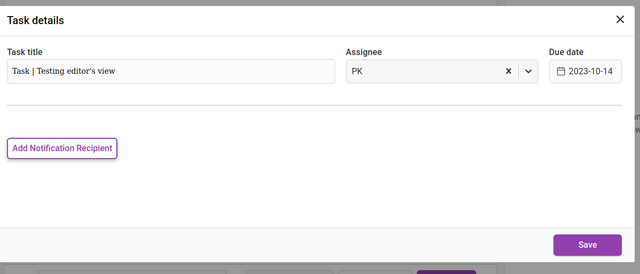
When editing a task the overlay for that task will appear.
Duration can be changed from the ‘Due date’ item on the left. When clicked it will display a date picker.
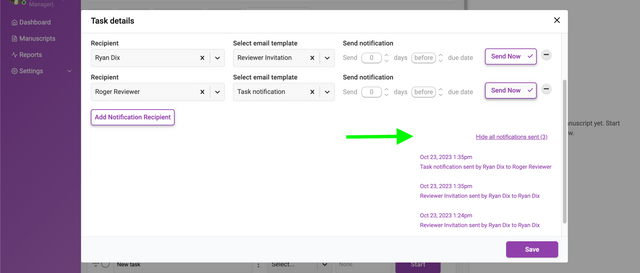
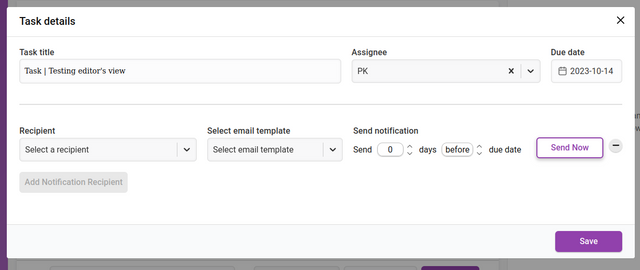
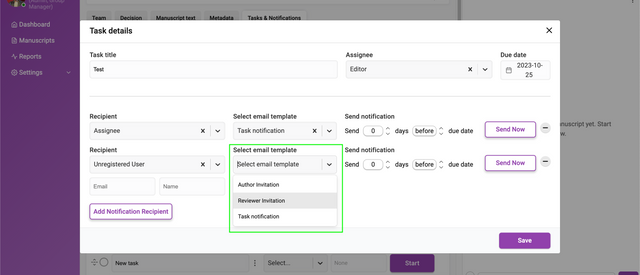
Clicking ‘Add Notification Recipient’ will display an interface for adding new recipients of notifications. You can add as many recipients as you like. These notifications are triggered according to the de date set.
The input fields require a chosen recipient from the Recipient dropdown list. You can also add a recipient that is not registered in Kotahi by choosing ‘Unregistered user’ from the dropdown. This selection will display additional fields for the email address and name of the recipient.
You then set when the notification is sent out. The notification can be sent at a time of your choosing (including Send Now) relative to the due date of the task. The Send notification fields allow you to choose a time before or after the due date by the number of days you require.
A record of email notifications sent manually or automatically are captured in a dropdown list, in descending order based on the date and time sent. System emails are sent by ‘Kotahi’ and notifications sent manually use the username as sender id e.g. ‘Ryan Dix’.
If an email notification cannot be sent due to a configuration error, then a warning icon will be displayed on the ‘Send Now’ button.
13
Roles
The basic Kotahi roles are as follows:
Admin
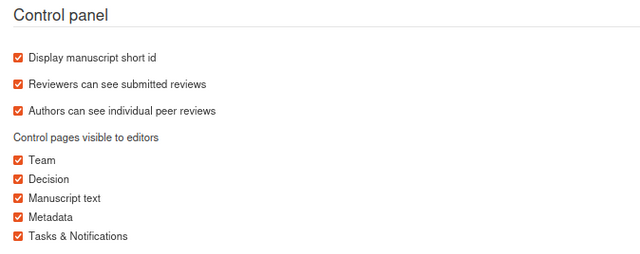
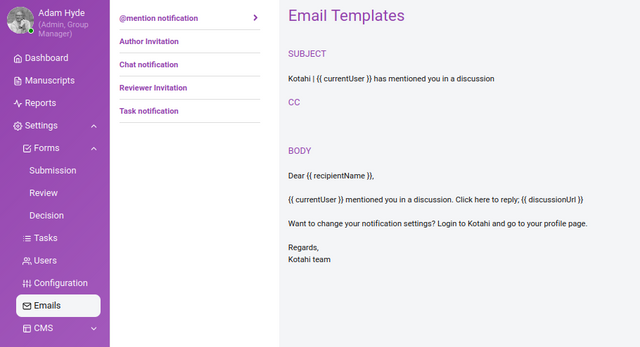
Admin is a global role with access to all groups. An Admin has system administration permissions and access to the Dashboard and Settings pages. Admin permissions support the configuring of groups (Configuration manager, Forms, Task templates, Email templates and CMS settings) and managing Users globally. Admins don't have permission for various editing tasks unless they are assigned as Group Managers or Editors.
Group Manager
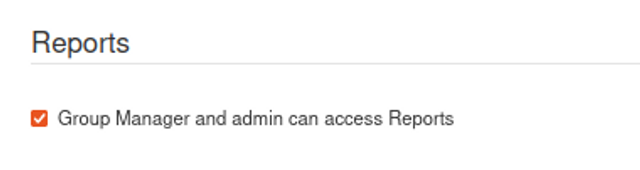
A Group Manager has managerial permissions within a group. They can access the Dashboard, Manuscripts, Reports and Settings pages. A Group Manager can assign editors. They can also perform editorial tasks themselves even without being assigned as an editor. They also can manage users within their group.
A Group Manager is the only role that has access to the Manuscripts page and has oversight of all the manuscripts within their group. This role can facilitate a curation role in support of manuscript triage, for example.
Currently, this role also has access to the Production editor from the Manuscripts page.
Admin users who are also assigned as Group Managers can delete any Discussion message in a given group.
Editor
Has permissions needed to access the Control page for managing the research objects they are assigned to.
This includes assigning other team members, inviting reviewers, editable access to metadata and decision/evaluation data as well as the ability to edit task lists and communicate with all stakeholders.
All research objects assigned are listed on the Dashboard→Manuscripts ‘I’m Editor of’ tab.
Reviewer
Has permissions needed to review the research objects they are assigned to. This includes access to the Review page and review form, and the ability to communicate with the editorial team.
All reviews assigned are listed on the Dashboard→To Review tab.
Author
Can access and manage the submissions they have created or are associated with.
Authors can submit multiple versions of research objects and/or datasets and communicate with the editorial team.
All submissions are listed on the Dashboard→My Submissions tab.
14
Tips On Setting Up Your Workflow
The easiest way to get started with workflows in Kotahi is to use a preconfigured group template. But for fully custom workflows, mapping desired processes to Kotahi's configuration is key. Here are some tips.
Hierarchical vs flat community workflow
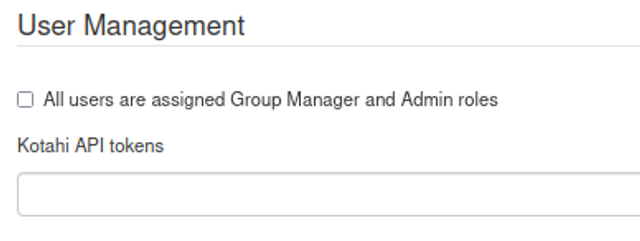
Kotahi allows configuring hierarchical roles or a flat community structure - it's flexible to fit different needs. By default, it separates Authors, Reviewers, and Editors into distinct roles. However, a flat hierarchy can be enabled in Settings → Configuration by checking ‘All users are assigned Group Manager and Admin roles’. It is also possible to manually make users Group Managers or Admins via Settings → Users which may assist if you want a ‘mixed’ model.
In flat communities where all participants can see everything, it also makes sense to set the Manuscripts page as the landing page upon login. This is configured in the ‘Landing page for Group Manager users’ dropdown.
With these simple tweaks, Kotahi can be adapted from hierarchical journal workflows to flat, open review communities. The roles and permissions model is customisable to enable varying levels of openness and transparency. You can craft optimal settings for your reviewers and authors to collaborate.
Review model
A key component in configuring the review model is customising the Review Form under Settings → Forms → Review.
This flexible form builder allows the creation of any desired structure for reviews, including custom rating systems. For example, you can add a ‘Select’ form element and use HTML star codes to easily build a 5-star rating selector. The possibilities are extensive - add text sections for comments, numeric scales for ratings, multiple choice questions, and more. Granular customisation of the Review Form enables tailoring the process to fit your evaluation needs. And helpful features like metric selectors and star ratings make it simple to collect key quantitative feedback. With full control over the form, you can craft an optimal review experience for your community.
Building a 3-star rating element using the Review form builder
Further, you can set up various kinds of review process.
Single blind
When authors are visible to the reviewer, but the reviewer is not visible then this is managed from the Control page for each research object by selecting ‘Hide reviewer name’.
If ‘Hide reviewer name’ is selected, the reviewer's identity is anonymised;
when submitting (sharing) Decision/Evaluation form data with the author
on the Review page if a review is set to ‘Shared’ with other reviewers
on the publish action when publishing to Flax
Anonymous review on the Review page
Double blind
In the case of a double-blind review where both the authors names and the reviewers name are hidden from each other, use the setting above to hide the reviewer name.
Second, selectively hide author names from reviewers. Under Settings → Forms → Submission, any form components that display author details like names, affiliations or the MansucriptFile, should have 'Hide from Reviewers?' selected.
Lastly, from the manuscript or production editor, you will need to delete the author names from the manuscript.
This obscures manuscript-identifying information from reviewers to complete the double-blinding. Between hiding reviewer and author details, you can easily implement fully anonymous peer review.
Open review
The identities of the authors and reviewers are known to each other. In which case, don’t hide the authors fields from reviewers in the submission form, leave the author names in the manuscript, and share the reviewers name from the Control page settings.
Collaborative review
Reviewers can discuss the submission together and collaborate on a review. This can be moderated or unmoderated and is managed at the moment you invite a reviewer by selecting ‘Shared’.
Only reviewers with ‘Shared’ enabled can see each other’s reviews on the Review page.
The option to enable collaborative reviewing is kept as a manuscript-level setting rather than global, to allow flexibility in mixing collaborative and independent reviews. For example, you may want 2 reviewers to collaborate on one manuscript while 2 others write independent reviews on the same submission.
This granular control makes it possible to have a hybrid approach within the same journal or collection. You can choose collaborative reviews when you want reviewers to discuss and consolidate feedback, while independent reviews give you multiple perspectives.
The per-manuscript configuration provides the most flexibility to tailor peer review based on the needs of each submission. You can determine the optimal individual vs collaborative review structure case-by-case.
Community self-review
For peer review models where the community self-selects to review manuscripts, enable access to submissions under Settings → Configuration and check ‘All users are assigned Group Manager and Admin roles’. This will make the Manuscripts page visible to all users, allowing community members to freely choose papers to review.
This facilitates review without editor assignments. Reviewers can simply pick submissions of interest to them and self-organise review efforts through the associated discussion.
The chat on the Manuscripts page provides a space for transparently coordinating who will review each item. Community members can claim papers, avoid duplication of efforts, and fill gaps.
With accessible manuscripts and integrated coordination tools, Kotahi can effectively support open self-selected peer review. The platform enables the community to democratically manage the process from paper discovery to discussion.
Multiple rounds
You can have as many iterative rounds of review as needed with the same or new reviewers each round (typical for Journals). A new round is started by submitting a decision to revise from the Control page.
Rolling submissions
Authors can update submissions during an active review round if enabled (this has proven useful for some preprint review use cases). You can enable this by checking Settings → Configuration → Allow an author to submit a new version of their manuscript at any time.
Workflow status
The submission form builder can be used to create tools to manually update and monitor the status of research objects as they are being processed. To do this, you can use the ‘Select’ form element (see above) to build a drop down menu outlining the processing stages. You can have any number of states, and additionally, the form builder enables you to choose a colour per state should you so wish so you can easily understand state at a glance.
This status display can be included in the Manuscripts page as a colum if you so wish by adding the internal name to the comma-separated list in Settings → Configuration:
Kotahi also has automated generic states that can also be included in the Manuscripts page by adding ‘status’ to the same list.
It is also possible to display the state tracker to the Control page by adding it to the decision form in a similar manner.
Taxonomy / Groups
Kotahi allows creating customisable taxonomies or groups for research objects using the ‘Select’ form component. These taxonomies are editable, so new types can be added as needed.
Including the taxonomy dropdown in the Manuscripts page columns provides filtering and grouping capabilities. Users can select a specific type from the dropdown to view only those matching objects. The filtered list URL can also be shared for collaboration.
For example, a group could contain types like ‘Type A’ and ‘Type B’. Filtering to ‘Type B’ would show all research objects in that group. The URL could be shared with others to coordinate efforts.
This enables segmenting objects in flexible ways - by status, priority, subject area, etc. Taxonomies help organise community work by creating specialist lists. And the ability to amend types supports iterative workflow design.
Deciding what to publish
There are many controls and settings in Kotahi to decide what you will publish. If you wish to publish data, for example, you may not need to supply a manuscript upon submission. In this case, you can hide the page displaying the manuscript from view from Settings → Configuration
You can also decide what data will be published when setting up the submission form. Each element has the option as follows:
Publishing evaluations / reviews
The review and decision forms in Kotahi can be fully customised using the form builders. This enables granular configuration of what data is captured in the review and decision processes.
Using the form builders, you can:
choose which review and decision fields are shared or published, and which remain internal
decide if full verbatim reviews are published or if curated excerpts are preferable
determine if overall decision summaries, reviewer recommendations, or any other custom fields are disseminated
select specific metrics like ratings or scores for publication rather than full text
opt to only share the decision outcomes such as ‘accept’ or ‘reject’ without additional details
hide reviewer identities from the published decision data as needed
The review and decision form builders allow optimising the data workflow - controlling what reviewers provide, limiting internal-only data, and configuring the published evaluation content. This enables sharing evaluations in customised formats, from high-level decisions to granular, transparent assessments. The system accommodates community preferences in determining what aspects of the process to openly disseminate.
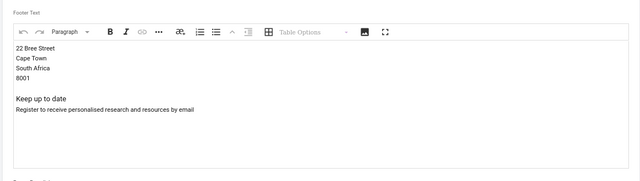
Formating
Kotahi offers extensive formatting flexibility when publishing content internally to its built-in CMS. The research object can be laid out and styled in any desired way, including custom components like data visualisations.
The internal CMS enables complete control over publication formatting. Content can be structured with sections, styled with CSS, and enriched with multimedia embeds as needed. Articles, data, code, images, and other supplementary materials can be tightly integrated.
For example, a published preprint review could contain the full community discussion threaded directly alongside curated recommendations. Interactive graphics could also enhance understanding of the analysis.
While publishing externally limits format control, the internal CMS provides limitless customisation possibilities. Creative publishing styles can truly amplify the value of the research object.
Tasks
The Kotahi task manager is a powerful workflow design and management tool worth investing time into. Tasks allow granular mapping out process steps, ordering, notifications, and roles.
Rather than just tracking tasks, the manager can be leveraged to actively conceptualise ideal workflows. The customisable main task template essentially serves as a blueprint for iterative workflow design.
As workflows evolve, the template can be modified to reflect new processes. Additional ad hoc tasks can also be added to individual objects as needed. This balance of structure and flexibility enables both workflow standardisation and handling unique cases.
Key benefits of the task manager:
visualise and conceptualise workflows through customisable templates
promote consistency via predefined task sequences
enable flexibility for per-object adjustments as needed
set notifications to coordinate community members
refine tasks continually as workflows improve
combine global templates and per-object adjustments
With powerful abilities to model workflows plus adapt them over time, the task manager is a valuable design asset. Investing in its configuration pays dividends for conceptualising, communicating, and continually improving publishing processes.
There is much more to designing and setting up your workflow. Kotahi enables you do do so much that most of what is possible hasn’t even been considered yet! The best thing is to experiment.
15
☙ Settings ❧
16
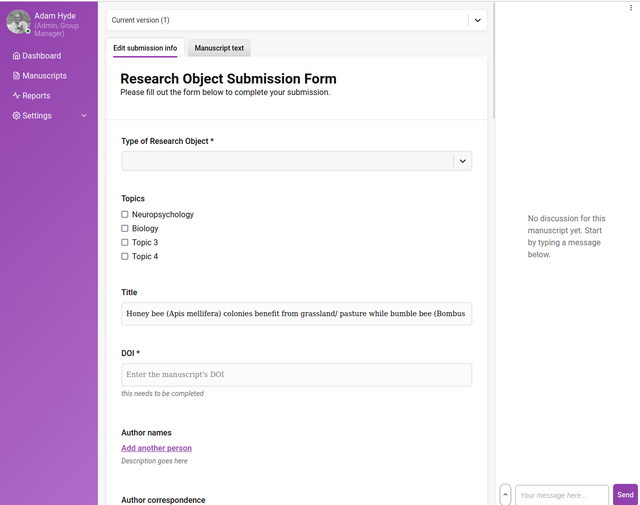
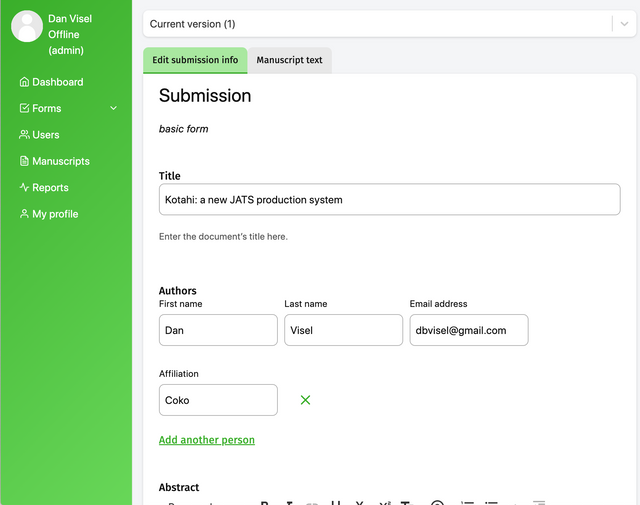
Build a Submission Form
The submission form builder allows you to customise submission forms to fit your workflow needs, whether ingesting metadata (from, for example, preprint servers) or accepting direct submissions. While it may not seem powerful at first glance, the form builder is actually a versatile tool for configuring workflows.
The power of the form builder lies in its ability to streamline gathering the metadata you need from authors. Forms can be carefully designed to optimise completeness, accuracy and user experience during submissions. For instance, you can craft forms that ensure authors provide all required information in a clear and easy-to-follow format.
In addition, the form builder lets you create different forms to support various submission types and sources. A preprint ingestion form pulling metadata may need only a few key fields, while a direct author submission form for a micropublication format would require more granular data, and a full journal submission form would possibly require even more comprehensive details. The form logic allows you to customise for each workflow.
The form builder and the data lifecycle
The Kotahi form builder enables innovative and powerful configuration options that can optimise the entire submission data lifecycle. The most powerful of these features include:
Hide from reviewers - Fields can be hidden from reviewers to control the metadata they see during the review process. This allows optimisation of the data profile for review.
Hide from authors - Form fields can also be hidden from submitting authors, for example, to capture data such as submission IDs without the author seeing it.
Include at publication - You can configure which fields are shared or published, and which remain internal only.
These form builder concepts allow granular control over the submission data workflow:
what authors provide
what reviewers see
what is made public
With strategic use of these capabilities, you can streamline submissions for authors, tailor review data, and determine publishable metadata - all from one form.
This flexibility and customisability within a single form builder interface demonstrates why it is such a versatile submissions tool. You can optimise the entire submission data lifecycle.
Getting started
To access the submission form builder, use the left menu → Settings → Forms. With some planning around your goals, the form builder allows you to build submission forms that truly enhance your workflows. It may not seem like a powerful tool initially, but the form builder offers extensive ability to optimise and streamline submissions.
The submission form builder provides all the necessary tools to create one or more submission forms. As mentioned above, Kotahi supports both automated creation of submissions (e.g. by ingesting preprint data using AI) and manual submission creation. Regardless of method, a submission form is required to hold metadata for research objects. For automated ingestion, fields can be auto-completed. For manual submission, authors/researchers must fill in the form data themselves.
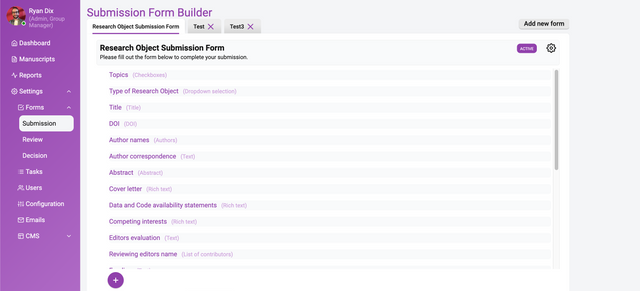
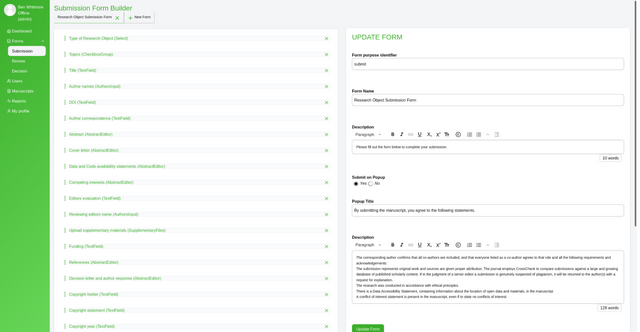
In the image above you see a already-completed Submission Form Builder. On the left you see a list of form elements, on the right is the information about each element.
Building a form
To start taking advantage of the submission form builder, I recommend beginning to build a form for your particular use case. A benefit of Kotahi is that you can easily do this in a new tenant without affecting any existing workflows you have already configured.
Some tips on getting started:
make a plan of the key metadata fields and submission information you need authors to provide. Organise these into logical groups or sections.
look at forms you currently use and think about areas that could be improved or streamlined in Kotahi.
start by building a simple prototype form in a test tenant. You can iterate on it and add complexity over time.
use Kotahi's flexible form widgets like descriptions and tooltips to optimise the author experience.
don't worry about getting it perfect right away - tinker and tweak as you learn. The form builder makes it easy to enact changes.
The key is to dive in and start building a form for your workflow. Kotahi makes it low-risk to experiment and learn. Taking an iterative approach allows you to progressively improve the form to best fit your needs.
Starting a new form
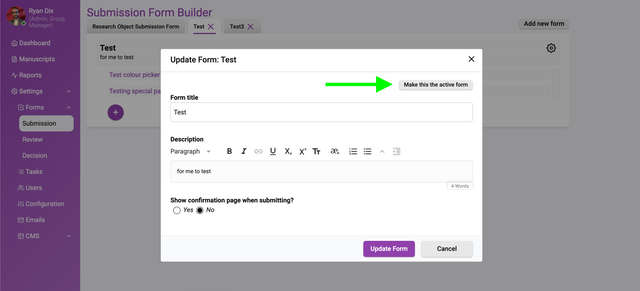
Let’s look at a new form and start breaking apart the interface. In a new form you will see the following.
Fill out the information on the right with placeholder or actual data (you can always change it later) and click ‘Update Form’.
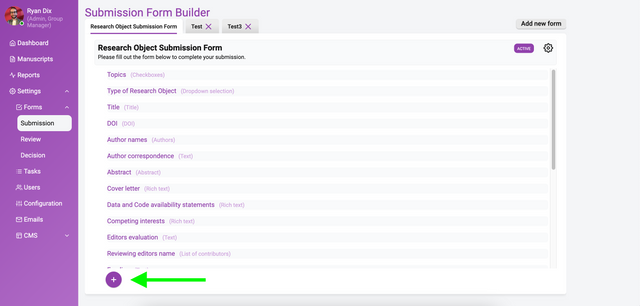
Now click ‘+’, and you will see something like the following:
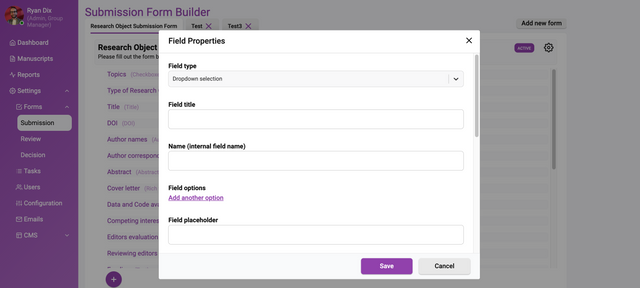
Select the Field type dropdown within this box enables you to choose what kind of form element you want. Currently, the choices are:
Text
Rich text
Dropdown selection
Radio buttons
Checkboxes
List of contributors
List of links (URLs)
Special fields types:
Title
Authors
Abstract
Attachment
Image attachment
DOI (suffix)
Custom status
Last edit date
When you choose one of these types then the page will display options for that element.
Adding your first element
Starting with something simple, let’s choose to create a ‘Select’ element (dropdown menu).
Let’s look at each of these controls.
Field type - the type of element (‘Dropdown selection’ in this case).
Field title - the name of your field as it will appear in the rendered submission form.
Name (internal field name) - Name (internal field name). This metadata identifier is important for integrating the form data throughout your workflow. Use a format like ‘submission.yourFieldNameHere’. For example, ‘submission.preprintServer’ if collecting the preprint server name.
The submission prefix carries the field through to other processes like generating JATS XML, publishing with the Kotahi CMS, or sending data to external systems.
With some planning on field names, you can efficiently pull form data to where you need it later. See the documentation for more on how naming conventions enable workflows. The key is to think ahead on how you want to utilise the information collected in the form.
Field placeholder - prompt the user through the user of informative text that is visible in the form field text editor.
Field description - a full text explanation (if required). This description is displayed below the field when submitting.
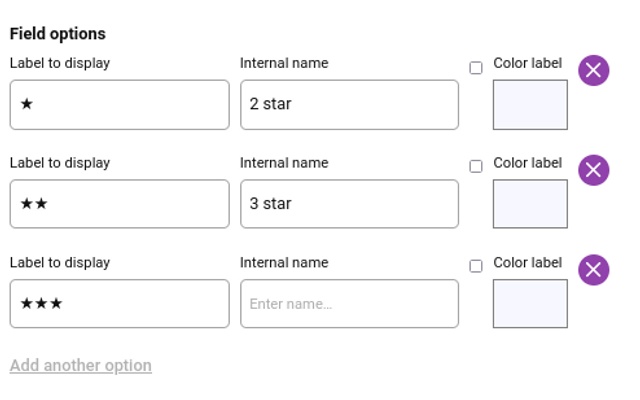
Field options - allows additional configuration specific to each element type added to the form. For a Select input type, Field options let you build the list of items available for users to select from in the dropdown menu.
To create the select options, first click ‘add another option’. You can now add one option per line in the format of ‘labelvalue’. The label is what users see in the dropdown, while the value is the internal metadata identifier that will be saved when an option is selected.
For example you could have:
Preprint Server A | preprintServerA
Preprint Server B | preprintServerB
This clearly labels the select options for users, while saving standardised values for the back end. You can also choose a colour for the section if required.
Once the options are defined this way in Field options, they will populate the select dropdown. When users make a selection, the corresponding value will be captured as the submission data.
Using Field options allows tailoring the Select input type with customised dropdowns that fit your metadata needs.
Short title (optional — used in concise listings)
Validation options - you can choose ‘Required’ if you wish this to be a required field.
Hide from reviewers? - here you can specify if the reviewers should this data on the Review page. In this way, you can use the form builder to determine the data profile of the research object which is visible for review.
Hide from authors? - you can decide if the field will be visible to the submitting author (if applicable).
Include when sharing or publishing? - Kotahi supports selective publishing and this option enables you to determine the data you will share at publish time.
Once you have completed all items press ‘Update Field’ and this will be recorded. You can now add more form elements and build up your submission form. See the documentation on each element.
Support for multiple submission forms
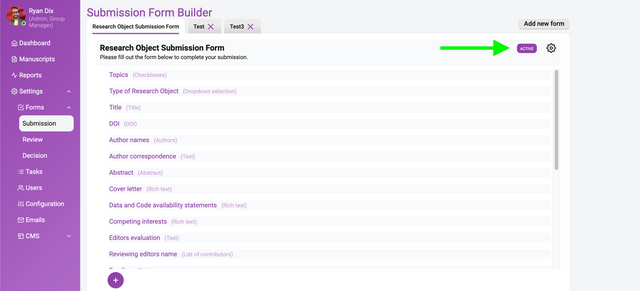
Currently, you can create multiple submission forms but only a single form can be selected for use. Only the Active form will be available to authors.
17
Building a Reviewer Form
You can build your own reviewer form through the form settings. Tailored reviewer forms focus the process, reduce fatigue, provide guidance, collect consistent structured data, and adapt over time. This ultimately leads to more robust, useful reviewer feedback and analytics.
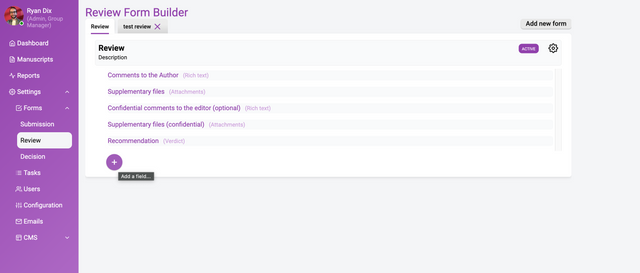
To get started choose Settings→Forms→Review.
The above image shows a completed reviewer form. Building a review form is essentially the same process as building a submission form (see documentation).
It is important to note that Kotahi enables individualised and shared reviews. These two options are not controlled here (see documentation on reviews).
Support for Multiple Review Forms
Currently, you can create multiple review forms but only a single form can be selected for use. Only the Form purpose identifier field populated with ‘review’ will be available to reviewers.
18
Building a Decision/Evaluation Form
The decision/evaluation form builder allows customisation of the controls on the Decision tab in the manuscript review interface. This enables capturing nuanced details of your evaluation workflows.
The form builder provides advantages such as:
adding custom fields related to the decision itself, like evaluation criteria ratings, rather than just a basic accept/reject choice
incorporating additional metadata fields beyond the core decision, such as status markers, that relate to workflow steps
guiding editors/curators to provide structured inputs through smart form design, rather than just freeform comments
collecting consistently structured data across all decisions for better reporting and analytics
adapting the decision inputs over time by altering the form fields to fit evolving needs
streamlining the decision process by focusing inputs on what's most relevant
The flexibility to customise the editor/reviewer decision form allows the creation of optimised workflows for evaluation. This moves beyond basic decisions to gather meaningful metadata that informs the publishing process.
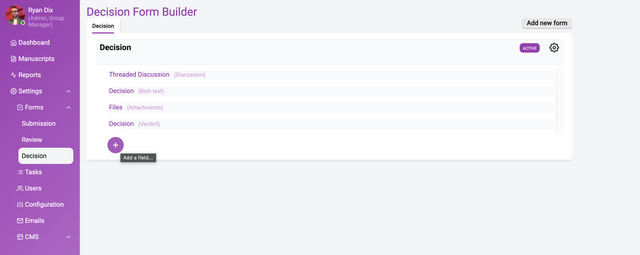
To get started, choose Settings→Forms→Decision.
The above image shows a completed decision form. Building a decision form is essentially the same process as building a submission form (see documentation).
Support for multiple decision forms
Currently, you can create multiple decision forms but only a single form can be selected for use. Only the Active form will be available to editors.
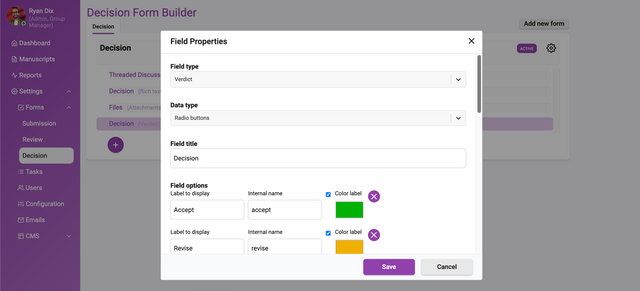
Furthermore, if your workflow supports a decision of ‘Accept’, ‘Revise’ and ‘Reject’ then select the Radio buttons Data type, set the Field type to ‘Verdict’ and configure the settings as follows;
selecting ‘Accept’ will enable the ‘Publish’ action
selecting ‘Revise’ will allow the author to submit a new version
selecting ‘Reject’ will disable the ‘Publish’ action
You will need to set the Field type to ‘verdict’ to enable this functionality.
19
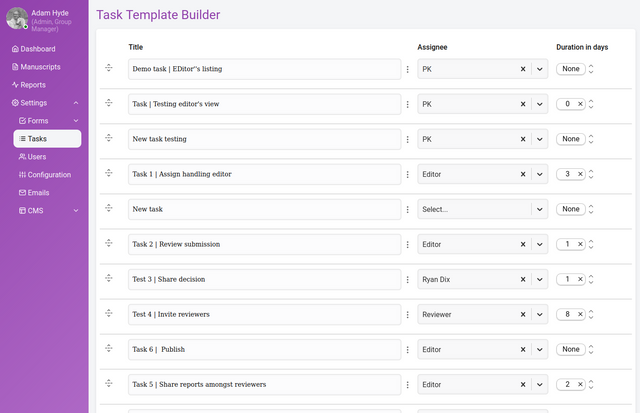
Building Tasks Templates
The task configuration in Kotahi is an extremely powerful yet often underestimated feature. Defining tasks is not just a to-do list but rather it is where you can further optimise and customise your editorial and publishing workflows.
In Settings→Tasks you can set up a template for tasks that will be inherited by all research objects submitted.
mapping out clear step-by-step workflows for different types of research objects
automatically prompting editors/curators, reviewers and authors to complete important actions
improving transparency by providing visibility into workflow status
identifying workflow bottlenecks
adapting workflows over time by iteratively improving task definitions
standardising workflows across users by assigning the same task lists
With some upfront planning around aims, the flexible task engine enables enacting efficient, consistent, and customisable workflows in Kotahi. The tasks truly represent a powerful yet often overlooked opportunity for workflow optimisation.
How to make task templates
The initial task list for the research object will be inherited from the task list set up in the system settings (see that section). It is also possible to add/delete/alter the inherited list to suit the needs of the specific research object.
Tasks can be created, edited, deleted, modified, started, and reordered from this interface.
Starting a task is done from the displayed ‘Start’ button.
Adding tasks is done via the ‘+’ button at the bottom of the task list.
Adding a title and adding an assignee can all be done via the input fields provided. The assignee dropdown displays a list of roles, and the full searchable list of users in the system for selection.
Duration (in days) can be managed via the duration field.
Deleting or editing of the tasks can be managed through the ellipses icon displayed between the task title and the assignee.
Deletion will ask you for a confirmation before completing.
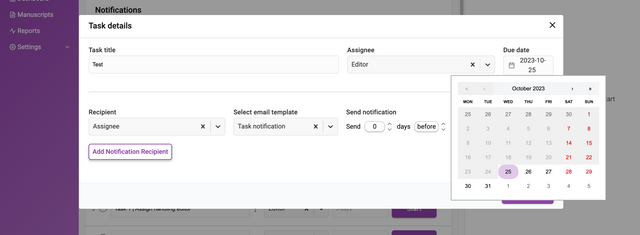
When editing a task, the overlay for that task will appear.
Duration can be changed from the Due Date item on the left. When clicked it will display a date picker where you set a due date.
Clicking Add Notification Recipient will display an interface for adding new recipients of notifications. You can add as many recipients as you like.
The input fields require a chosen recipient from the Recipient dropdown list. You can also add a recipient that is not registered in Kotahi by choosing ‘Unregistered user’ from the dropdown. This selection will display additional fields for the email address and name of the recipient.
You can also Select an email template to be sent to each recipient.
Next set when the notification is sent out. The notification can be sent at a time of your choosing (including ‘now’) relative to the due date of the task. The Send notification fields allow you to choose a time before or after the due date by the number of days you require.
Email notifications are only sent when a task status is I****n progress. To enable a task, click on the Start action. A task that is ‘Paused’ or marked as ‘Done’ will suppress scheduled email notifications from being sent. Notifications can still be manually using the ‘Send Now’ from the overlay.
Special actions
We are adding further controls to the task manager as we believe it has enormous potential. Two important actions already possible from the task manager are inviting authors and inviting reviewers. You can action these from the notification controls. Inviting reviewers will add the reviewer invitation to the research objects reviewer list (accessible from the Control page). Inviting authors is for inviting an author to join a submission if that submission was automatically ingested (useful for some preprint review workflows).
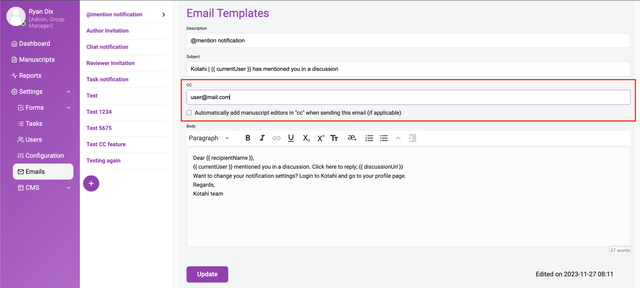
The ‘Task notification’ email template contains a hyperlink that will direct the user to the manuscript task list. This can be particularly useful for editors who wish to be reminded of upcoming task deadlines.
20
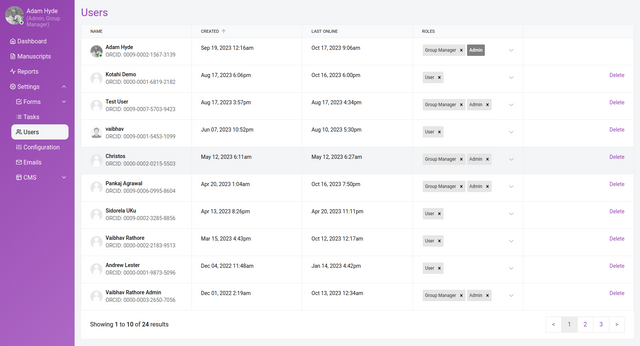
Managing Users
Users are managed from Settings→Users.
Here you see a list of all users in the system. The users are listed with the following information in columns:
Name - the full name of the user (with a picture if provided by the user in their profile page)
Created - the date the user created an account
Last Online - when the user was last online
Roles - the role(s) they’re assigned
Delete - deletes the user from the system (requires a confirmation)
All columns are sortable by clicking the column title.
Roles
There are two roles you can set at this interface that have to do with the administration of the system - Group Manager and Admin.
User - a user assigned either as an author, reviewer and/or editor in a group
Group Manager - has permission to access all group pages listed in the menu, essentially a ‘Group Admin’ role
Admin - has access to all groups on an instance and has limited access to group pages
21
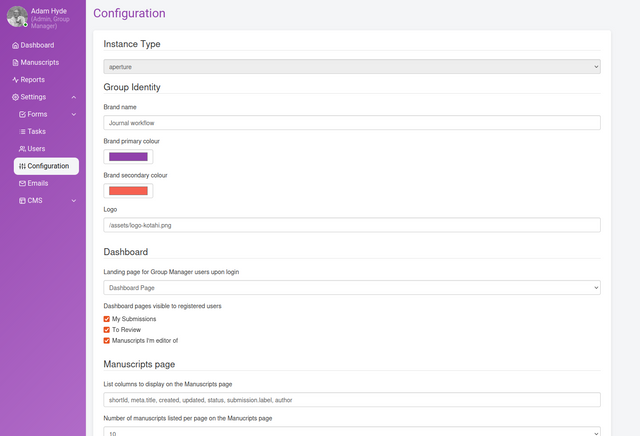
Configuration
This page shows general settings for configuring many aspects of Kotahi. To access this page choose Settings→Configuration.
There is a lot here! Let’s go through the controls one by one, top to bottom. This will be a long story as there is some context that we need to give for some of the items.
Instance type
Kotahi can be configured to meet many types of workflows and use cases (see section titled ‘Pre-configured workflows’). What is also very powerful is that Kotahi comes with some preset configurations you can choose from. We call these ‘archetypes’. Typically you cannot change this setting for a group (tenant) in Kotahi once it has been set by the administrator. However, you can create as many groups as you like, each with its own archetype. Instance types are set by a developer via the system configuration (.env) file.
It is also possible to create a workflow and save it as a template but at this moment you will need a developer to do this for you.
Instance types at the moment include:
aperture - a typical Journal workflow
colab - a PRC workflow
elife - submit, review and publish from a single form
ncrc - submit, review and publish from a single form, and import preprints
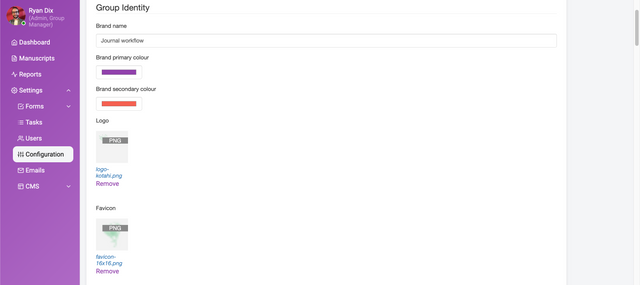
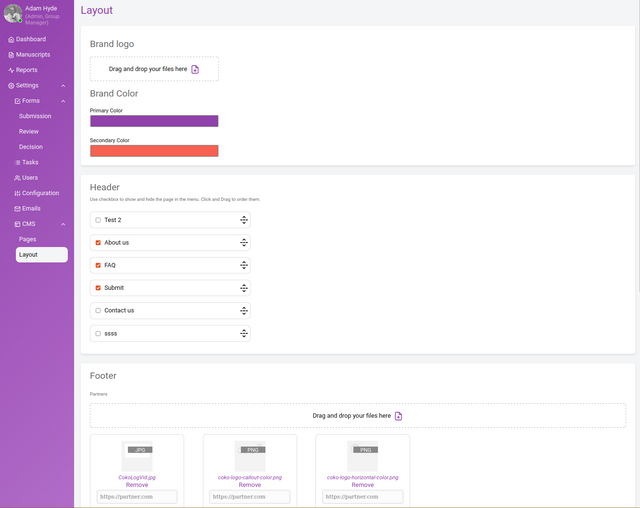
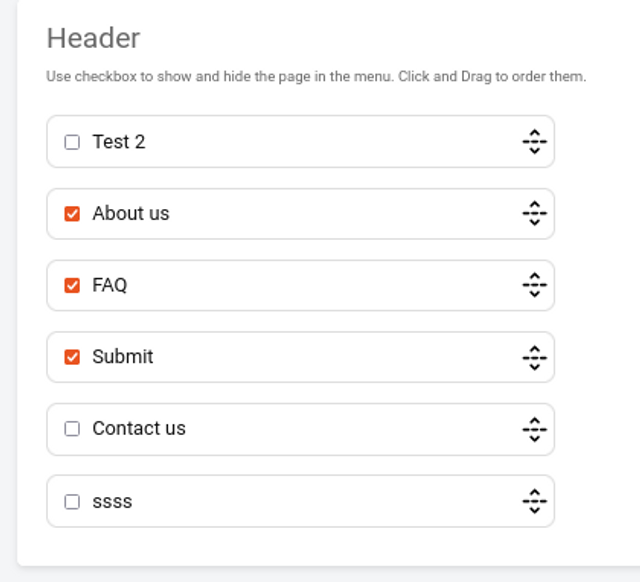
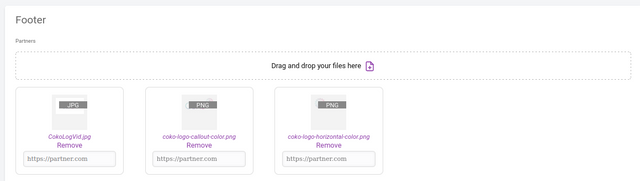
Group identity
Enables you to set basic branding for your group.
Brand name - this enables you to set the name of the group. The group name is displayed in a dropdown menu at login time for installations with multiple groups.
Brand primary color - used for the left hand menu, some buttons, and title texts.
Brand secondary color - used for additional highlighting.
Logo - the logo for the group login page.
Favicon - icon displayed on your browser tab.
Dashboard
In Kotahi, you can change the landing page for users as the first page they arrive at after they log in.
The Landing page settings allows you to choose from either the Dashboard or the Manuscripts page as the landing page. The Dashboard is probably the most common use case but in flatter hierarchies, the entire community may wish to have access to the manuscripts page. We have found this to be the case for small groups working together or some preprint review communities.
You can additionally choose which tabs are displayed on the Dashboard. Your choice here is also reflective of your use case. If you are a Journal group, then you probably want to select all three items. If you are a community that reviews preprints that are automatically ingested, you may wish to only display the ‘To Review’ item etc
Semantic Scholar
A checkbox setting to enable/disable the import of preprints from Semantic Scholar. Group Managers can select servers to import preprints/journals from. This feature is only implemented on the prc archetype. This is because import queries are most commonly associated with a publish, review and curate workflow, and an existing query will need to be in place to use this feature.
Manuscripts page
Here you have some great options for configuring the Manuscripts page.
List columns to display on the Manuscripts page - you can configure the columns displayed on the Manuscripts page. This is actually more powerful than you might think. It is possible, for example, to create a form element in the submission form builder for the selection of workflow status from a dropdown. This can then be displayed as a column on the Manuscripts page and effectively functions as a workflow tool. There are many other possibilities and experimentation is key. Columns are added using the comma-separated internal fieldname fields for each form element added in the submission form (you can hide these elements from submission and review forms if required via the form builder controls).
Number of manuscripts listed per page on the Manucripts page - this controls the number of items displayed as a list (pagination controls).
Hour when manuscripts are imported daily (UTC) - this is a setting for the AI importing of preprint metadata. Currently set up for the AI integration requires a developer but you can use these settings to control how it works once set up.
Number of days a manuscript should remain in the Manuscripts page before being automatically archived - if you are auto-ingesting manuscripts, you might get a lot of ingested items and not be able to get through them all in the time window you desire. This option gives you the ability to auto archive those ‘expired’ items if required.
Import manuscripts from Semantic Scholar no older than ‘x’ number of days - when auto-ingesting preprints via AI you can specify the maximum age of the preprint. This helps preprint review communities discover the latest preprint materials for review.
'Add new submission' action visible on the Manuscripts page - displays the button to start a manual submission from the Manuscripts page. This is useful for many use cases, it has been used to enable preprint review communities that have automated ingestion of preprints to also add an item manually.
Display action to ‘Select’ manuscripts for review from the Manuscripts page - ‘Select’ is a triaging feature, especially useful in conjunction with bulk imports. It changes the 'label' field to ‘Ready to evaluate’. Filtering and bulk deletion can be used in conjunction with these labels. It is also used for feeding AI selection criteria in some use cases.
Import manuscripts manually using the 'Refresh' action - this will put a ‘Refresh’ button on the Manuscripts page so you can manually start the auto ingestion process.
Control panel
This setting group enables you to configure various items on the Control page.
Display manuscript short ID - each research object has a unique ID given to it by Kotahi. This is an ‘internal’ identifier largely just used so users can discuss or find the item easily. Checking this item will display the relevant manuscript ID on the Control Panel for each research object.
Reviewers can see submitted reviews - set if you wish reviewers to see each others’ reviews. If not checked, reviewers can see only their own review.
Authors can see individual peer reviews - if checked, authors can see the entire review for each reviewer.
Allow authors to participate in proofreading rounds - if checked, editors will be able to assign authors to a round of proofing.
Control pages visible to editors - you can hide various tabs if they are not relevant to your use case.
Submission
There is one item - Allow an author to submit a new version of their manuscript at any time. This setting determines if an author/submitter needs to wait until the beginning of a new review round to submit a new version of their manuscript and metadata, or alternatively, if checked, the author can submit at any time (even mid-review). This has been used by preprint review communities where the review process (Kotahi) and submission system (a preprint server) are decoupled.
Review page
This setting determines whether Reviewers can see the decision/evaluation information.
Production
Settings relevant to the Production page include controls to configure output when using the ‘Reference’ parser.
Publishing
Settings related to some specific publishing endpoints. This may or may not be relevant to you. Essentially, if you are publishing preprint reviews to some external services the way in is via the hypothesis API.
Crossref
API information and controls for accessing Crossref.
Webhook
This section enables you to set a webhook for publishing to an external endpoint.
Publishing webhook URL - the endpoint or target for the publishing action supplied as a URL
Publishing webhook token - the secret token used to authenticate the exchange
Publishing webhook reference - data sent to the target to know how to process the information
Task manager
Here you can set the timezone for the date picker when setting tasks.
Emails
Configuration for the account information through which Kotahi will send emails. Currently, only Gmail is supported. These instructions outline the correct Gmail password to use when configuring your account.
Event notifications
Configuration options for sending email notifications. Each workflow type has supporting events, and the option to assign an email notification template.
*Reviewer rejects an invitation to review - choose from the email templates for the email to be sent to the reviewer when they reject an invitation to review.
Reviewer invitation - set the email to be sent to the reviewer when they are invited to review.
*Submitted review - set the email to be sent to the author when the editor has submitted a decision (accept, revise or reject) .
*Submitted manuscript - choose the email to be sent to the submitter when a research object is submitted.
Author proof assigned invitation - choose this email sent to the author when invited to participate in a round of proofing.
Author proof completed and submitted feedback - choose this email if you wish an editor (editor role assigned) to receive a notification that the author has submitted proofing feedback.
Unread discussion message - choose the email to be read when messages are remaining to be read in a chat for all users.
Immediate Notification for users @mentioned in a message - choose the email template to be sent when a user is @ mentioned in the chat.
*****Currently, only available when using the journal workflow (instance archetype)
Reports
Settings to show or hide the reports page from the menu.
User management
One interesting user setting and a misplaced API key setting
All users are assigned Group Manager and Admin roles - essentially gives you a flat community hierarchy in which all users can access all pages in the menu and see all parts of the process.
Kotahi API tokens
A setting for the Kotahi API to be used by external applications.
COAR Notify
Kotahi can receive messages from COAR's Notify service. Authors can submit a manuscript to a 3rd party server and request a review from a group in Kotahi. Selected server IP addresses can be inserted (as comma-separated variables) and whitelisted - Kotahi can only receive requests from servers that are whitelisted.
A request results in a manuscript being imported and displayed on the Manuscripts page. Manuscripts imported via COAR Notify are identifiable by the Notify logo in the title text.
22
Email Templates
You can view, edit and/or create email notification templates here. All templates appear as options to assign in the event in the Configuration manager, recipients in the Task manager and when sending an ad-hoc Notification.
Group Managers can create a new template or edit an existing template from the Settings>Email page.
Email body content can be personalised using the Handlebars.js variables framework. A set of variables map to select metadata content that is either system-generated (e.g. manuscript id) or captured in a form (e.g. manuscript title).
These initial variables allow for the insertion of text and hyperlinks in the body content of an email notification template e.g. Manuscript titles, sender/recipient usernames, manuscript ids etc.
A list of variables that can be used include:
Manuscript title - \{\{ manuscriptTitle \}\}
Group login link - \{\{\{ loginLink \}\}\}
Sender name - \{\{ senderName \}\}
Recipient name - \{\{ recipientName \}\}
Author name - \{\{ authorName \}\}
*Manuscript link (URL) - \{\{\{ manuscriptLink \}\}\}
Manuscript title link (submission.link) - \{\{\{ manuscriptTitleLink \}\}\}
Manuscript number (shortId) - \{\{ manuscriptNumber \}\}
*This link is adapted based on the receiver's role. If an editor receives an email notification that includes a link to a Manuscript in Kotahi - the link will point to the Control panel. If the recipient is a reviewer, the link will direct the user to the Review page and the author to the Submission page.
Group Managers can manually add a CC from the Emails>Email template>CC field, allowing someone apart from the primary recipient to receive a copy of the email. Selecting the checkbox will CC all editors assigned to a manuscript into the email notification when sent.
23
Language Selection
Select your preferred language from your Profile page.
All interface component language strings are accessible for translation via the backend. You can add a new language or alter a string to personalise your experience e.g. changing the role of ‘Editor’ to ‘Curator’ in all cases where the text appears.
24
☙ The Kotahi CMS ❧
25
Overview
Kotahi offers configurable publication options, including an internal CMS. Content can be published to the CMS, external endpoints, or both.
The Kotahi CMS design follows the principle: ‘Make simple things simple, and complex things possible.’
The CMS interface enables straightforward management of basic websites and content publishing. This simplicity makes routine tasks easy.
However, the CMS also provides tremendous flexibility to customise sites. It can be structured to function as a journal publishing platform, a preprint server, a micropublication repository, a preprint review publisher, or virtually any model required. With some configuration, the Kotahi CMS can handle highly specialised and structured content. Its versatility supports diverse scholarly publishing needs.
The CMS balances simplicity for basic use cases with extensive customisation potential for complex requirements. Teams can start simply and then evolve the CMS as needs grow. This range encapsulates the design principle driving the system. The CMS aims to make simple things simple while enabling complexity when required.
26
Using the CMS Interface
The CMS interface is provided for creating simpler publishing sites easily. You can locate the controls under Settings→CMS. If you choose the first of the items (‘Pages’) below the CMS selector, you will see the following.
Create new pages here and edit them with the editor provided.
To add a new page, click the ‘+’ icon. The page won’t be added to the publishing site until you include it in the menu and choose to publish it. You can publish pages by clicking on the Publish action.
You can fill out the new page title, the ‘stub’ (effectively the URL the page will appear on), and then add the initial content. The editor also supports image insertion.
Layout
Layout of the page is accessed by clicking ‘Layout’ in the CMS menu.
Here you have some basic settings for the brand, uploading a logo, and selecting a primary and secondary color.
Header
In the Header section, you can control the menu. The header section appears on every page. Pages ordered top to bottom are displayed from left to right as links in the header. Only selected pages are displayed when published.
Pages selected to appear in the header section on the publishing site (Flax).
View of published header page links on the publishing site (Flax).
Footer
In the following options, you can configure what appears in the footer, starting with partner logos and associated website link. Footers are displayed on all pages.
Next you can set the footer text.
Lastly you can include links to additional pages in the footer (possibly items not in the topmost menu).
When you press ‘Publish’, the updated settings will be pushed to your publishing site.
Status
This option allows you to hide your publishing endpoint from the web. Your publishing website will only be visible to those who have access to the ‘Draft’ link.
27
Advanced CMS Use
The Kotahi CMS is an Agile Digital Content Platforms (or ACP* for short), better known as 'static website generator' or 'headless CMS'. ACP’s are a game-changing solution. With an ACP, publishers define the logic and organisation of their content using plain text files. This paradigm escapes the 'hard-coded' and predefined logic imposed by a GUI, and allows for enormous flexibility for publishers wanting to tailor their content's structure, design, and functionality.
ACPs are also not new in the publishing world, but usage in this domain is relatively rare. The rarity in publishing is due largely to legacy thinking and narratives from incumbent vendors that are heavily invested in their own technology. Consequently, most publishers think that a traditional CMS is the only way there is to present their content. Not so. The British Medical Journal has used the ACP approach, so has the Getty, and you can also have a look at a recent work by the Louvre made by Coko's ACP - FLAX (built into Kotahi). The scope illustrated by these projects, built by prestigious organizations, should tell you that the ACP approach is mature and mission-ready, as well as giving you some idea of the flexibility of content presentation that can be achieved.
*Agile Digital Content Platform is a term used in this article for the purpose of better explaining this technical category to publishers. Many thanks to Christian Kohl for the name.
How it works
As an example, let's look at the Kotahi CMS developed by Coko for publishing use cases, built on top of 11ty (an approach also adopted by the Getty).
With the Kotahi CMS you edit text files that allow you to define three principle items - your data, your content, and your layout. There is more to it than this, but this idea is central to the design.
By way of example, let's consider creating an 'About' page for a journal. This process involves creating a simple text file as follows:
Let's dig into a brief, lightly technical, explanation. In the file above, the section between the --- lines is known as the front matter. It defines variables (title, description, and last_updated). The content following the front matter is the content of your 'About Us' page.
Alongside the this you would also have a template file which defines a layout for your page:
In this template, the \{\{ title \}\}, \{\{ description \}\}, \{\{ content \}\} , and \{\{ last_updated \}\} parts are placeholders for your data as you already defined in the first file.
The Kotahi CMS interprets the 2 files, processes the variables, applies the templates, and generates static HTML files (HTML files on a server).
For our 'About Us' page, the output would be:
Your users would then see the above HTML rendered as page in their browser.
This is an obviously over-simplified example - there is enormous additional sophistication to be had via API integrations, calling external databases, plugins, Javascript, CSS etc - but it gets across the basic principles.
Core to the paradigm is the idea that you can provide any data you want, and surface it (and your content) in any kind of structure you want, as described using just text files.
Furthermore, because the entire system is defined simply by a bunch of text files, you can expose the directory tree to the user (which contains these files), giving the user full control over the way their content is presented.
Advantages
The use of the Kotahi CMS instead of a traditional CMS provides many advantages:
Independence from CMS constraints: You're not tied to a particular CMS's complex, opinionated, codebase and predetermined constraints.
Flexibility: You have enormous flexibility to define the structure, design, and behavior of your publishing front end.
Ease of Use: Even with its high customisability, only a minimal amount of technical knowledge is required to build your content portal using this approach.
Lightweight and Efficient content delivery: ACPs generate static HTML files, leading to fast-loading pages and enhanced website performance. This is especially beneficial for users with slow internet connections or when your site experiences high traffic. This is also incredibly cheap when it comes to hosting costs as opposed to the hosting costs of a heavy duty CMS.
Publisher autonomy
One further, major, advantage of this approach is that it liberates publishers from dependency on third-party software vendors for altering the CMS's internal logic. Traditionally, such alterations can be costly and time-consuming, leaving publishers at the mercy of software vendors. Particularly with proprietary software vendors, publishers have limited options but to request or pay for changes. Even when successful, the process of incorporating those changes is often protracted, as the vendor has to modify their code base's internal logic to accommodate the publisher's requirements.
In contrast,the Kotahi CMS allows publishers to collaborate with any technician - be it an in-house staff member or a local web developer to make these changes by simply editing text files. The required skill set falls within the web development realm, which is a more accessible and cost-effective field compared to traditional programming.
In essence, this approach provides publishers with an escape route from vendor lock-in, granting you greater autonomy and flexibility in managing and customising your content.
Getting Stuck In
You can access the article CSS and template from the CMS>Article Template page.
To move ahead with advanced Kotahi CMS use it is best to join the support channel at Coko and start talking to the folks there.
28
☙ Production ❧
29
Using the Production Page
The Kotahi Production interface is designed to radically reduce the cost and time for producing various formats such as HTML, PDF and JATS (XML). It can also be used for author proofing.
The interface is simple but powerful. In the production editor, you will see the manuscript displayed. This is entirely editable. On the right we see a download dropdown menu.
From this dropdown menu, you can select PDF, JATS and HTML. PDF is generated using Paged.js (see documentation). JATS is created automatically by Kotahi and validated. HTML comes straight from the content displayed in the editor.
If you wish to improve the granularity of the JATS files you produce, you can use the tools on the left menu (see JATS documentation in this manual).
You can also access the PDF (Pagedjs) editor, which can be used to alter the CSS or template before exporting to PDF. Although accessed at the manus cript level, changes here will reflect all manuscripts exported as aPDF.
30
Using the Automated Citation Tools
When using the production interface, the team can check the citations and improve them with the assistance of Kotahi’s automated citation tools.
To access these tools, view the research object in the production interface (linked from the Manuscripts page) and scroll down to the reference list.
On the left, you will see a reference tool:
Select an item in the references and then click on this reference tool. You will see a menu appear to the right of the reference.
Clicking on one of these icons will display an overlay.
Here you see a list of possible citations based on the information in the original citation. The recommended citations come from a variety of sources (more can be added). Native to Kotahi 2.0 are AnyStyle and Crossref sources.
You can now choose one of the citations displayed (these also conform to the citation format set in the Kotahi system settings).
You can also select one of these citations and click ‘edit’ and a further box will display for editing that selection.
This service relies on 3rd party APIs to generate results. These services may be disrupted from time to time. You may need to re-run imports if this service does not generate results as expected.
Settings to change the citation style and other related controls are located in the Configuration→Production section.
31
Producing JATS
JATS is the Journal Article Tagging Suite. It is an XML format used to describe a journal article.
Creating XML is usually done via inhouse technical staff or outsourced to a publishing vendor. This generally increases the costs for processing articles and slows down the time to publish.
Kotahi has inbuilt tools that enable you to create high fidelity JATS output at the press of a button and with no technical expertise.
The production editor includes features related to creating JATS.
The user requires no prior knowledge of JATS or XML to prepare the document for JATS export. The interface simply requires the user to highlight parts of the document and choose what type of content that selection contains from the tools in the left menu. This is very much a drag-and-drop and point-and-click exercise. No messy editing of XML required.
The Production editor then marks the underlying format (HTML) in such a way that Kotahi can map these tags to JATS at export time.
The following annotations can be applied in the Production editor;
Front matter - Abstract, Funding group, Funding source, Award ID, Funding statement, Keyword list and Keyword.
Back matter - Appendix, Acknowledgements, Glossary Section, Glossary term, Reference list and Reference (parser).
32
Producing PDF
Kotahi 2.2 introduces a streamlined PDF production interface. With the default template, generating a polished PDF is as easy as a single click.
Yet Kotahi also provides sophisticated customization tools for full control over the final PDF's look and feel. While primarily designed for publishing journal articles on the Kotahi CMS, the PDF can be hosted anywhere and the tools enable creating PDFs out of any combination of data, manuscripts, and evaluations.
This chapter explains how to leverage Kotahi's flexibility. It covers creating article PDFs step-by-step, from simple defaults to elaborate custom designs. Whether you need a basic article download or a complex tailored layout, Kotahi equips you to produce the PDF you envision.
PagedJS
To understand Kotahi’s PDF production, it helps to know the underlying process. Articles are stored internally as HTML. To generate print-quality PDFs, Kotahi utilizes the open-source Paged.js engine (https://www.pagedjs.org/).
Developed by Coko for typographic control, Paged.js applies CSS styling and typesetting logic to paginate HTML content into PDF.
Kotahi PDF customization boils down to creating a HTML template and adjusting CSS styling rules. This enables independent and granular control over page dimensions, typography, colors, layout elements, and more prior to output. From a high level the process looks like this:
For full docmentation on the CSS rules that can be used to control the struture, look, and feel of the PDF using PagedJS please see the PagedJS documentation (https://pagedjs.org/documentation/).
The Production Interface Tabs
You will see several tabs in the Production Interface (Kotahi 2.2 and later).
Kotahi’s PDF production interface contains several tabs:
Editor - The content editing environment for writing, structuring articles, managing images/media, enabling citations, and producing JATS XML.
PagedJS CSS - A dedicated CSS editor for fine-tuning visual styles like colors, fonts, alignments applied to the PDF content. The CSS also controls PDF page elements like page numbers etc.
PagedJS HTML Template - The template used for creating the HTML that will in turn be used by PagedJS to create PDF.
PagedJS Template Assets - Storage for all supporting assets like logos, images, and custom fonts to include in the PDF.
PagedJS Metadata - Shortcodes referencing data from the Kotahi system to dynamically pull into the PDF, like publication date, ethical declarations, authors, publisher etc.
Together these tools provide end-to-end control over the PDF output - from editing content with supporting assets, to structuring the document format, styling and customizing the visual presentation as PDF, and injecting dynamic article data elements.
To effectively leverage Kotahi's PDF engine, four key points to understand are:
The PagedJS HTML Template acts as the overarching blueprint dictating the structure and arrangement of all PDF content.
The template can mix static content with variables pulling dynamic article data from Kotahi's database through PagedJS Metadata shortcodes.
The linked PagedJS CSS provides precise control over styling and typographic treatments applied to template contents when generating the PDF.
Together, the HTML template handles content while the CSS controls visual presentation and style - in combination they allow crafting polished, customizable PDF layouts.
With this foundation established, the production flow is:
A) Arrange content blocks in the HTML template
B) Use PagedJS Metadata to inject dynamic article data
C) Style and refine visual design through cascading CSS
D) Export to PDF
If you understand these key points and high level process, you understand a lot.
Making a Template
Templates can be made using the PagedJS HTML Template tab.
Kotahi includes a default PagedJS HTML Template demonstrating best practices for structuring PDF-destined content. When first accessing the template editor, this pre-loaded template serves both as a starting point for modification and a functional example for dissecting key features.
As the foundation driving PDF rendering, scrutinizing the default template lends vital insight into creating optimized templates from scratch. It illustrates conventions for employing:
Metadata shortcodes to incorporate dynamic article data
Modular components to manage distinct content blocks
Structural HTML elements like headers, paragraphs, and divisions
Styles for custom CSS treatments
Lets walk through an example template from head to toe and point out some of the important features as we go.
The templating language used in Kotahi is Nunjucks. It’s easy to understand and edit, and yet, it’s still capable of complex manipulations, loops and filters to generate the content in every way needed.
Head
The head of template contains information that is typical for a HTML page. The lang property will define the language used for typesetting engines hyphenation and character encoding.
Loading Scripts
Since we’re using Paged.js server side rendering, the existing scripts in the head tag will not be used. Instead, to load custom Paged.js scripts in Kotahi, you need to add them as external assets. Kotahi will try to use any file with a .js extension from the asset panel. Those script will then run when you’ll download the pdf.
You can experiment with all kinds of scripts (for example a Q-code generator) and we recommend reading the PagedJS documentation on how to do this. You can find everything about hooks and custom javascript for paged.js here: https://pagedjs.org/documentation/10-handlers-hooks-and-custom-javascript/
Linking External Assets
The head is the place to add link to custom fonts that exist in the Template Asset tab, or link to external stylesheets or custom fonts to make them available when the PDF generation will happen. There is no need to preload any images in the HTML, as Paged.js will generate the PDF only after loading all images.
Careful script and link management in the head are vital first steps in crafting fully-functional templates.
Body
The body information is where the content is layed out in the template:
You can see here how HTML elements and template variables are combined to lay the content out in the template. You can see this clearly in this simple example:
In this example you can see a paragraph tag (
) with an id used by the CSS for styling. Inbetween the P tags we see a template shortcode which draws in data from the Kotahi database. In this case, the variable is pulling in the name of the Journal that publishes the article.
In the following example you can see how the source of the article itself is brought into the template:
There is also conditional logic in some of the lines using variables:
PagedJS Metadata
The Metadata tab lists all the data you can pull into the template using shortcodes:
The list of items on the left of the page is the actual shortcode you need to use. Clicking the page icon wiht the ‘+’ will copy the shortcode to the clipboard that you can copy and paste into the template.
PagedJS Template Assets
You can upload assets you wish to use in the template via the assets tab.
In this tab you can upload any kind of assets but the three main types are:
Images - images such as logos or partner logos etc can be uploaded to the asset interface.
Fonts - any fonts you wish to be used for rendering the PDF should be uploaded here.
Batch uploading of assets is possible.
All items listed can be easily included into the template by clicking on the appropriate ‘Copy’ link. This will copy to the clipboard the appropriate information to paste into the template.
PagedJS CSS
The PagedJS CSS tab is where you can edit the CSS:
To know how to write this CSS first read the defaults to get an understanding and then also consult the PagedJS documentation.
Add your OpenAI credentials on the Configuration>Integrations and Publishing Endpoints>OpenAI access key to activate the service.
You also have controls to display content (left column), PDF preview (right column).
In the lefthand column; select an area (element) by clicking on the screen.
Insert a prompt into the AI chat editor...
and see the result.
33
☙ How to Guides ❧
34
Making a Manual Submission
Both Manual and Automated Submissions can be made in Kotahi. This chapter covers manual submissions, please also see the appropriate section on Automated Submissions.
Manual Submissions are made from your Dashboard.
When you click the ‘+ New Submission’ button you will be presented with a new screen:
There are two basic methods to create a submission:
Upload Manuscript - by clicking ‘+Upload Manuscript’ you can choose a research object to upload. The types of filetype accepted depends on the configuration of your group.
Submit a URL instead - by clicking on this you can simply add a URL as a submission (good for preprint reviews or submitting dynamic notebooks, code repositories, online data sets etc)
Upload manuscript
There are two major categories for Upload Manuscript:
Selecting a docx - in this case, the MS Word file is ingested into Kotahi and can be viewed and edited in the manuscript editor.
Selecting another filetype - in this case, the manuscript is treated as an attachment.
Entering submission data
After you have uploaded a manuscript (or provided a link) you will be automatically redirected to the Submission page:
Note, the page displayed in this image is an example and may differ from how your Submission page looks.
You can now enter data to fill out the submission form. It is also possible to toggle between the manuscript and the submission data by clicking on the tabs ‘Edit Submission info’ and ‘Manuscript text’).
When you have entered all the data press ‘Submit your research object’. You may be prompted to complete a Terms & Conditions/disclaimer before submitting.
35
Reviewing
If you have been invited to review, you will have received an email.
The actual text of your email may differ from the above. The email invitation includes a link to accept the invitation and a link to reject the invitation.
If you choose to accept, then you will be asked to login and redirected to your Dashboard. In the ‘To Review’ tab you will see your item for review:
Clicking Do Review on the right will take you to the reviewing page for the item:
The page will differ depending on how your version of Kotahi has been configured. You will see the following pages:
Metadata - displays all submission form data shared with reviewers.
Manuscript - displays content that has been converted from a Word document submission
Review - your (reviewers) review form.
Other Reviews - any submitted reviews that have been ‘Shared’ by the editor.
Scrolling down will display all the relevant data.
Again, the review form is entirely configurable so you will probably see something different to what is displayed in this image.
You may now complete the review form and submit your review. If you have not completed the review, you may come back to it at a later date and the content of your partial form will persist across sessions.
Depending on how Kotahi has been configured for you, you may be able to upload a PDF or other file that contains your review.
36
☙ Thinking about Workflow ❧
37
Technology Supporting People
Kotahi's core design principle is that technology should support people and processes, not that people should serve technology. The platform aims to provide adaptable infrastructure for configuring publishing operations while giving users control to optimise over time.
This means Kotahi supports both streamlining established operations and experimenting with innovative models. Teams can use Kotahi to make existing procedures more efficient and pilot progressive ideas in parallel.
Easy reconfiguration of components like tasks, forms, and decision screens makes iterating processes seamless. Teams can continuously adapt approaches based on data and feedback.
With sandboxed multitenancy, Kotahi encourages trying new workflows with minimal risks. Fresh concepts can be tested without disrupting current operations.
At its core, Kotahi recognises publishing processes should be led by your needs not ‘how technology works’.
38
Understand Your Workflow
At a high level, many scholarly workflows follow a similar path - a research object is submitted, reviewed, improved, and shared. However, when examining the specifics, workflows that appear identical on the surface often diverge in their details. For example, while two projects may both conduct open peer review, one may rely on assigned editors while the other utilizes a flat (or flat-ish) community model. Or while two preprint review projects both automatically ingest submissions, their triage processes may differ significantly.
It's common for teams to state their needs are "quite simple" or their workflows are "pretty standard." But frequently, drilling down reveals unique requirements in submission steps, review processes, content types, and more. Standardized stages like "submit, review, improve, share" manifest differently across diverse fields and models. Assumptions of simplicity can obscure the intricacies involved in scholarly communication.
Thus it's important to resist perceived commonality and invest time to uncover granular needs. Workflow innovations often emerge from those subtleties. While patterns exist at a high level, the "magic" lies in the details.
The following is a self-help guide for understanding your current (if it exists) workflow and your ideal workflow.
Step 1: Understand the current workflow - this is necessary to generate an understanding of what you are actually doing right now. This step needs to drill down into the nitty-gritty of the daily workflow so you can get a complete picture of what actually happens ‘on the floor’. High-level executive summaries are not what we are after. We need to know what actually happens.
Without understanding exactly what you are doing now, improving what you do will be based on false assumptions. As poet Suzy Kassem has said:
“Assumptions are quick exits for lazy minds that like to graze out in the fields without bother.”
When examining workflow we need to bother people. To ask hard questions and get to the bottom of things. I’ve often heard folks say they know their workflow or that someone within their organisation knows the workflow. But after asking a lot of exploratory questions I inevitably find that no one person understands exactly what happens at all stages of the workflow. Consequently, understanding your current workflow, to the granularity required to move to the next steps, requires a process in itself. But we will discuss this in more detail in the next article.
However, Step 1, while important (and important to get right), is just prep for the most critical step of the entire process:
Step 2: Optimise the workflow - optimising the workflow is what every publishing technology project should aim to do. If you don’t optimise the workflow, if you haven’t improved what you do, then what have you achieved? It would make sense then, to prioritise thinking about improving workflow before you start to think about technology.
Optimising the workflow is, in itself, a design problem and requires dedicated effort. Unfortunately this step is often skipped or paid only a passing tribute. Conflating steps 2 and 3, for example, is typical of the popular publishing RFP (Request for Proposals) process (see https://upstream.force11.org/can‑we‑do‑away‑with‑rfps/) :
Understand the current (or speculative) workflow.
Design technology to enable the workflow,
Build (or choose) a new technology (optional).
An RFP process may be motivated by a few big ticket items that may need improving (or licensing issues as per above), but often lacks a comprehensive design process aimed at optimising the workflow. Instead, technology is chosen because it fulfills the requirements of the current workflow audit (Step 1) with a few possible fixes - this is because most RFP processes focus on updating technology rather than improving publishing processes. Consequently there are minimal, if any, workflow gains and a failed opportunity to identify many optimisations that can deeply affect a good technology choice and improve how you publish.
To avoid these problems and to improve how you publish, it is really necessary to focus dedicated design effort to optimising workflow.
The kind of process I’m talking about was once brilliantly described by Martin Thompson (Australian Network for Art and Technology) a long time ago. Martin was explaining the principles of video compression for streaming media, but the principles can be applied to workflow optimisation. Imagine a plastic bag full of air with an object in it (let’s say a book). The air represents all the time and effort required to produce that book. Now suck out the air, and we see the bag and book remain the same but the volume of air has reduced. We have reduced the effort and time to produce the book, while the book remains unchanged.
This is a simple but clear metaphor for what we are trying to achieve. In summary, optimising workflow is about saving time and effort while not compromising the end product.
Workflow optimisation requires an examination of every stage of the process (as discovered in step 1 of our workflow-first process) and asking if that stage can be improved or eliminated. We are also asking some other questions such as -
Can anything be improved to help later stages be more efficient?
Are there ‘eddies’ in a workflow that can be fixed?
Can operations occur concurrently rather than sequentially?
When asking these questions, we will discover many efficiencies and we can slowly start drawing out a complete improved workflow. Some steps will disappear, some will be improved by mildly altering the order of operations, others will be improved by small tweaks. Some changes are more significant and may require greater change.
Once we have been through every stage looking for efficiencies, once we have our complete and optimised workflow, we are ready to start thinking about what we need to enable these changes. Technology may be part of the answer, but it is never the only answer, and in some cases it is not the answer at all. If we do decide new technology is required then only now should we start on the path to designing or choosing the tools to support our optimised workflow.
39
Workflow Notation
The most effective way to describe workflow is through a numbered list of who and what for each step, using WorkFlow MarkUp (WFMU).
There is no need to have complex flow diagrams and extended narratives - most of the time, these do not add clarity and sometimes mystify.
The three elements of WFMU are:
Who - usually the role of a team member or group (eg author, or editor). We use the naming convention of the host organisation for the role names. In some cases, the ‘who’ is an automation ‘role’ and refers to a machine (computer/s).
What - usually a single verb that describes what actually happens (eg review’, or ‘write’ etc).
The third part of documenting each step - When - is usually understood simply by the position in the numbered list.
An entire publishing process can be described in WFMU. Here is a short example:
Author creates a new Submission
Author completes Submission
Author Submits
Editor reviews Submission
Editor invites Reviewers
Reviewers accept (or reject) the invitation
Reviewers write reviews
Reviewers submit reviews
Editor reads reviews
Editor writes decision 1. If accept → publish (go to 15) 2. If revise → Author revises, return to (5)
Documenting workflow like this is straightforward to create and easy to read.
WFMU enables us to easily identify where problems exist. For example, if we saw this:
Editor reviews Submission
Editor invites Reviewers
Reviewers accept the invitations (or reject)
Editor considers a possible desk rejection
We can easily see a problem – we have just spent a lot of time inviting reviewers for a submission (Step 5) that might be rejected (Step 7) before reviews are written. These kinds of problems are not uncommon and are clearly exposed with WFMU.
Conditional Logic
As you can see from the above example, we can easily capture conditional logic by using nested bullets and conditional statements eg:
Editor writes decision
1. If accept → publish (go to 15)
2. If revise → Author revises, return to (5)
Documenting Automation
Automation can also be described using WFMU, for exam
Author Submits
System checks document validity
If all passes -> create workspace
If fail -> generate report for Author
Note: When designing new or optimised workflows that involve automation, we must avoid magical thinking. To this end, it is good to have trusted technicians in the room to help the group understand the promise of technology.
40
Workflow Sprints
A Workflow Sprint is a fast and efficient methodology for organisations to understand and optimise their publishing workflows before making technology choices.
This process was designed after observing some common mistakes:
investing in slow and costly general requirements research
looking at workflows mainly through a technology lens
Understanding and improving workflows need not be lengthy or expensive. Traditional processes like interviewing staff and producing large narrative reports are slow, expensive and often lack clarity.
In contrast, Workflow Sprints produce clear outputs in days, not months. The Sprint first investigates current workflows and then defines optimised ones. With these results, organisations can make informed technology decisions.
Coko designed this process and we facilitate Workflow Sprints, we are also documenting them here in case you wish to try them yourself.
Principles of Workflow Sprints
There are some fundamental principles of Workflow Sprints:
Principle 1: Invite operational stakeholders
The best people for describing an existing (or speculative) workflow and optimising that workflow are the people actually doing the work now - your team (operational stakeholders).
Principle 2: Group discussion is essential
Group discussion involving the operational stakeholders is the most effective way to understand and optimise workflow. Having these experts in the same room eliminates guesswork and team members can drill down into an issue together in quick time to tease out the fidelity needed.
Principle 3: Facilitation is key
Experienced facilitation conducted by someone external to your organisation is critical for keeping the momentum going and managing any potential and problematic team dynamics.
Principle 4: Keep the documentation light
If the documentation of the workflow is not something decision makers can easily grasp, then you are doing it wrong. Use Workflow MarkUp (WFMU - see documentation) to aid in expediting the documentation process while producing clear, human-readable documents.
Now that we have the principles covered, let’s take a brief look at what a Workflow Sprint actually looks like.
What does a Workflow Sprint look like?
Photos included are from actual Workflow Sprints (arXiv, Open Education Network, Ravenspace, Érudit, Organisation for Human Brain Mapping, Wormbase/Micropublications.org).
Sprinting with arXiv
A Workflow Sprint is a facilitated, structured conversation between the organisation’s primary stakeholders. The stakeholder group should comprise those people that are part of the current workflow (constituting all parts of the workflow) and decision makers.
Wormbase Workflow Sprint
Operational stakeholders are the people who do the work. These are the most important people to have involved because they are the ones that understand what is done, on the floor, at this time. Sometimes, if automation is involved, a trusted technician that knows the limits and possibilities of publishing technology might be useful. No Workflow Sprint can occur without operational stakeholders.
Open Education Network Workflow Sprint
Strategic stakeholders are the organisation’s decision makers. The decision makers may, or may not be part of the process, however, they will certainly utilise the outcomes to guide them in making decisions going forward. It can be a good idea to include strategic stakeholders to build internal buy-in.
Open Education Network Workflow Sprint
The Workflow Sprint draws these two types of stakeholders together in a series of remote or realspace sessions. If held in realspace the event can occur over one day. For remote events (which we have found to be more fatiguing), the Sprint should be broken down into multiple shorter sessions over several days.
Érudit Workflow Sprint
The facilitator guides the group through a process designed specifically for your organisation. The steps usually include (discussed in more detail below):
Introductions
High-level description of the goal
High-level discussion
Documentation of the existing workflow
Open discussion
Designing an optimal workflow
Report (optional)
Each phase of the above process should be fun and characterised by a high level of engagement from the team.
Érudit Workflow Sprint
Simple tools such as whiteboards (or ‘virtual whiteboards’ if remote), large sheets of paper, and markers are often used to draw out existing workflow processes or future workflow ideas.
Ravenspace Workflow Sprint
Workflow Sprints are fun, efficient, cost-effective, and fast. The process is a good way to generate additional internal buy-in for a project and to quickly help everyone understand the broader goals and challenges.
Wormbase Workflow Sprint
We have found that Workflow Sprints are also extremely effective team-building events. If held in realspace, we advocate good food and coffee! If done remotely, we sometimes include some less formal moments to help people relax and get into the flow of the event.
Aperture Neuro Workflow Sprin
Now let’s look at the process in more detail. The following is not comprehensive, but it should give you a good starting point. If you want to drill down further into the process, feel free to contact me.
Speculative vs extractive Workflow Sprints
Before we get started, a quick word about two types of Workflow Sprints already hinted at throughout this document. The two types are:
Speculative - Speculative Workflow Sprints imagine new workflows. Typically new entrants or start ups require speculative Sprints. Inevitably the speculative variety can reveal a lot of contradictory requirements and ‘blurry vision’ that need to be discussed and examined in detail. Sometimes, the outcomes may also lead to compromises the stakeholders may find difficult to accept. Consequently, Speculative Workflow Sprints often take longer and require a higher degree of expert facilitation.
Extractive - Extractive Workflow Sprints start by examining a known (existing) workflow. Generally speaking, these descriptive processes are easier to facilitate and quicker to document.
Realspace vs Remote
A word regarding remote vs realspace events. In-person Sprint processes are definitely more effective and quicker. Remote Sprints are possible, however, the dynamics and format change somewhat. Documentation for remote events is usually done with shared virtual whiteboards, and the process is usually split into several shorter events spread over a number of days.
Hybrid Workflow Sprints (a mix of virtual and in-person participants) are also possible but are harder still, mainly due to the fact that the tools used for documentation are necessarily different, which makes it harder to share ideas across a team split between real and virtual spaces.
The team
When hosting a Workflow Sprint, the first question you need to answer is - who do I invite? There is a simple rule - invite enough operational stakeholders to have every part of the workflow covered. Having strategic stakeholders may be (not always) a good idea, but do keep in mind the more people involved that don’t do the work ‘on the floor’ the longer the process will take. Having said that, strategic stakeholders stand to learn a lot during the process if they participate.
In the case of ‘speculative’ (new) workflows, you need to gather the people with the vision and some folks that know about the kind of work you have in mind.
The space
If the Sprint is held in realspace, it is good to have a single table that can seat everyone involved. In addition, break-out spaces with enough whiteboards or paper and markers to go around are necessary. Post-it notes are welcome but not required.
Facilitation
It is very important to have a neutral facilitator. The facilitator needs to ask hard, bothersome questions, and consequently it is much easier to do this if the facilitator is not subject to internal power dynamics and existing interpersonal relationships. In addition, the facilitator must:
Facilitate conversations - the facilitator must hold the space for the group to come together and share their knowledge and ideas.
Manage the process - the facilitator must keep the process moving forward.
Balance group dynamics - the facilitator constantly reads the group, pre-empting obstacles to collaboration and productivity and adapting the strategy accordingly.
Facilitation is a deep art and there is way too much to go into here (yet another thesis…). However we strongly advise hiring (us!) an experienced facilitator from outside your organisation.
The steps
As mentioned above, the process generally follows a similar pattern but should be adapted before or during the event if necessary:
Introductions
Quick introductions of everyone in the room.
High-level description of the goal
The facilitator outlines what the group is trying to achieve and, in quick detail, describes the Workflow Sprint process. A strategic stakeholder may be introduced to give a 5-minute validation of why the group is gathered.
High-level discussion
It is always necessary to start with a very high-level discussion about the workflow and what the group is trying to achieve together. In general, the Workflow Sprint process starts with a very wide (sometimes meandering) conversation and very quickly begins to focus on specifics.
Documentation of the existing workflow
If the group is large, the facilitator may break it down into smaller groups to drill down into specific parts of the workflow. Each group will then present their documentation back to the larger group. At the completion of this process, workflow should be documented in its entirety in front of the entire group (using whiteboards or large pieces of paper or shared virtual whiteboards if working remotely). Documenting with everyone present helps validate the workflow and ensures any vagueness or ‘gotchas’ are caught.
Open Discussion
A general discussion on what people think about the existing workflow. It is good to allow this to slip into a little brainstorming in anticipation of the next step.
Designing an optimal workflow
The facilitator generally breaks the team into smaller groups. Each group chooses some part of the workflow (or the entire workflow) they wish to re-imagine. Documentation is often captured with drawings (there is no preferred format - let each group decide). Each smaller group’s work is presented back to the entire group and discussed. From this, the facilitator can document (also in front of the entire team) a proposed optimised workflow.
Report
Generally, the facilitator will take all the documentation and distill it into a short report. Documentation of the outcomes usually uses workflow notation (see below) as well as pictures of all the artifacts created during the event. The facilitator generally adds further information to tease out some questions for the organisation to consider (contradictions/compromises etc).
What are the outcomes of a Workflow Sprint?
There are two direct outcomes of a Workflow Sprint:
Documentation of the existing workflow - a description of your workflow as it exists now.
Documentation of the optimised workflow - a description of the ideal, optimised, workflow.
In addition, depending on how much your facilitator understands about publishing, they may wish to generate a third outcome: a report - a report with the above two items plus narrative about the realities of achieving the optimised workflow and any other issues that may need to be considered.
From this report, the organisation should be in a very good position to consider technology options. A publisher can now do a gap analysis to evaluate existing solutions or start the design process to build new technology.
41
Implementing Kotahi in a Lean, Iterative Fashion
Kotahi provides extensive versatility to model diverse workflows through its configurable roles, forms, tasks, and review systems. However, fully customizing a complex platform can seem daunting. Here is guidance on rolling out Kotahi incrementally by blending workflow design concepts with lean development principles:
Start by Focusing on One Usecase
Don't try to "boil the ocean" upfront. Focus your initial implementation on the primary or easiest use case. Get one core workflow fully operational before expanding scope.
Focus on Workflow First
Start by modeling your first optimal use case (as above) and workflow, independent of technology constraints. Use techniques like workflow mapping and sprints. Define key roles, content flows, and bottlenecks to address.
Deploy in Small Batches
Map the conceptual workflow to Kotahi in stages, starting with a minimal viable product. For example, first focus on getting base submission and review forms operational.
Gather User Feedback
After each incremental deployment, solicit user feedback through direct discussion. Identify pain points and opportunities.
Continuously Improve
Utilize feedback to rapidly iterate improvements aligned with the workflow vision. Add features, enhance forms, modify configurations etc. in small batches.
Foster Collaboration
Facilitate open communication with your users throughout the process. If possible, form a cross-functional team empowered to collaboratively guide the rollout.
By blending workflow design with lean, collaborative development practices, Kotahi can be implemented iteratively at a sustainable pace. The focus is on incrementally enhancing real-world operations through participatory prototyping and user-centered improvement. With this adaptive approach, the full benefits of Kotahi’s versatility can be realized over time.
42
Kotahi Setup Checklist
There are essentially two phases for setting up Kotahi. The first involves planning, the second is implementation.
Planning
☐ Understand what type of object you wish to process and publish and document it’s attributes (what kind of data).
☐ Plan your workflows - Map out your team's current or ideal workflows using workflow notation.
☐ Document your Submission, Decision, and Review forms.
☐ Understand the structure of your publishing end point(s), what you are sharing and where.
☐ Gather or create your branding materials (colors, logos etc)
Implementation
☐ Install Kotahi - Get a Kotahi instance running yourself or pay a service provider to do it.
☐ Brand Kotahi - Customize the look, feel from the System Settings.
☐ Configure system settings - Set up core parameters like notifications, crossref integrations etc.
☐ Build submission forms - Construct customized forms to capture metadata from authors.
☐ Design review forms - Create tailored forms to collect feedback from reviewers.
☐ Model tasks - Configure task templates to define workflow steps.
☐ Customise PDF - Configure PDF to your inhouse designed (if required).
☐ Customise CMS - Customise the Kotahi CMS or integrate with an external CMS.
☐ Invite intital users - Onboard team members by sending invitation emails to create accounts.
☐ Run tests - Validate workflows, forms, and integrations function as intended.
☐ Go live - Flip the switch to activate for real-world usage!
☐ Gather feedback - Continuously collect user feedback to drive improvements.
☐ Iterate and optimize - Use feedback to rapidly iterate and enhance workflows over time.
43
☙ For the Techies ❧
44
General Technical Information
Kotahi is an open source publishing platform built using modern JavaScript technologies.
Publishing is stuck. Legacy organisations are wedded to outdated models, employing rigid processes on antiquated software. This yields expensive, sluggish, and wasteful systems that are stunting better ways of sharing knowledge. Dominant structures and inflexible conventions have stalled attempts to improve publishing, as core power centres remain entrenched and change stays superficial.
But while the current implementation is broken, there is value in what publishing is trying to achieve - to create, refine, and share knowledge. We must reconnect to this core purpose and revisit how we achieve it.
The path forward starts with re-envisioning publishing from its foundations.
At Coko, our focus is on developing the fundamental building blocks enabling publishing to be reimagined in this way. We are constructing core open infrastructure, tools and platforms - aligned with publishing's true purpose of advancing collective knowledge. With this open infrastructure in place, pioneering new publishing models become possible.
From this position of collective power, we envision a boundless future for publishing, where bold new models emerge through open collaboration. A future transformed by radical openness, where minds connect across organisations to co-create, innovate, and progress together.
In this open ecosystem, cross-functional teams seamlessly collaborate—powered by needs and human-centric technologies, not legacy conventions and obsolete systems. The boundaries between creators and publishers dissolve, as they merge together in the service of knowledge creation—not antiquated organisational structures.
Through open collaboration, knowledge becomes more accessible, more representative, more meaningful. Timelines accelerate, costs plummet, and errors disappear as capabilities expand continuously.
Guided by our core values of trust, openness and collective empowerment, we must reimagine publishing from the ground up together. Our shared responsibility is to pioneer these new workflows, technologies, and models that unlock publishing's immense collaborative potential.
Not simply improving publishing, but redefining it.
This is publishing's collaborative future. This is Coko’s journey.
We advocate for the adoption of open web formats throughout the publishing workflow. Open web formats (eg, HTML, JSON, CSV) should be embraced as core publishing formats. They enable publishing on the world's largest collaborative platform - the web.
Enable multi-modal content
Enable real-time collaboration
Proliferation of format conversion options
Support progressive structuring
Enable single source publishing
We advocate for Single Source systems. By using one content source across authoring and production, Single Source systems enable seamless collaboration, reduce handoffs, eliminate conversions, condense timelines, and connect workflows.
Use open web formats throughout the process
Connect content creation and production
Enable concurrent workflows
Allows real-time collaboration
Reduce handoffs between teams
Lower costs by eliminating conversions
Condense overall timelines
Promote synchronous operations
Reduce errors by minimising versions
Adapt to future needs
Publishing has become unnecessarily complex. The current fragmented systems result in disconnected teams, wasted effort, and preventable errors.
Publishing is a process, not an organisation. Publishing should focus on needs, not be constrained by existing organisational structures.
The boundaries between authors and publishers must dissolve. We must move past artificially separated systems and embrace collaborative creation and dissemination.
New, open processes require new, Open Source technologies. To reimagine publishing, innovative workflows require empowering new technologies.
Collaboration, concurrency, and communication are essential. By integrating real-time teamwork into systems, we can break down silos, work in parallel, condense timelines, and reduce costs.
Deep collaboration changes everything. Deepening collaboration transforms structures, flattening hierarchies, decentralising leadership, and shifting to collective ownership and integrated teamwork.
Publishers must embrace facilitative leadership. Facilitation unlocks collective potential as dominance gives way to inclusion, silos are replaced by openness, and individual agendas dissolve into shared purpose. The end result is empowered teams, accelerated workflows, and publishing that truly serves its community.
Systems should be designed with open, cross-functional spaces. Cross-functional digital spaces allow teams to collaborate without boundaries. Hardcoded workflows construct gated paths that inhibit emergent teamwork.
Open source tools reduce the barrier to entry for innovators. Open source software, when developed professionally, can provide high quality, innovative, systems at lower costs by sharing efforts across organisations.
AnyStyle - An open source citation parsing tool that identifies reference strings and matches them to citation metadata. Developed by Coko.
API - Application Programming Interface. Enables software to exchange data and interact with Kotahi programmatically.
Archetype - A predefined configuration or template for workflows and publishing models in Kotahi.
Automatic ingestion - The automated importing of content into a system. Kotahi can be configured to automatically ingest manuscripts from sources like preprint servers.
arXiv - A popular preprint repository used across many scientific disciplines.
bioRxiv - A preprint repository for biology, operated by Cold Spring Harbor Laboratory.
Collaborative review - Multiple reviewers work together, either openly or anonymously, to provide a consolidated set of feedback.
Community review - Self-organisation of reviewers from the community, often used for post-publication review of preprints.
Coko - A non-profit building open source publishing infrastructure to enable new models of research communication.
Cokoserver - An open source workflow server by Coko that integrates tools and manages publishing operations.
Containers - A standardised unit of software encapsulating code and dependencies. Kotahi uses Docker containers.
Concurrency - The execution of multiple tasks or processes at the same time. In publishing, it refers to authors, editors, designers, etc. working on a project simultaneously.
Crossref - A nonprofit collaborative reference linking service that provides persistent identifiers (DOIs) for scholarly research.
Curation - the process of selecting, organising, and presenting content to enhance its value, context, and accessibility for specific audiences.
Deployment - The process of installing, configuring, and running an application like Kotahi on servers to make it available for use.
Docker - An open platform for developing, shipping, and running applications using containers. Used to package and deploy Kotahi's microservices.
DOI (Digital Object Identifier) - A unique persistent identifier for digital objects like journal articles. Provided by identification systems like Crossref.
Downconversion - Converting a structured document format to a less structured one, usually involving some loss of information. E.g. HTML to plain text.
Double-blind review - The identities of both authors and reviewers are concealed from each other throughout the review process.
Evaluation - The process of assessing a manuscript or preprint submission through peer review and editorial decision-making.
Express.js - A lightweight Node.js web application framework used in Kotahi for routing, middleware, and APIs.
FLAX - An open source static site generator and publishing framework developed by Coko, built on 11ty. FLAX is integrated into Kotahi.
Form builder - A tool for creating customised forms to collect submission metadata in Kotahi. Enables optimising submission workflows.
Fragmented Publishing Process (FPP) - A disjointed publishing process involving different teams, tools, and file formats between the content creation and production stages.
Git - A distributed version control system for tracking code changes. Kotahi uses GitLab for repository management.
Group - In Kotahi, an isolated publishing community like a journal, preprint server, or review collection. Groups act as independent tenants.
Instance - A single installed copy of the Kotahi software. Can contain multiple groups running independently.
JATS (Journal Article Tag Suite) - An XML-based standard format for structuring and encoding scholarly journal articles to enable archiving, exchange, and preservation.
JavaScript - A programming language commonly used for web development. Kotahi is built primarily using JavaScript technologies.
Manuscript - A written document containing research findings submitted for publication in a journal.
Metadata - Data about a publication, like title, authors, keywords. Required for identification, discovery, and management.
Micropublication - Bite-sized scholarly outputs focused on a single finding or idea, enabled by web-based publishing.
Microservices - An architectural approach in which an application is composed of small independent services that work together. Kotahi employs a microservices architecture.
Multitenancy - An architecture where a single software instance serves multiple independent groups like journals or preprint communities.
Node.js - An open source JavaScript runtime environment for building server-side applications. Kotahi's backend services are built using Node.js.
Notifications - Emails, in-app messages, and alerts to notify users of events and updates.
Open review - Reviewers and authors are known to each other during the review process. Reviews may be published alongside articles.
Open Source - Software with source code that anyone can inspect, modify, and enhance.
Paged.js - An open source JavaScript library for pagination and print-quality PDF generation from HTML. Developed by Coko.
Paged Media - An evolving CSS standard for styling and laying out content in paged environments like PDF documents. Enables print-quality typesetting from HTML.
Postgres - An open source relational database system used by Kotahi to store content and metadata.
Preprint - A manuscript that is shared publicly prior to formal peer review and publication in a journal.
Preprint servers - Online repositories for sharing preprint manuscripts, like arXiv, bioRxiv.
Preprint review - the process of assessing and evaluating scientific preprint articles (usually) prior to formal publication in a journal.
Production tools - Components of a publishing system that prepare content for final publication, like typesetting and PDF generation.
Progressive structuring - The ability to incrementally add more structure to a document format without interrupting the workflow.
Publish-Review-Curate (PRC) - An emerging publishing model based on posting preprints, community peer review, and curation.
Real-time editing - A feature allowing multiple users to collaboratively edit a document at the same time and see live updates, such as in in Google Docs.
React - An open source JavaScript library for building user interfaces. Used extensively in Kotahi for UI components.
Research object - A generalised term in Kotahi referring to any submitted item, including articles, data, code, presentations etc.
Review rounds - Iterative stages of peer review in which a submission may go through multiple cycles of assessment, revision, and re-review. After each round, the editor makes a decision to accept, reject, or initiate another review cycle.
Rolling submissions - Authors can update submissions during an active review round if enabled (this has proven useful for some preprint review use cases).
PID (Persistent Identifier) - a long-lasting reference to a digital resource that does not change over time. PIDs like DOIs allow reliably locating content even if it moves or changes hosts. Using PIDs enables consistent access and integrity in linking between related research objects across systems.
Scalability - Ability of a system to handle increased usage and data volume. Kotahi scales using microservices and containers.
Sciety - A platform built by eLife to aggregate preprint peer reviews happening across the web and power PRC workflows.
Single-blind review - Reviewers know the author's identity but authors do not know the reviewer identities.
Single Source Publishing (SSP) - Utilising a single file format throughout both content creation and production stages of publishing.
Structured text - A simple markup language like Markdown or AsciiDoc that adds some basic structure for formatting documents.
Submission - The process of submitting an article or other research object for publication or review in Kotahi.
Taxonomy - A hierarchical system for categorising and organising knowledge.
Tenant - An independent group within a shared Kotahi instance, like a journal or preprint server community. Multi-tenancy allows supporting many groups on one platform.
Typesetting - Adapting content styling and layout for different mediums like print or mobile screens.
Upconversion - Adding structural information to enhance a document's fidelity, like HTML to XML.
Versioning - Tracking revisions to submissions by creating new iterations or ‘versions’ recording the changes.
Wax - An open source browser-based rich text editor for scholarly writing and publishing, developed by Coko.
Workflow - The end-to-end set of tasks, roles, and steps involved in a publishing process.
XML-first - A single source publishing approach involving all users working directly in XML files and tools.
XSLT - A language for transforming XML documents into other formats like HTML. USed in XSweet.
XSweet - An open source tool by Coko for converting Microsoft Word documents to HTML.
49
What is Single Source Publishing?
In the world of publishing, content creation and production are often disconnected processes. Content creation happens in isolation from the production phases, and the technical systems and file formats used in each stage are often completely separate.
Single Source Publishing (SSP) utilises a single source file throughout the content creation and production phases.
Fragmented Publishing Processes
In numerous publishing environments, authors, copy editors, and proofreaders use a single tool, often Microsoft Word, to create and refine content. This content then undergoes production, where it is converted into various formats such as Web, HTML, PDF, XML, and ebook formats, either programmatically using software or manually by individuals using applications like InDesign.
This separation between content creation and production creates a disconnect in the people, tools, and working files involved in the process. A simple example to illustrate the issue is when content changes are required after it has entered the production stage. This necessitates a multi-step process involving communication between content creators and production staff, using their respective tools, and then checking the changes made. This back-and-forth process can be not only time-consuming and expensive but also involve numerous conversions, leading to multiple versions and potentially introducing errors along the way.
Fragmented Publishing Process
We could call this type of process a Fragmented Publishing Process (FPP). This term emphasises the disjointed nature of the process, as it requires ‘jumping a gap’ between different teams, tools, and formats from the content creation to the production stages.
Single Source Publishing
Single Source Publishing (SSP) tackles the main challenge of FPP by enabling both content creation and production stages to utilise the same file format. While shifts in teams and tools may still occur during each stage, SSP ensures that both stages remain linked through a shared ‘single source’, promoting smoother transitions between them.
Single Source Publishing
In a Single Source Environment, for instance, when content alterations are needed during the production phase, the content creation team can make those modifications using the same source file utilised by the production team. This ensures smooth integration into the production process, as both teams are working on the exact same files.
SSP seeks to simplify the publishing process, leading to considerable time and cost efficiencies. There is also a reduced likelihood of introducing new errors, as SSP eliminates the need for multiple conversions and manual interventions between content creation and production stages.
Concurrency - the real benefit of SSP
However, the advantages of single source publishing (SSP) extend beyond merely facilitating a smoother document exchange between content creators and production teams. In an SSP environment, the real value lies in concurrent workflows.
Concurrency, in general terms, refers to the execution of multiple tasks or processes at the same time. In the context of publishing workflows, it is the ability for authors, editors, illustrators, and designers to all work on the project at the same time. For example, while an author is in the process of writing the main content, an illustrator could be designing illustrations or graphics and placing them in the text. Simultaneously, a copy editor might be reviewing and editing completed sections of the text, and a designer could be working on the layout and formatting of the book or digital publication.
There are two primary advantages of concurrency:
Condensed product completion time: Concurrent workflows allow tasks to be completed in parallel, speeding up the overall process.
Enhanced collaboration: Concurrent workflows cultivate a collaborative environment with real-time interaction, fostering open communication and faster decision-making by addressing questions and feedback promptly.
Concurrency, stemming from a well-crafted SSP system, is vital in elevating the efficiency of publishing workflows. It could be argued that concurrency represents the true value of SSP.
Concurrency and realtime-editing
It's essential to highlight that one crucial feature must be present for concurrency to truly reach its full potential in terms of efficiency: real-time editing. Real-time editing allows multiple people to edit a document simultaneously and see each other's changes in real-time, similar to tools like Google Docs or design applications such as Plasmic and Figma.
To achieve genuinely concurrent workflows, real-time editing must be enabled, allowing all team members to modify the file and perform their tasks at the same time. Without this feature, we would need to rely on locking files while one team member works on them, which may be preferable in certain situations (for example, a copy editor may not want an author to add new content to the same chapter they are editing). However, in most cases, real-time editing significantly enhances the benefits of concurrency.
Simple SSP
The simplest, and most common, way to implement SSP is to require that everyone involved in the publishing process use the same tools. Since production tools can modify content but authoring tools (e.g., MS Word) generally cannot adjust layout, style, or design elements, content creators are often required to use production tools. Some effort has been made to improve these tools for content creators, but the strategy has limited success.
We'll start by exploring this strategy in a common scenario – using an ‘XML-first’ environment in which all parties involved in the publishing process work directly with XML files and tools more commonly used by production staff - XML editors. As highlighted in Peter Meyer's insightful 2004 presentation on SSP, this approach offers both benefits and challenges that we'll discuss in more detail.
Meyer presents many arguments in favor of designing SSP systems around XML, but chief amongst them are its adaptability and longevity. In situations where documents are held and updated over long periods, employing XML can help avoid technological obsolescence of the content caused by changing software versions and publishing styles. This ability to stand the test of time and adapt to various requirements make XML a common and celebrated choice for publishing systems. Meyer, amongst many others, believes that XML serves as an excellent file format for Single Source Publishing.
This strategy can be successful for a known group of regular authors; however, Meyer points out several challenges. One notable challenge is the need for authors to possess a thorough understanding of the specific rules governing a document's structure, known as the ‘schema,’ as well as the capability to edit XML. Meyer observed that within any group, about a quarter of authors could edit XML and work with a moderately complex schema without extensive training and support. Half of the group might learn to use the application with varying efficiency, while the remaining quarter would likely struggle to adapt to the new content authoring process.
One way to address this issue is to develop an editor that feels like a word processor but edits structured XML ‘under the hood.’ This, however, is challenging. Developing an interface that is intuitive, flexible, and preserves the structural integrity of the highly structured and rigid XML document is difficult and expensive. Additionally, updating the interface to accommodate changes to the overall document structure (schema) can be a complex and costly process.
It's important to keep in mind that even with the most user-friendly interface for editing XML, authors are still required to understand the document structure, use it correctly, and learn a new tool. These factors can contribute to challenges in adoption and productivity when implementing Single Source Publishing with an XML-first approach.
Essentially, when dealing with XML, it becomes clear that expecting authors and content creators to use tools that require them to add any kind of structure beyond the basic "display structure" (the visual organisation of content as it appears in a typical word processor) is not particularly effective.
There have been other attempts to solve for the problem of unfriendly author experience when using highly structured document formats. Some platforms, like Overleaf for example, have attempted to simplify the author experience by combining user-friendly, word processor-like tools, withLaTeX markup. This takes away some of the disruptions to the writing/content production flow, however, it still requires content creators to learn and conform to the structure and markup of LaTeX and faces the same adoption and productivity issues. However this strategy has proven effective for those wishing to learn LaTeX, which is mainly researchers in 'hard sciences'.
Overleaf with the Rich Text + LaTeX Editor
There are still other approaches to requiring everyone to use tools more commonly used by production staff. A few publishers have required authors to use desktop publishing systems like InDesign. The idea being that they write in InDesign (or similar) and then the designers can also work in the same environment. Thankfully, this approach is uncommon, as it also disrupts the natural writing process for authors more familiar with word processing software like Microsoft Word or Google Docs.
The examples provided are not exhaustive, but they effectively demonstrate the challenges encountered when expecting all users to adopt tools typically used by production staff. Although it may be somewhat successful, this approach can lead to issues with adoption, a higher likelihood of introducing errors (particularly in terms of structure), and often results in productivity loss. Additionally, it necessitates considerable resources for training and support.
Simple File Formats
As mentioned earlier, highly structured file formats can present challenges. Can a simpler file format be the solution? Some SSP systems attempt to address this issue by using simpler file formats like Markdown and AsciiDoc. I have previously discussed the benefits and limitations of this approach in detail. The primary drawbacks are the lack of advanced formatting options, the necessity for content producers to learn a new, somewhat technical syntax, and the difficulty in adding the required structural information for styling and layout of published content, even though these formats are known as, paradoxically, 'structured text' formats.There is a use case for Markdown and AsciiDoc in SSP, but it ls largely for content creators who are also technical eg technical documentation (although there have been some production companies, such as Electric Bookworks, that have taken Markdown workflows quite far into other categories).
Qualities of a SSP File Format
How can we solve the 'SSP problem' when both complex and simple file formats fall short? What, then, are the characteristics of a good SSP file format?
An ideal file format for a single source publishing system must have certain qualities to meet the needs of both content creators and production staff. First, as we have already established, it should be compatible with tools that are familiar to both content creation and production teams.
Secondly, it is important to consider the distinct objectives of each group working with the file. Content creators focus on adding content, while production staff primarily concentrate on structure to enable conversion to other formats and display environments (discussed in more detail below). Essentially, the file format must be capable of containing minimal, moderate, or extensive structure as it passes continuously through the hands of both content creation and production staff. In other words, the file format should support progressive structuring without disrupting the workflow.
The argument for HTML
Interestingly, HTML emerges as a strong candidate for an SSP format due to its flexibility in handling document structure and the wide array of content creation and production tools available for working with HTML.
In terms of structure, unlike other formats that enforce strict structure, HTML is capable of accommodating unstructured, partially structured, or fully structured documents with ease. While some may perceive this lack of enforced structure as a drawback or weakness, I believe it is actually one of HTML's key strengths. Moreover, HTML's structural flexibility enables it to accommodate progressive structuring throughout the publishing process, a characteristic critical to well design SSP systems.
The question then arises, can HTML be used to support the 'native tooling' of both content creators and production staff? For content creators, the answer is a resounding yes, as many online word processors that support HTML as an underlying format look, feel, and operate like traditional word processors.
HTML can be effectively employed for production purposes, including converting to XML, creating visually appealing print-ready PDFs, EPUBs, and other formats. The ability to transform into various formats, especially XML and high-quality PDFs, may prompt some inquiries. How exactly is this achieved, and what tools are necessary?
To address these questions, we must explore the requirements for converting HTML to other formats in greater detail. This examination will offer a better understanding of the essential tools and their impact on the culture of production in the publishing industry.
How does HTML get to other formats?
There are essentially three types of document conversion: Upconversion, Downconversion, and Typesetting.
Downconversion
Downconversion entails converting a structured format to a less structured one, such as transforming HTML to plain text. This process involves losing information rather than adding it. Downconversion is straightforward.
Upconversion
Upconversion involves enhancing a document's structural fidelity. This process requires someone or something to add structural information to the document.
As previously discussed, one can add as much structure to HTML as needed. This is accomplished technically by incorporating attributes to the elements and enclosing items with different identifiers. Upconversion is facilitated by mapping these identifiers to other document structures, enabling the automatic conversion of the single-source file format to the structure of the desired target format (e.g., XML).
Typesetting
Typesetting is the process of adapting content to fit specific layouts (and look visually appealing), such as mobile displays or paginated PDFs for print.
Typesetting within an HTML context is a fascinating topic in publishing. There are two primary use cases: HTML display environments (such as laptop browsers or mobile phones) and PDFs for screen display or print. As previously mentioned, CSS is the design language that determines the style and layout of HTML in browsers and phones. Interestingly, CSS has been expanded to encompass rules governing design and layout in page environments, making it a popular method for generating PDFs from HTML. CSS PagedMedia, an evolving standard, is commonly used to create visually appealing, print-ready works from HTML, including all the features expected in print layouts, such as page numbers, margin control, running headers, and orphan control etc.
An example textbook PDF typeset from HTML by Pagedjs
HTML and CSS are currently being employed to create PDFs for publishers across a diverse range of use cases, including books (as per above) and journals.
eLife PDF generated from HTML + CSS using PagedMedia
In summary, it is possible to achieve all the required formats through the combination of these three strategies, along with the numerous conversion tools readily accessible for converting HTML. In fact, one could argue that the variety of strategies and tools for format conversion is greater for HTML than for any other available format.
The tools
As previously mentioned, it is crucial to identify tools that cater to the needs and working styles of both content creators and production staff. The ideal tools should work with HTML and, optimally, support real-time concurrent operations. Fortunately, such tools do exist, and if they don't perfectly meet your specific use case, they can be cost-effectively extended or custom-built.
Numerous modern word processors that use HTML as their underlying document structure offer a range of benefits, including the ability to support real-time editing. These web-based word processors can be tailored to accommodate production teams, allowing them to mark up more complex structures.
Downconversion is easily supported by numerous conversion tools like Pandoc, making the tooling for this aspect simple. However, the two high-value transformations to consider are upconversion and typesetting.
Typesetting can be accomplished with a relatively simple setup. For example, the book production system PressBooks utilises WordPress and PagedMedia typesetting (employing the proprietary PrinceXML). To add structural information in a PressBooks book, users can take advantage of the customised editor to include the necessary structural information for typesetting.
Design is managed in both systems by linking the structure with CSS styles. This can be done by editing CSS files using a range of CSS editors popular in web design workflows or by using the built-in CSS template editors available in both platforms.
Ketida Inbuilt CSS Editor and Side-by-Side Renderer
In yet other strategies, there has been work put into a InDesign-like interface. Hederis, for example, follows this paradigm. The underlying technology behind Hederis is HTML and CSS (and Paged.js for HTML pagination).
Hederis
If publishers do not have in-house CSS PagedMedia skills, this work can be outsourced to a growing number of design professionals.
Upconversion solutions for transforming from HTML to highly structured formats are available, but they are not extensively distributed or widely adopted. Kotahi is a prime example, providing a word processor interface with controls for marking up display document elements with additional structural information. During export, this information is mapped to the Journal Article Tag Suite (JATS) format and validated, resulting in a clean, well-formatted JATS representation of the article.
The observant reader may ask, "What about metadata?" Preparing files in production isn't solely about the structure of the underlying content; it also involves including additional information about the content that isn't considered ‘display content.’ For instance, the ISBN number is not typically part of the content since we don't usually expect to see it within the text of a book. Placing an ISBN at the beginning of a chapter just to ‘carry that information forward’ would be a rather cumbersome solution. However the ISBN number might need to be embedded in some outputs (eg. XML). In journal publishing, particularly, a significant amount of metadata needs to be merged with content into an XML file (JATS) for archiving and distribution.
So, how does this fit into the overall picture? The answer lies in combining content from an HTML file with metadata at export time (when creating JATS for example) and constructing the XML from the individual components. There is no need for metadata like this to live in the original single source file. It can exist anywhere that is accessible to the export mechanism when generating the desired format.
Conclusion
Single Source Publishing is an effective strategy for accelerating publishing workflows and lowering costs. The secret to achieving SSP lies in the nature of a shared file format across content creation and production. Highly structured formats can be problematic, while formats with reduced structure have limited use cases. An effective SSP file format must:
Be compatible with tools that are familiar to both content creation and production teams.
Support progressive structuring without interrupting the workflow.
HTML emerges as the best contender, as it can accommodate both content creation and production tools, and supports progressive structuring. Although a growing number of tools support this approach, they remain largely under-explored by those who stand to benefit the most from them.
50
What is Publish-Review-Curate (PRC)?
Publish-Review-Curate (PRC) represents an emerging model of research communication combining preprint posting, community peer review, and curation.
The stages of PRC are:
Publish - Researchers first publish preprints openly on servers like arXiv and bioRxiv for early sharing of findings.
Review - Volunteer communities then conduct peer review of preprints in a transparent, public process.
Curate - Preprints undergo a final curation stage for further validation, improved formatting, and communication of findings.
This sequence flips the traditional journal path of Review → Curate → Publish to:
Publish → Review → Curate
Some key aspects of PRC:
Accelerates research dissemination via preprints prior to formal peer review. Enables rapid sharing of findings.
Community peer review of preprints in a publicly visible manner amplifies transparency.
Curation stage improves preprint formatting, legibility of findings, and provides aggregation around topics.
Curators can be traditional journals but also communities and new forms of curatorial organisations.
Blends rapid sharing of preprints with improved communication after review/curation.
Combines benefits of preprints, community review, and curation.
PRC balances accelerating discoveries through preprints with the improved clarity and validation of findings in curated versions. It also maintains focus on preprints as the core, shared object flowing through the processes.
The PRC model represents an evolution of research communication - leveraging preprints to accelerate sharing while retaining the value-add of peer review and curation.
Importantly, PRC is not just a theoretical model but an approach already being adopted by scholarly communities across disciplines.
51
Kotahi: a new approach to JATS production
A new innovation from Coko - push button JATS production.
Dan Visel (Coko), Adam Hyde (Coko), Ben Whitmore (Coko)
Kotahi is a free, open-source system for scholarly publishing, designed to support a wide variety of publishing use cases including journals, micropubs, preprints, PRC (Publish, Review, Curate), weblabs, and more. Kotahi supports multiple workflows for each of these use cases, with a key feature being the single-source publication to multiple formats. Once a document is in Kotahi, it can be exported to JATS (Journal Article Tag Suite), PDF, or HTML with the Kotahi source as the single source of truth.
Not all workflows require every one of these output formats – it’s possible to use Kotahi for evaluating preprints residing on external servers, for example, with no need to regenerate their PDFs – but an increasing number of publishing projects aim to generate multiple formats, and Kotahi is designed to make it easy for teams with minimal format-specific knowledge to publish to any of those formats. Kotahi also versions documents; if a new version of a document is created, re-exporting in all formats is simple.
Kotahi is in active development, with a growing number of users. It is available for installation from the Coko Gitlab).
Features
Kotahi’s main features include:
Multiple workflows and use cases: Kotahi supports multiple workflows for PRC (Publish, Review, Curate) and the submission, peer review, and publishing of everything from preprints, micropubs, journals, and books to exciting new types of publishing.
Multiple review models: Kotahi enables publishers to use a number of different review models: open, blind, or double blind. Reviewers can have individual reviews or collaborate on a shared review. Review forms are customizable from within the browser.
Document editing: Users can author and edit articles in the browser, using Wax (https://waxjs.net/), Coko’s full-featured web-based word processor.
Real-time notifications and chat: Kotahi is built to get the best from web collaboration and supports real-time notifications, chat, synchronized updates and more. Live chat (both text and video) functionality can be used to communicate with authors or collaborate as an editorial team.
Metadata: The in-browser form builder can be used to design submission forms to capture and manage metadata specific to each workflow.
Single-Source Publishing: Kotahi supports single-source publishing (https://coko.foundation/articles/single‑source‑publishing.html). All stakeholders are able to access the same manuscript during content creation (peer review, editing, etc.) and production (copy editing, semantic tagging, etc.). This obviates the need to track and control documents across multiple systems.
Versioning: Versioning is supported so that changes to a submission can be easily compared.
Exporting: Currently Kotahi exports to PDF, JATS, and HTML. A GraphQL API makes it possible to export Kotahi’s data to other systems (such as PubMed, Crossref and FLAX) as needed.
Integrations: Authorization integration via ORCID is available. Kotahi can register DOIs for articles via integration with Crossref. It can also publish reviews of existing articles as Hypothes.is annotations, as used by eLife for generating Transparent Review in Preprints (TRiP) on the bioRxiv server.
Reports: Admin users of Kotahi get a dashboard that dynamically displays the progress of articles through the system.
Users
Development of Kotahi is being supported by eLife, Amnet Systems, and Aperture (an open publishing platform from the Organization for Human Brain Mapping).
This article primarily focuses on the production of JATS (https://jats.nlm.nih.gov/) in Kotahi. These capabilities have been anticipated for many years by the Coko team and the build up to the current JATS functionality has taken many years. However it is worth noting that recently Coko has collaborated with Amnet, a publishing solutions company in India, on the Wax-JATS development.
Background: Coko and Kotahi
The Coko Foundation was founded with seed funding from founder Adam Hyde’s Shuttleworth Foundation fellowship. Coko produces a variety of open-source software for publishing. Kotahi is one of many open source publishing-related projects from Coko, and is built on top of several prior Coko projects.
Coko frameworks used by Kotahi
Kotahi builds on a number of different projects produced by Coko. Major components include:
PubSweet. PubSweet is Coko’s open source framework for building state-of-the-art publishing platforms. Kotahi uses this as a component library and parts of its framework. PubSweet is written in JavaScript.
Wax allows marking up of documents in a way that can be easily translated into valid JATS. Wax and Wax-JATS are written in JavaScript.
Paged.js to create high quality PDF output from any HTML content. Using instance-specific templates, this allows Kotahi to export manuscripts and metadata as print-ready PDFs. Paged.js is written in JavaScript.
In conjunction with Kotahi, integration work is also being done on another Coko project:
FLAX (website forthcoming). FLAX is an open source publishing front end, a web presence for content produced in Kotahi and Editoria (https://editoria.community/). FLAX is in active development as a way to present content which lives in Kotahi in a web-first model. FLAX is written in JavaScript.
And two other projects at Coko, which may be integrated with Kotahi in the near future:
Science Beam (https://sciencebeam.org/). An open source machine learning application to convert PDF scholarly articles to XML with high accuracy. Originally built by eLife and transferred to Coko to further develop and maintain. ScienceBeam is primarily a Python application.
Libero Editor (website forthcoming). An open source JATS XML editor (a replacement for Texture). Originally built by eLife and transferred to Coko to further develop and maintain. Libero Editor is written in JavaScript.
While traditional workflows involve direct editing of documents inside of Kotahi, it’s also possible to use Kotahi to run a PRC workflow, ingesting preprints from external servers. In that particular case, ScienceBeam might be used to generate JATS from PDF-based manuscripts. In this use case Libero Editor would then be used to edit the JATS produced by ScienceBeam. This same pipeline could be used for other scenarios that need to convert PDF back into structured data (eg. where LaTeX PDF output has been submitted).
Key concepts used by Kotahi
Workflow
The Kotahi workflow is very configurable and can support workflows that range from very linear to very concurrent. Submission types are also configurable. These two features together mean that Kotahi can support a wide variety of use cases and workflow models. As an example, here’s a diagram of how Kotahi is being used by the Aperture Neuro journal (Organization of Human Brain Mapping):
The following is also a workflow diagram showing Kotahi being used by a PRC organization (Publish, Review, Curate):
These diagrams don’t need to be explored in depth for an understanding of how JATS fits into Kotahi (see https://coko.foundation/articles/white‑paper‑kotahi‑current‑state.html), though it’s useful for thinking about the ways documents travel through a system from user to user. Many different people are viewing a manuscript – in different states – and may be making changes; and every publication probably has their own, slightly different, path. Aperture, for example, is publishing to static HTML pages and PDF as a one-time event; but you can also configure Kotahi to publish multiple times synchronously or asynchronously. Most of the time we imagine JATS as being the final point in a document; but Kotahi is designed in such a way that it doesn’t have to be.
HTML
Kotahi is using HTML as the source of truth. This has been core to Coko’s philosophy - bringing publishing to the web.
However, we’re also realistic about the ways in which authors are working: they’re largely using Microsoft Word to prepare manuscripts – and editors by and large seem to resist moving away from MS Word. In this case, we need to bring the Word Documents into the web, that is, convert the docx files to HTML at submission time.
MS Word poses particular challenges: Although the content of a docx file may look nice, the underlying source is very complicated and messy. Consequently, computationally determining the correlation of author intent to underlying document markup is difficult. xSweet approaches the problem by computationally interpreting the very messy XML source of docx files and converting to well-structured and clean HTML.
The following is an excerpt taken from article written by Adam Hyde and Wendell Piez (the designers of Coko’s xSweet) on this approach:
“…attempts to ‘get out of Word’ have tried to jump from unstructured MS Word to very structured XML formats by:
copying over all the data in the document and
interpolating structure at the same time in an attempt to ‘understand’ the ‘intent of the author’ (or a proxy) as represented by the display semantics of the document.
But if the structure does not exist in the first place, you have a problem. xSweet’s Word-to-HTML conversion retains step one (copying over all the data) and replaces step two (interpolating structure) with a process that forsakes the introduction of any structure in favor of carrying over whatever information from the original MS Word file might be useful later on, whether for programmatically understanding or manually applying document structure. The best solution of course, being a little bit of both. Hence we:
convert the unstructured MS Word document into an unstructured (or partially better structured) HTML document; and
interpret the original MS Word file and carry forward as much information as that original Word file contained for possible future use in interpreting the document structure – or representing any features of interest – while not actually structuring the document.
Interestingly, since HTML does not require you to enforce a strict document structure if you do not have it, an unstructured document flows into HTML as easily as a structured, or partially structured, document flows into it. If your aim is a well-controlled document format, such a failure to enforce strict structures is regarded as a flaw or weakness. Yet, since we do not have much or any document structure in the originating Word document, and our goal is to improve it – HTML’s flexibility becomes a critical feature.”
This process produces an intermediary carrier format – an information-rich, sanitized HTML format that is suitable for improvement.
A final step of the xSweet libraries further interprets the information carried over from the conversion which implies structural elements, applies that structure, and then converts the total output to a (configurable) target HTML profile. In an HTML editor, we can then bring to bear further tools (Wax, for example) for adding structure, reviewing, commenting, and revising.
Single-Source Publishing
Kotahi’s design is also informed by the idea of Single-Source Publishing. There’s a lot that could be said about this; where it’s relevant to Kotahi and JATS is that the Kotahi model sees JATS production as an integral part of the publishing workflow, not something that should be considered as a separate step.
Publishing has long suffered from broken workflows that slow down the time to publish and unnecessarily inflate the cost to publish. In general, this comes from a historical disconnect between content creation processes and production processes.
In many publishing environments, authors, copy editors, proofreaders and others create and improve content primarily in one tool (usually Microsoft Word). The content creation process feeds into the production process where production staff create a multitude of other formats – HTML, PDF (for print and screen), as well as XML and ebook formats.
To convert to these file formats, the content has to either be programmatically converted to various target formats via software (such as Pandoc or bespoke software), or manually converted by people using software (such as InDesign). Publishers achieve this by either slinging the content over the wall to a publishing services vendor or contractor, or they employ internal staff. The people doing these conversions belong to the general category of production people – usually programmers, designers, or format wranglers.
Most publishing workflows separate the content creation from the content production. This disconnect separates who does the work, the tools used, and, most importantly, the files worked on. The people, the tools, and the working files all change as the content jumps from content creation to content production.
Consider a simple journal example: imagine that the production staff have discovered from proofs that figures are in the wrong place. This information must be communicated to (for example) the publishing services provider (via email, MS Word, annotated PDF, etc.). The vendor interprets the information, makes the changes in their (various) tools, and sends it back to the publisher to check. This may be iterated repeatedly.
Larger publishers have staff to manage the communication of changes, track the changes, check the changes etc. This costs time and money. If publishers don’t do this well, the consequence is that more errors are introduced.
This is the problem single sourcing is meant to solve. Single sourcing is a general approach to publishing workflows that is intended to avoid disconnecting the content creation and production processes – saving time and money, and reducing errors.
Single sourcing isn’t a specific solution, it is a general idea that must be intentionally designed into a publisher’s workflow. Single sourcing changes how people work and often requires a different tooling. The secret really, if we zoom out to a high-level abstraction of the problem, is to work out how the content creation and production people can work in a shared environment where they all work on the same files, the same source files – hence the term ‘single source.’
In a single-source environment, if a change needs to be made while the content is in production, the content people can make the change themselves. Less time and communication required, less to-and-fro, less management overhead, and fewer errors.
What this also allows, is moving from a more linear model of publishing – a manuscript goes from step A to step B to step C, each done by a separate person – to a model that allows more concurrency and collaboration, leading to more efficient document production. Efficient document production is one of the many things Kotahi sets out to achieve.
Documents in Kotahi
A Kotahi document is both a document and a collection of data - a network of content.
Kotahi’s representation of a document can be split into two main interlocking parts:
a submission form which contains metadata; and
a manuscript editor (Wax) which contains the body of the text.
As different users edit the content or the metadata, each session is added to the document history. The most recent edit becomes the common version for all users (as per Single Source Publishing). In this way users are always working with the most recent content (single-source).
Submission forms for documents can be customized per instance in Kotahi with a drag-and-drop form builder; the forms contain the particular set of metadata that the journal uses.
The submission form is completely customizable by the publishers and can be used to capture any metadata they wish. It can include, for example, the title of a document, relevant dates, author names and affiliations, and a document abstract. The form metadata could also include keywords (either freeform or from a predefined list) and file attachments. Kotahi’s conception of the form is extremely abstract by design to support as wide a spectrum of use cases as possible.
The manuscript has some flexibility as well. Kotahi uses Coko’s xSweet to import docx documents. For anything that’s not a docx, the manuscript is treated (at this stage) as an attachment; an URL for a document that exists elsewhere on the web can also be used.
The most common workflow, however, is to import docx files into Kotahi. These go through xSweet and are returned as HTML (as discussed above) and displayed in Wax. Understanding this chain of events is critical to understanding how Kotahi enables users with no prior knowledge of XML to produce valid JATS, as will become evident later.
xSweet not only converts the docx file to clean HTML but also pulls metadata from the file which is inserted into the form – the primary header, for example, becomes the title of the document, though that can be overridden by the form.
When a manuscript has been imported, it can be edited by users (dependent on roles and document state). Editing happens in the Wax editor, which is a full-featured editor. Features of Wax include:
Threaded Comments and Annotations
Different views for different users: an author or a reviewer might see a read-only version of a Wax document which appears as the final version. Authors might be able to reply to comments but not add their own.
Support for editing equations using MathJax: entering a $ or $$ enters math mode, where LaTeX can be entered. When math mode is exited (by typing another $ or $$), the LaTeX is converted to an SVG for display purposes; clicking it allows editing.
Predefined (configurable) styles
Interactive widgets (e.g. question models)
Uploading of figures and media
Full-featured footnotes
Table entry and editing
Highlighting
Internal track changes: Additions and deletions can be tracked by user.
The following image shows the user interface for Wax.
As mentioned earlier, Wax’s internal format is HTML. Consequently, Kotahi can directly export PDFs using HTML with PagedMedia queries (utilizing Paged.js). Styling for Paged.js is done with stored CSS templates. Paged.js is itself a comprehensive topic and deserves a separate article.
For more information on PagedMedia and how Paged.js works please see https://pagedjs.org/
It’s important to note that Wax (as used in Kotahi) is not an ‘anything goes’ HTML editor: Wax allows only a strict predefined (and configurable) set of document semantics. Each semantic element (eg italics, or headings) are recorded in the underlying source as tags (eg. <em>``</em> or <h1>``</h1>) which align (by configuration) with the same tags produced by xSweet. While a submitted docx file might consist of a great variety of (almost) arbitrary tags, the result of xSweet’s docx-to-HTML conversion has a clearly defined, clean, tag range and structure. The output from xSweet is also conformant with the structure and tags required by Wax. Editing in Wax also ensures the underlying integrity of the underlying document source is maintained.
Making JATS-ready documents
When the staff/team are satisfied with the shape of the content, they can then prepare the material for publication using the Kotahi production interface which contains the Wax-JATS editor. The Wax-JATS editor is similar to the regular Wax editor (it is a ‘version of Wax’), but it also includes functionality specific for preparing the document to export as JATS. From this production page, the user can also download versions of the document as PDF, HTML, or JATS.
JATS in production (the Wax-JATS editor)
The Wax-JATS editor includes features related to creating JATS. The user requires no prior knowledge of JATS or XML to prepare the document for JATS export. The Wax-JATS interface simply requires the user to highlight parts of the document and choose what type of content that selection contains. This is very much a drag-and-drop and point-and-click exercise. No messy editing of XML required. Citations, for example, can be identified by selecting text and clicking on ‘citation’.
The design principle envisioned by Adam Hyde, behind the Wax-JATS editor, is not to expose the JATS document model (which is a complex set of XML tags) but to give the user simple MS Word-like tools they can use to create JATS without having any knowledge of the JATS syntax. The conversion to JATS is as automated and as simple as possible. The user doesn’t need any knowledge of what the internal format is; they only see content and visual style and use simple selection tools to identify parts of the content.
The Wax-JATS editor then marks the underlying format (HTML) in such a way that Kotahi can map these tags to JATS at export time.
For example, internally a Kotahi document might have a typical flat HTML structure such as:
On conversion, that familiar HTML structure is carefully wrapped in JATS-style sections from the smallest header up, becoming:
This is a more logical structure; but the user is not forced to convert the document into the nested format - that is all automated. The user simply imposes structure visually; the converter attempts to make sense of it, and exports to JATS at the push of a button.
A similar approach is currently taken with citations. The Kotahi approach is currently to wrap the selected citations in a Reference List element; every paragraph or list item that’s inside a Reference List in Wax becomes a <mixed-citation> on export to JATS.
The following screenshots show this process in action. The first screenshot (below) displays the Wax-JATS editor with some areas of an article selected.
The following image shows what the underlying HTML source in the Wax-JATS editor looks like for the above example.
Finally, at a click of a button the above HTML is mapped onto a JATS structure. The below image shows the above HTML converted to JATS by Wax-JATS at export time.
Even if the user has put a Reference List or an Appendix element in an odd place (e.g. in the middle of a document) this approach means that on conversion to JATS, Kotahi pulls the reference list or appendix out of the body text and moves them to the back matter (conformant with JATS specifications) of the resulting JATS file. This helps prevent the user from making invalid JATS.
JATS structures front matter very carefully in a <front> tag. Kotahi can generate this very easily from the internal submission form data, which, for example, will split a list of authors into neatly structured first and last names and affiliations.
The following image is of a basic example Kotahi submission form created by the form builder.
The form above displays a few simple fields, all of which are mapped to JATS front matter at export time. The following image shows the data from the above form as it has been exported on-demand to a valid JATS file.
Who can produce JATS?
One part of the Kotahi philosophy that should be again noted: we assume that the production team is not necessarily expert in JATS, though the team might have some domain knowledge. Kotahi is aimed at making JATS at scale; a journal might publish thousands of articles per year. While it will take a little time for the production editor to learn how content needs to be formatted in JATS-flavored Wax, the learning curve should not be steep and once the process is familiar the production process is very fast.
Exporting JATS
JATS export is currently done on-demand from the Wax-JATS editor. When JATS export is chosen, the server processes the document’s manuscript and submission form data and sends back an XML (JATS) file.
Internally, the ‘JATS-flavored’ HTML from the Wax-JATS editor is processed tag by tag and turned into JATS markup as covered above.
Initial setup: metadata
The front matter of a typical JATS file composed from an article contains two major types of metadata:
metadata specific to the article and
metadata for the journal (the journal’s title, ISSN, etc.).
Journal metadata (with a few exceptions) tends to be similar across all articles in a journal; this is set up as part of the process of getting an instance of Kotahi off the ground. (Initial setup similarly involves setting the stylistic defaults and layouts for articles as they are seen in the editor and exported as HTML and PDFs.)
The shape of the submission metadata will vary greatly from workflow to workflow. Kotahi’s interactive submission form builder allows setting up the sorts of metadata that will be attached to each submission. However, there’s not a one-to-one correspondence between what’s in the form and what’s exported as metadata. A form may include workflow-specific metadata – who, for example, anonymous reviewers are, something that some users of Kotahi but not others should know – that isn’t part of the metadata that’s involved in JATS. This is controlled by a mapping of form fields to JATS metadata types during the setup of a new instance of Kotahi (this might change over time towards a friendly admin interface to map metadata to JATS output).
Validation
When JATS is created, it goes through an XML validator and is validated against the JATS schema. Because the elements allowed in Wax-JATS has been carefully enumerated and constrained – all of the paragraph styles, list styles, and character styles that can appear in the document have been defined by configuration - those elements can be thoroughly tested programmatically. Consequently, validation errors are not something that users should see; instead, they tend to indicate that something is wrong on the development end.
JATS as part of the document lifecycle
JATS export (as well as PDF and HTML export) is currently on-demand from Kotahi. Conversion to JATS is not necessarily an end of line process; although it would most likely happen near the end of a document’s workflow, a user could generate a JATS file, inspect it, make changes to the manuscript, and regenerate at any time. JATS, PDF, and HTML can all be exported at any time in the document lifecycle.
Crucially, a manuscript that’s had JATS elements highlighted can be sent back to the ‘normal’ Wax editor; so if a last-minute mistake is discovered that needs to be corrected by an author, the author can work in the same editor that review was done in, rather than using a separate (and possibly confusing) production tool.
The Future
Kotahi is under heavy development through a consortium of organizations (Coko, eLife, Amnet, Aperture). Kotahi is also being used with real content by real publishers who are providing valuable feedback about the functionality (and provisions for workflows). While Kotahi is open source, it can be customized to be used in for-profit systems: Amnet Systems, for example, is already using a private instance of Kotahi (Reach OA) with customized functionality to fit into their workflow.
JATS is something that’s been added to Kotahi as part of this ongoing process. At this time Kotahi is using a small fraction of the range of functionality that JATS allows; as users call for more, we envision adding more. A handful of examples:
There’s a current bifurcation of documents into a form (the metadata) and the manuscript (the body of the text). Metadata is imported into the body content of the final paper at export time. We would like metadata instead to be linked to the document and be editable in both places. Smart components that are part of Wax/Wax-JATS would allow author names, for example, to appear as they should in a PDF or as HTML but to be correctly parsed when exported to JATS. Editing in the Wax-JATS widget would then also update the form metadata and vice versa.
Kotahi’s treatment of citations is very simple – it’s possible to imagine adding a citation manager to Kotahi’s interface that would treat citations as structured data if authors can provide them this way. Though there are other ways of achieving this goal: we’re also looking at using packages such as ScienceBeam (now a Coko product) to process submissions and automatically extract metadata such as citations to structured data for importing into the form and document.
Math in Kotahi is currently handled by MathJax, which displays equations as SVGs and exports them as MathML. Other ways of handling math can be imagined and could be added. Interestingly MathJax also supports chemical symbols, which might lead to Wax support of chemistry equation creation using (for example) the mhchem syntax.
Export process improvements can be imagined. As mentioned above, for example, Kotahi’s JATS export is currently on demand; we imagine this will move to a more persistent basis, with current JATS for published documents available via API. Kotahi could also be configured to deliver JATS to predefined third-party services in demand (Kotahi currently does this for delivery of HTML and PDF to the Coko FLAX product and adding JATS to this process will occur in the near future).
As previously mentioned, the Wax-JATS editor allows users a wide amount of flexibility when identifying JATS structural elements. There’s nothing stopping a user, for example, from putting in 12 abstract sections, even though a JATS document can only have a single <abstract> tag. Currently if you have a manuscript in the production editor with 12 abstract sections, the first will be pulled out of the body and moved to the front matter of the created JATS and put inside an <abstract> tag. The others will be deleted, as abstracts can’t appear in the body (according to the JATS specification). The result is perfectly valid JATS, though this result might be confusing to a novice user. The plan going forward is to offer structural hints to the user: So if, for example, a second abstract element is inserted into the text, it might get a red border, and a warning might explain that a document can only have a single abstract in JATS. There is also the possibility to programmatically constrain the number of abstracts identified (etc). However, while Wax does provide the functionality to constrain (for example) the addition of multiple abstracts, this kind of logic is complex. The preference is to take a less burdensome development path in the near term and support the user with information they can use to better structure the document.
While Kotahi currently uses an on-demand model for creating JATS – where the XML is created and then destroyed after download – it’s possible that we’ll move to a model where JATS is created automatically every time a change is made in the production editor; this would happen server-side, and if the editor chose to download JATS, the file would already be ready.
Until very recently, Kotahi handled uploaded / in a document as base-64 strings. This is in the midst of changing, and this won’t be the case within weeks of this article being published. If images are handled as base-64 strings, however, JATS can be exported as a single XML file, which is the current situation. A full-function image store is currently being built; when this is in place, what’s output as JATS will not be a single XML file but rather a ZIP file containing the XML and the images in multiple formats – if authors have TIFFs as their original format, for example, the JATS will include both the TIFFs and lower-resolution WEBPs created to display the image online or in PDFs.
Conclusion
JATS is one piece of Kotahi; it’s recognized as being part of the process of scholarly publishing and Kotahi integrates it as such. There are certainly other ways of producing JATS than the ‘Kotahi way’. The virtue of Kotahi’s approach to JATS production – and perhaps why it is valuable to the wider landscape of JATS – is that it makes the threshold to generate JATS very low, and might bring JATS to a wider base of users, and the process is fast, scalable and cost effective.
Kotahi is a modern scholarly publishing platform. It is built with modern technologies with modern, efficient workflows in mind. The platform is also very modular, extensible, and configurable. There is almost no element of the system that is immutable – all elements can be changed if required. In addition, Kotahi leverages modern real-time communication protocols and, together with the Single Source Publishing design, the entire system offers publishers enormous futureproofing and workflow optimization opportunities.
All aspects of Kotahi are open source and liberally licensed (MIT). The Coko Foundation exists to support organizations wanting to hire us to extend Kotahi or go it alone. We also welcome anyone wanting to join the Kotahi consortium/community. In all development scenarios, Coko facilitates the multiple organizations extending Kotahi to ensure the community is building upon each other’s work – this helps ensure lowering the burden of development cost and time as well as eliminating possible duplication of efforts.
Wendell Piez, “HTML First?: Testing an alternative approach to producing JATS from arbitrary (unconstrained or “wild”) .docx (WordML) format,” on early attempts to make JATS from HTML with xSweet: https://www.ncbi.nlm.nih.gov/books/NBK425546/
Dan Visel wrote most of this article with edits by Adam Hyde and input from Ben Whitmore. Large parts of the article are quoted from prior articles written by Wendel Piez and Adam Hyde. The section on Single-Source Publishing is a direct copy from an earlier article on the topic by Adam Hyde.
Diagrams by Henrik van Leeuwen. Initial Aperture and PRC Workflow diagrams by Ryan Dix-Peek (Kotahi Project Manager).
Christos Kokosias is the lead wax developer for Coko. Wax itself is built on the wonderful open source ProseMirror framework.
Dan Visel has done most of the work on the Wax-JATS editor (sponsored by Amnet).
Ben Whitmore is the Coko lead dev for Kotahi. Prior to Ben the lead Kotahi developers for Coko were Giannis Kopanas and Jure Triglav.
Adam Hyde and Wendell Piez are the designers of the xSweet approach. Wendell Piez did most of the XSLT development for xSweet.
Adam Hyde designed the Wax-JATSapproach.
Copy editing by Raewyn Whyte.
This article is CC-BY-SA 2022 Dan Visel, Adam Hyde, Ben Whitmore. Please distribute!